🖤 Cool, sleek, and ready to power your next breakthrough.
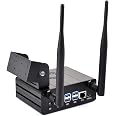
The Waveshare Aluminum Alloy Case is a precision-engineered mini-computer enclosure designed for Jetson Orin Nano and NX kits. Featuring triple-side airflow vents, dedicated fan mounting holes, and a versatile camera holder with 180° roll, it ensures optimal cooling and flexible hardware integration. Its durable aluminum alloy construction combined with silicone nonskid feet offers stability and enhanced heat dissipation, making it the perfect professional-grade accessory for developers seeking performance and style.


| Number of USB 3.0 Ports | 3 |
| Brand | waveshare |
| Series | Waveshare Aluminum Alloy Case |
| Item model number | JETSON-ORIN-CASE-A |
| Item Weight | 1.01 pounds |
| Package Dimensions | 8.15 x 6.02 x 1.61 inches |
| Color | Black |
| Manufacturer | Waveshare |
| ASIN | B0CG38BS5S |
| Date First Available | August 19, 2023 |
G**A
Fits Jetson Orin Nano perfectly!
Nice case! high quality and looks good too. Wanted to protect the nano i purchased and this fit the bill!Two things I noticed.1) if you put the board in backwards it's offset from the front, turn the board around and it fits perfectly.2) the LED polarity on the video is backwards for the Jetson Orin Nano. Once i flipped it it was fine.I am not using the camera mount at the moment, but now that I have one i may get myself a set of cameras to play with as well.
W**G
Works fine for the money
Everything fit well and it's not bad for the money. No issues mounting with a NVME drive installed, plenty of room in the case. Watch the video if you want to enable the power button
M**V
Great for Jetson Orin Nano developer kit
Great product. It fits the Jetson Orin Nano developer kit perfectly.
D**N
wireless connector does not work
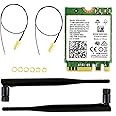
I have the exact same problem from another reviewer (back in 2023!). The wireless connector to the wifi module doesn't work, both of them can't fit the connector on the wifi module. I'll wait for couple days to see if the store will reach out to me.
T**5
Worth th money
Worked well for the described application
I**R
works well enough
it fits fine the jetson orin nano super dev kit board (after removing the nano's plastic base). The power button connected as directed by the vid, but button did NOT light up. it turns out the LED- is left most and next to it is LED+. The person in the video said the right thing but implemented it in reverse where Red wire was on the left most LED-. Turn those around and everything works.
A**U
A quick guide to power button wiring
The assembly is pretty straight forward. The power button wiring took me some time to figuring out which goes where. So here is short summary:1. The button header is in-between two PCBs, not the 40 pin expansion header2. Use included yellow jumper to connect pin5 and pin6 (pin1 is printed on PCB). This is to disable auto power on. Now plug in power supply, verify that nano will not power on automatically. Unplug power.3. The power button comes with 2 2-pin header. One of them is for power button, one for LED status. In my case yellow-blue is for power button, this goes to last two pins. The direction does not matter. Now plug in power supply again, press the button to verify it can power on. If not, use the other red-black header. Unplug the power.4. Plug the remaining header (red-black in my case) to the other end two pins. Polarity matters here. Plug in power and power on to verify the LED lights up. If not, switch the red and black color wires.Hope it helps.
S**Y
Meh.
What's good: nice anodized aluminum extrusion. Extra HW.What's lacking: instructions - as others have noted they have a video. I would prefer written instructions with pictures - ideally paper but a website would be ok. I'll figure it out but I think most folks could use instructions - especially since from the photos it looks like some have gotten the case the wrong way 'round (slot for the 50 pin cable should be placed next to the 50 pin connector).What's bad: the UFL to reverse SMA cables are fine except the end plate for the case expects that the SMA connector has a flat milled in the side. Mine are round. 🤦🏼 So I gotta get out a file to mill a flat onto the connector so it will go through the end plate.
Trustpilot
2 weeks ago
4 days ago