
DOWNLOAD THE APP


Customer Services
Copyright © 2025 Desertcart Holdings Limited
DOWNLOAD THE APP


🎮 Level up your Switch’s style with Atomic Purple power!
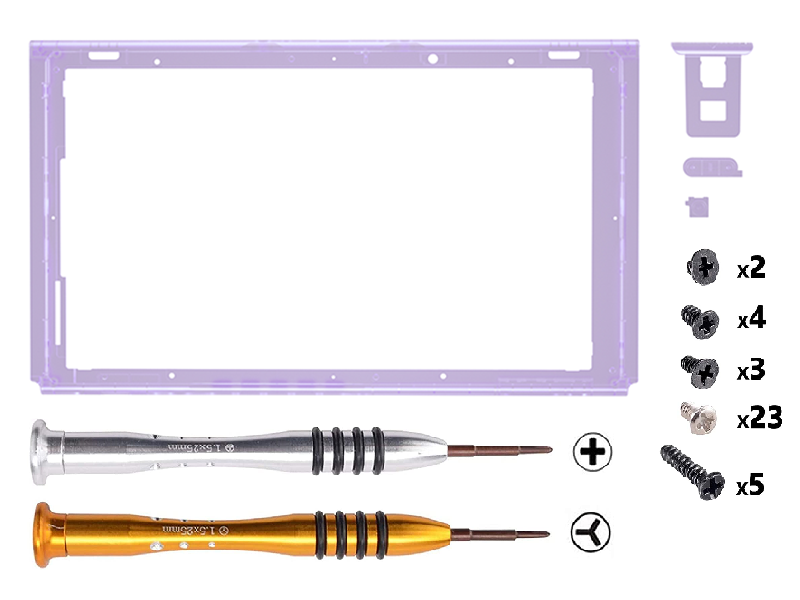
The eXtremeRate Clear Atomic Purple DIY Housing Shell is a premium replacement front cover for the Nintendo Switch, crafted from durable ABS plastic with a striking transparent purple finish. Designed for experienced DIYers, it includes all necessary tools and buttons, ensuring a perfect fit and restoring your console’s original functionality while adding a bold, personalized look.


| ASIN | B08N5TKV69 |
| Best Sellers Rank | #9,632 in Video Games ( See Top 100 in Video Games ) #54 in Nintendo Switch Skin & Protector Sets |
| Brand | eXtremeRate |
| Color | Clear Atomic Purple |
| Customer Reviews | 4.5 out of 5 stars 465 Reviews |
| Enclosure Material | Plastic |
| Finish | Clear |
| Finish Type | Clear |
| Hardware Platform | Nintendo Switch |
| Item Dimensions W x H | 1.97"W x 1.97"H |
| Item Weight | 30 Grams |
| Manufacturer | Extremerate |
| Material | Plastic |
| Product Dimensions | 1.97"W x 1.97"H |
M**Y
Just take your time
Everything seems about perfect for me. I actually used the included screwdriver(s), even though I already have a few sets. I watched a video on YouTube on my tablet while I did the installation. I had to rewind and pause the video a couple times but I just took my time and didn’t break anything. I also have years of experience disassembling electronics so I’m sure that might have helped. People who complain about the screwdrivers don’t understand that you have to apply pressure while unscrewing those screws or they most likely will strip. The only part that confused me was which way to put the power button in. It seems like I got it though. The switch looks great and some people think it’s a limited edition. I used a blow dryer to heat up the edges of the screen and used the included suction cup to pull it out. Once again, you have to take your time. This is really a must if you have replaced the backplate because it looks kinda dumb just to replace the backplate and the front plate is still black. I ordered the front and back at the same time. It takes a little over an hour to complete. The only real problem was the kickstand.: I had to soak it in hot water from my Keurig to soften it up so I could straighten it out because it was warped, but after I was done it was fine. Both kits included a whole set a screws and a really nice screwdriver(s).
W**Y
Quality product, clear concise directions
My Switch, which I purchased at launch, has been through the ringer - multiple moves, kids and various drops and falls. The shell was broken in multiple places and the left side controllers weren't connecting or charging when attached. I spent a little over an hour installing this product using the YouTube video provided on their website. All the tools needed were included as well as extra screws in case any from the original equipment were missing (several were, in my case), with the reception of a heat gun, though a hair dryer worked just fine. Once installed (along with the back plate which I ordered from the same company) not only for the Switch feel like new, but the controllers were syncing and charging again, presumably due to a loose wire or something that was fixed during the installation. All in all, 10/10, no issues, clear directions, a great product.
A**G
Easier than other reviews have stated, very straightforward with excellent results
Pleasantly surprised by this kit. I read over the reviews first and saw lots of complaints and was concerned it would have quality issues or the disassembly would be tedious (it does involve a heat gun to remove the digitizer after all). Nope! Followed their youtube video and it was painless. I already have my own electronics tool kit though so I have no comments on the included tools with this kit (or the joycons + back panel, dock, or pro controller ones either). Suction cup was included so that was convenient. I also got the LED firefly and button kits but they weren't here yet and I was impatient so it's pictured above without. Disassembling the screen can be tricky if the tape refuses to let go. I used a hairdryer on low instead of a heat gun - it had a better nozzle and low heat is plenty. Just go slow over one side at a time and gently pull it free. A spudger carefully applied can lift it out but make sure it's heated up enough first. Keeping all the parts laid out on a mat where I was working in roughly the same positions they got removed from, layer by layer, made reassembly even faster than disassembly. A good pair of tweezers or two really help it along. Total install time for all of the kits in one go was about 5 hours (front and back shells, joycons, dock, pro controller + led upgrade). Lots of screws are included but they seem to be backups and replacements only. The only ones I used replaced the annoying tri slot screws on the outside of the case with standard phillips ones for later access. I wish extremerate offered all their colors for the front panel. I have a second switch I want to do in transparent blue but it's not available yet. However this makes a fine addition to my growing collection of atomic purple electronics (pictured) and I'm quite pleased for how cheap the shells were.
J**R
exactly as advertised
My day-1 switch's original fan grille broke after a fall from a hotel bed - I put up with it for a while but already had the purple variant and figured I'd do both at once, so I went with this clear one. It was a perfect fit - easy enough to install and felt great, especially with a glass screen protector. I put a sticker on the rear heatsink-cover assembly and it was still very visible through the plastic. 10/10.
A**N
Not worth the time or money for a cosmetic upgrade. Maybe worth it as a repair.
I'm quite conflicted about this product. My early-model Switch was experiencing the common "plastic rot," and this replacement shell offered a promising solution to its crumbling exterior. The plastic quality itself seems good, which is a significant plus for renewing an aging device. However, several notable issues prevent this kit from being perfect: Tight Right Joy-Con Rail: The right Joy-Con rail is now excessively tight, making it difficult to remove the controller. Misaligned Screw Holes: During reassembly, the screw holes did not align perfectly, requiring some "twisting" of the plastic to get everything back together. Missing Screen Adhesive: Crucially, the kit does not include double-sided adhesive for the screen. The instructions expect you to reuse the old adhesive, which inevitably loses its stickiness during disassembly. This is a significant and cheap omission. Oversized Screen Opening: The screen opening is slightly larger than the original equipment manufacturer (OEM) specification, resulting in noticeable gaps on one side of my screen. While I can try to "cheat" the screen closer to one side for a better appearance, the fit is clearly imperfect. Had the screen adhesive been included, I would have easily given this kit a 4-star rating. However, given the overall less-than-perfect quality and this very inexpensive but impactful omission, I cannot rate it higher than 3 stars. I would not recommend purchasing this kit for purely cosmetic reasons. If your Switch's plastic is crumbling as mine was, you might consider enduring the current state or waiting for an alternative kit to become available.
B**Y
LOOKS AWESOME
Great product! I got hooked on extremerate shells since I got the clear ones for my joycons and this front shell didn’t disappoint! This is not a beginners mod and be prepared to set aside a few hours to install it as the entire switch has the gutted, carefully remove the screen from the old shell and put it all back together in the new one. After it’s finally done it is so worth it! These shells aren’t completely see through, they are more of a matte but still clear enough to see what’s going on underneath. It’s better that way as if it was completely see through and glossy it would be a fingerprint magnet. 10/10
A**S
Long and tedious process to install
some minor seam inconsistencies (by the joycons, it makes the tolerances tighter), otherwise looks great and feels like it wont break anytime soon it came with a bunch of loose replacement screws in a bag aswell as screwdrivers (both the front and back shell come with their own screwdrivers. Lol)
J**7
The front is not easy to install, but they have 10/10 videos and support
I'm just not skilled enough to get it back together and working. Make sure you have a proper hot air station or warming pad specifically for screens. Otherwise the kit is very fully featured, and looks fantastic once together (I did get it back together but damaged lcd connector, very careful but still too rough).
Trustpilot
1 month ago
2 days ago