
Desert Online General Trading LLC
Dubai, United Arab Emirates
Desert Online General Trading LLC
Dubai, United Arab Emirates


🚀 Elevate Your Garage Game!
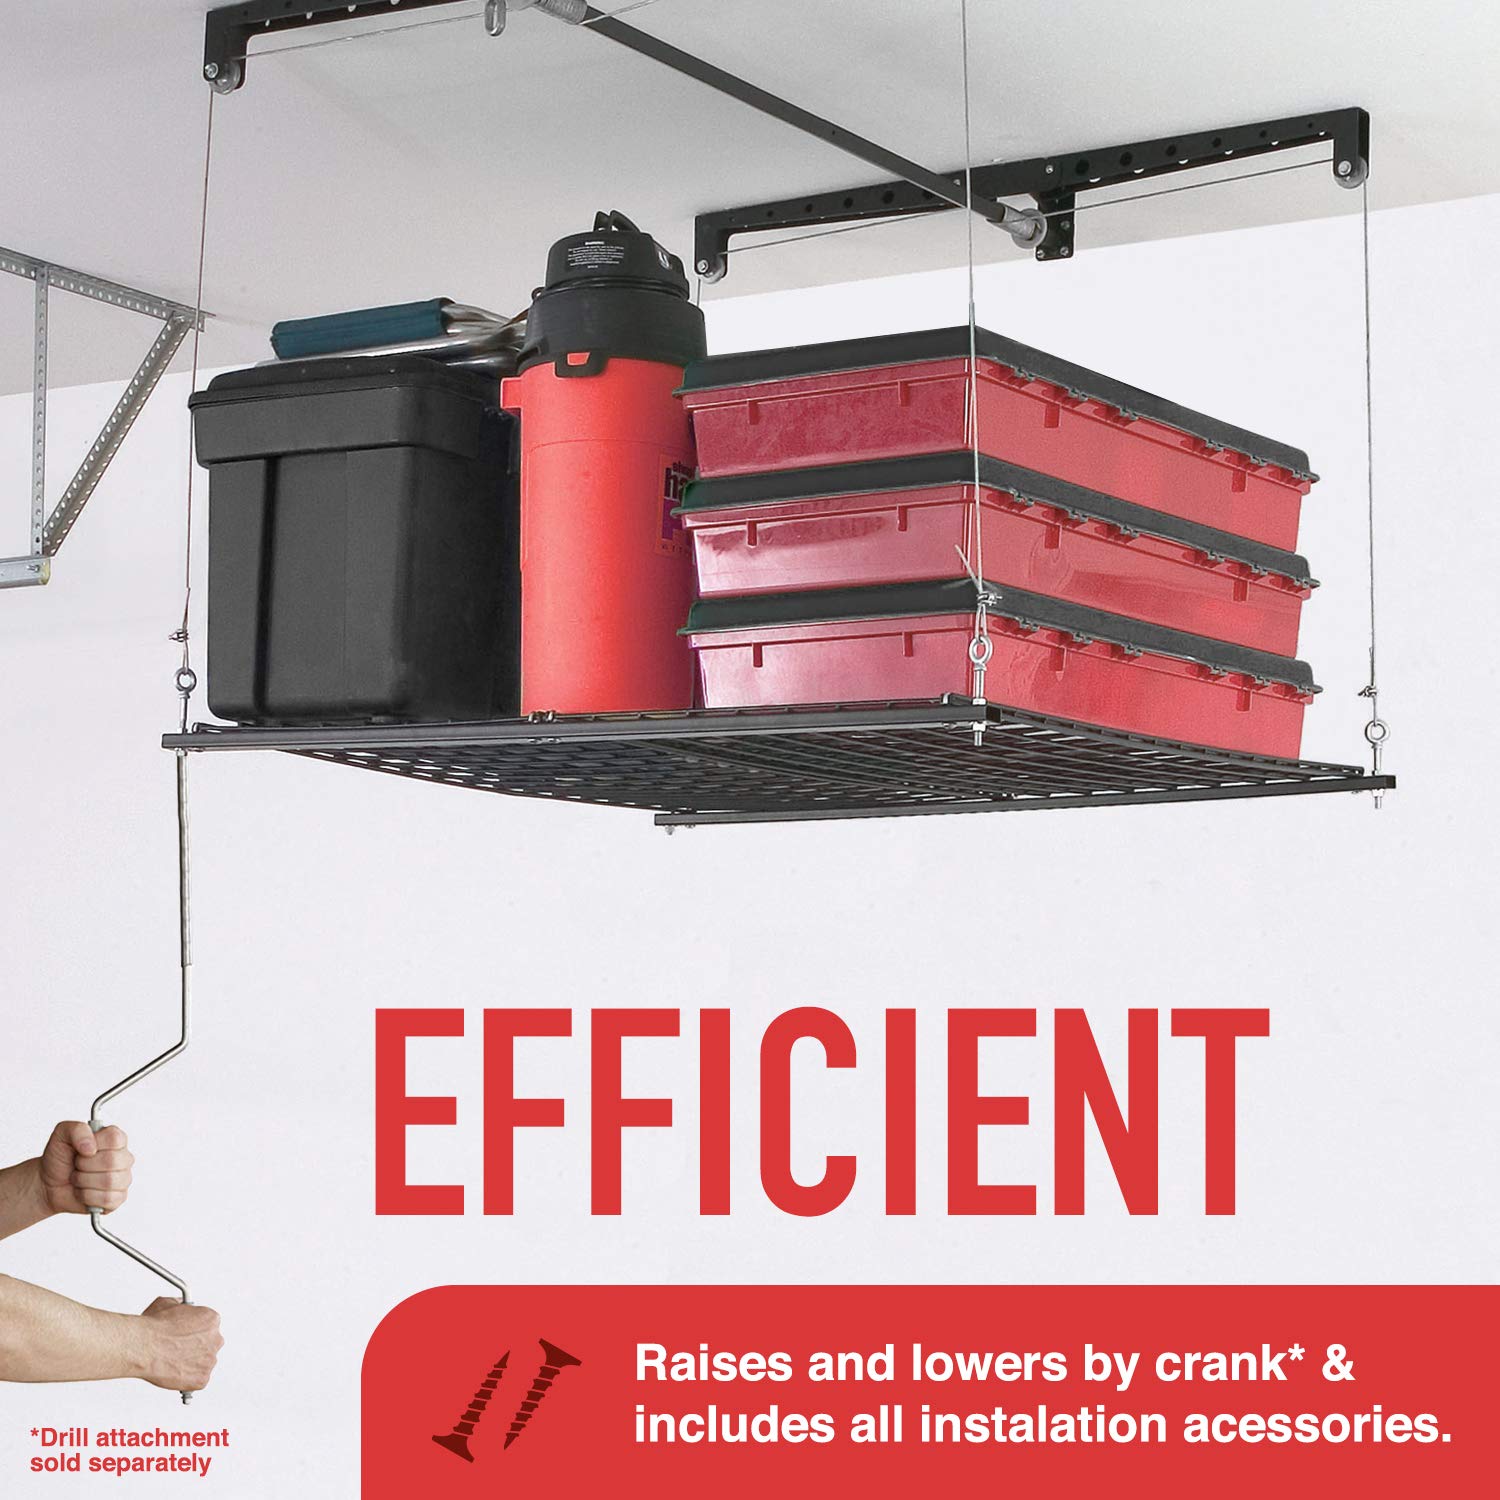
The Racor PHL-R Garage Ceiling Storage Rack Lift is a robust and adjustable storage solution that mounts to any ceiling, offering a remarkable 250 lbs capacity and 8ft of vertical lift. With its durable steel construction and efficient crank operation, it provides 16 sq ft of additional overhead storage space, making it the perfect choice for reclaiming your garage.


| Manufacturer | Racor |
| Part Number | PHL-1R |
| Item Weight | 47.2 pounds |
| Product Dimensions | 48 x 6 x 24 inches |
| Item model number | PHL-1R |
| Is Discontinued By Manufacturer | No |
| Size | Pack of 1 |
| Color | Black |
| Style | Adjustable,Unique |
| Finish | Steel |
| Material | Steel,Nylon |
| Item Package Quantity | 1 |
| Mounting Type | Ceiling Mount |
| Special Features | Durable |
| Included Components | Add-on Units |
| Batteries Included? | No |
| Batteries Required? | No |
| Warranty Description | 1 Year Limited |
D**A
Works for my heavy duty use, with additional modifications & an explanation of what will happen if you overload or stand on it
This is not much of a review, the other reviewers have covered most of the high/low points well.You'll want to read this if you are considering hoisting a heavy-duty snow thrower, or any other load which is close to the recommended load limits, or going to be a point load, and not spread out over the whole platform.This is a cool product. For one, here is a company willing to sell an inexpensive consumer-grade product with moving parts that is rated to hold 250 pounds above people's heads. I think this company has succeeded tremendously.I needed a platform which would hold my heavy duty snow thrower out of the way in my shed during the off-seasons. My 30" 357cc snow thrower probably weighs 240 to 260 pounds, so it is over the edge of their design parameters. Add to that their restriction that the weight be spread evenly on the platform. Not my snow thrower. I would say 200 pounds of its weight is carried by its wheels, so it has two point loads less than 2' apart of 100 pounds.To accomodate the anticipated overweight cargo, I planned put some thin plywood over the platform to better spread the weight, and to attach a system of extra pulleys and counterweight (5 gallon bucket of ice melt!)Luckily I stood on the platform, and bent it slightly during my initial assembly. (I say lucky, because otherwise I might have bent it worse trying to hoist the snow thrower.) This clued me in to a key design detail that I initially thought was a major flaw, but now realize is intentional. The platform is intentionaly meant to bend if it is overloaded, or has a load which is not spread evenly over the whole platform.If you try to hoist a 250+ pound load without making any changes, the platform will act more like a cargo net with very stiff cables, instead of a platform made of steel rods. I suspect that all four corners might fold upwards, cradling your load in the middle depression. What an ingenious solution Racor has come up with to prevent getting sued by knuckleheads who overload their product. All they have to do is show a jury a photo of the folded up product, and ask the knucklehead why he (its always a he) kept cranking, even after the platform folded in on them. Its sorta like a circuit-breaker, to prevent overloading, without having a catastrophic failure. My guess is that the pulley and hoist mechanism is actually capable of handling 4 times the load, but why risk it?I will describe what I did with this overweight snow thrower though. I beefed up the platform with some old hickory "studs" I had around. (photos included.) Once I hoisted the snow-thrower up (with counterweight system), I looped chain around all four corners, and backed off the Racor pulley/cable system so the dead weight is mostly being sent to the chains. When I need snow thrower next winter, I will crank the platform up again, disconnect the chains, make sure the counterweight system is still working, and then lower the platform.BTW, let me say that this is not hanging in some dorky little mass-manufactured shed. My shed is built more like a house, with 2x4's and rafters. You will see from my photos that I was able to remove one rafter, and sister up the rafters on either side of this opening. This allows me to lift the platform with snow thrower on it almost 6 feet in the air (a good portion of the snow thrower is actually up above the rafters and pulleys and lifting mechanism.) You will note that I had to position the snow thrower on the platform so that the central axle of the Racor mechanism slides into a low area on the snow thrower between the motor and the auger shield. Otherwise I'd be limited to lifting the thing to only a not-so-useful 3-4 feet.You will find photos of the slightly bent platform (from standing on the edge), then photos of the snow thrower hoisted up into the rafters, and finally a photo of the chains loop on one corner. (That's a rusty old garbage can on it in first photos)
K**R
Excellent Hoist for Lifting, Storing and Reinstalling Jeep Hardtop
This hoist is rated for 250 pounds and I use it to lift, store and re-install the hardtop on my two door 2015 Jeep Willys. I considered electric hoists and various home made hoists before deciding on Racor. I decided a manual hoist made more sense than electric due better reliability and control of operation. The home made hoists were mostly contraptions made from ratchet straps which might work for lifting the top but not reinstalling it.The Racor hoist has been installed in my garage for more than a month and I'm quite pleased with the result. It turned hardtop handling into a one person job with reasonable effort. My garage has 11 foot ceilings and I'm over 6 feet tall. I can lift the hardtop and have enough room to walk underneath with several inches of clearance even with both Freedom Tops on top of the hoist.Standard installation requires the hoist's support rails to be 48 inches apart so if the joists in the ceiling aren't 12, 16 or 24 inches apart you'll need to first mount two 2X4 studs perpendicular to the joists, which I did. Be sure to measure everything and verify the joist locations at least a couple of times before you start drilling holes, especially in a finished garage. My garage is finished so I used 5 1/2 inch by 3/8 inch lag bolts from Home Depot to mount the 2X4's. The 2x4's were each about 6 feet long with each stud mounted with four lag bolts into four ceiling joist. This is probably way more strength than I need but I prefer the extra safety. Using the 5 1/2 inch lag bolts made sure I was getting through the studs, through the plaster board and into the joists. I pre-drilled 1/4 inch guide holes and it was a bear getting the lag bolts screwed in with a hand ratchet. An impact wrench would've been helpful.I also beefed up the rail mounting screws from less than 2 inches to about 3 inches to increase the tensile strength. I also increased the width 1/8 inch too. The pre-drilled holes in the rails were able to accommodate the larger size bolt. The pulley wheels and the gear box made a lot of noise so I gave them all a good shot of WD-40 which caused everything to work easier and quieter. There were a couple of bolts and washers from the parts list that were missing from the box but those were standard metric size items that I was able to buy at Home Depot. Also, the nuts attaching the cables to the wire frame via a C-bolt weren't even hand tight out of the box so those should be checked and tightened, if needed.I purchased three ratchet straps to hang the hardtop to the bottom of the wire platform. It could be done with two ratchet straps but three distributes the weight more evenly and provides more safety. You'll need some type of padding between your Jeep hardtop and the bottom of the hoist's wire frame. I zip tied plastic or rubber pipe insulators along the edges of the platform and then put an old quilt on top of the hardtop.I'm very happy with the Racor hoist for lifting, storing and reinstalling my Jeep top. It is useful for other storage too. As mentioned earlier there is plenty of room to hold the Freedom Tops and a few other items. I was able to assemble and mount everything by myself but did call a helper for a few minutes to make things a bit easier. My only gripe is a couple of small missing parts that cost a couple of dollars to replace at Home Depot. I suggest upgrading some of the bolts for better strength and safety although the included hardware is adequate.
Trustpilot
1 month ago
3 days ago
3 weeks ago
2 months ago