✨ Stick, Style, and Slay Your Space Instantly! ✨
The DIH Peel and Stick Backsplash features 5 sheets of premium 11.51” x 11.81” Volakas Linear white marble tiles with a durable aluminum and PVC construction. Designed for easy DIY installation, these water, heat, and scratch-resistant tiles bring a modern brushed metal finish to kitchens, bathrooms, and stair risers, delivering a high-end look with minimal effort.
Brand | DIH DELIGHTS IN HOUSE |
Material | Aluminum |
Color | Volakas Linear |
Finish Type | Brushed |
Style | Modern |
Installation Type | Peel and Stick |
Product Dimensions | 11.51"L x 11.81"W |
Pattern | Marble |
Shape | Rectangular |
Edge Style | Square Edge |
Unit Count | 4.71989930555556 Sq Ft |
Form Factor | Square, Flat, Smooth |
Water Resistance Level | Water Resistant |
UPC | 716852939442 729257739111 |
Manufacturer | DIH DELIGHTS IN HOUSE |
Part Number | WHI-A5 |
Item Weight | 5.96 pounds |
Item model number | WHI-A5 |
Finish | Brushed |
Item Package Quantity | 5 |
Batteries Included? | No |
Batteries Required? | No |
N**L
Beautiful, sturdy product that looks like stone mosaic
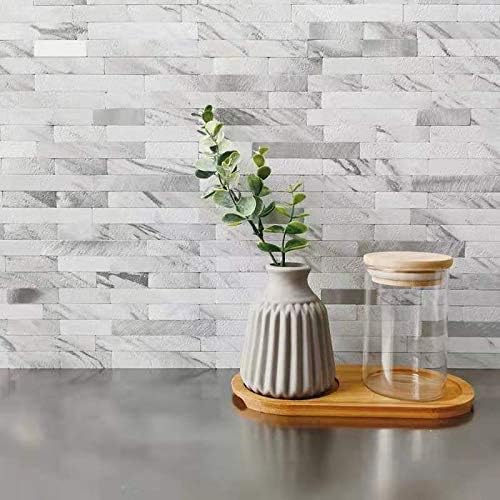
Used 7 boxes of 5 to cover 30 sqft of kitchen backsplash ( a few leftover and a few user errors discarded). Make sure to get the interlocking seams tight before you start pressing down. The product lines itself up well if you do it slowly, carefully, while pushing tightly together. If you end up with any gaps due to counter /walls being non-uniform, just spread some grey (my color) grout or even drywall plaster into the gaps and wipe. You'll never notice it.If you need an extra row or two to cover a gap to the cabinet bases, just cut them and line them up on the top rows. You can even cut small tabs to form a column.A great tip my remodel contractor gave me: when you cut out around outlets, cut them to a size so the tabs on the physical ac outlet rest on TOP of the tile. That way you end up with the outlet being flush to the surface instead of recessed. In fact, this tile is thick enough that in some cases if you don't do this method, you could end up with an outlet recessed enough that you can't get a large plug in it. To do this you need to unscrew the outlet from the box and pull it out enough to insert in the cut-out opening you made in the tile. TURN OFF THE CIRCUIT BREAKER BEFORE DOING THE OUTLET WORK!!! Test that each is off before assuming that all on a wall are off. I had 5 outlets around one wall and 3 of of 5 were on one GFCI and the other two a separate GFCI - so two breakers needed to be thrown. Glad I checked!For cutting, I used good sharp scissors for straight verticals, and a Dremel with cutting blade for cut-outs for outlets. I took a few pieces of tape overlapped to form a rectangular template the size of my outlet boxes, applied the tape to the correct offsets on the back of the tile, outlined it, then cut it with the Dremel. Don't use high speed, use the lowest setting that will cut it. Otherwise you'll melt it.I had trouble with (not a product problem), was how to do an outside corner. There's no way to not have an ugly gray/black line even if you caulk it. I cut an 90 degree piece of white plastic to line up down the outside seam and siliconed it in place. Looks great. You can see it on the left side of my photo. This photo is just 1/3 of the kitchen. Took about 3 days to get all the tile in correct and siliconed around edges. I suggest using a trans-white silicone as it will cover gaps and take on the color of the materials adjacent. Where there's nothing behind, it's a milky white. I used Dow Corning -786 TW Translucent White SIlicone (purchased on Amazon): https://www.amazon.com/gp/product/B075FTQKQM/ref=ppx_yo_dt_b_asin_title_o04_s00?ie=UTF8&psc=1As noted by all the other reviews, these are extremely sticky. Peel the backing off as you apply. If you accidently let the tile fold itself, it will stick together and you'll have to throw it away. If you accidentally stick it to the wall before you're lined up, you basically need to tear the top coat off the wall to remove it. That's ok because the tile will recover that as long as it's not an edge you need securely fastened. I used a putty knife to get under it- that seemed the least intrusive tool for removing sections.
M**1
Great Alternative to Real Stone
This peel & stick tile is a beautiful alternative to real stone tile. Real stone, although pretty, takes specialized tools to cut and it can easily chip or break but this material is durable, strong, and super easy to clean. It’s perfect for those wanting an easy DIY project at a lower cost than real stone.The texturing on the tile combined with the print mimics marble in a convincing way. The added metallic sheen also shines nicely under light without being overly glitzy.To make end cuts in the tile we used a miter saw. The tile pieces fold in half without breaking and unfold without a noticeable seam which makes it easy to make one clean cut. We used a Dremel with a cutting blade to do the cuts for the electrical outlets. A heavy duty pair of scissors would work to cut the edge pieces but we found that the lines weren’t as clean with scissors. Box cutters work too but the miter saw and Dremel are much more efficient.
L**P
You can do this even if you’re a beginner.
This tile is fairly easy to install as long as you take your time. There are no instructions. Tips and hints would help. I found that at times there were noticeable gaps between sheets that I couldn’t seem to avoid. I fixed this my “grouting” with white caulk and now I don’t see the gaps anymore. Also once they are placed there’s really no turning back so be careful. Save your bits and pieces to trim in awkward spots. Trim outlets before placing tile. I cut mine with a craft knife. Over all I’m really please with my backsplash. I’m not a person with tile experience and I think it looks pretty professional. As my friend says “this backsplash makes everything sparkle.”I finished my edges by cutting off individual tiles and creating a straight edge with them.
B**P
Highly recommend!
I ordered these to update my kitchen. I had never seen peel & stick tiles in person and wasn’t sure what to expect. These are GORGEOUS. They look like real tile, and don’t look cheesy at all. They are easy to install. I would recommend opening all the boxes and lining out your tile before you start. My install would have gone much smoother if I’d done this. My 1st box went up in just a few minutes, I opened the 2nd box and the tile placement was a different pattern than the 1st, and I am a nut about consistency, rather than opening another box and seeing if it was true for all boxes I started cutting and applying by strips so the pattern matched the first box, I could’ve avoided this by looking in other boxes. The tiles are VERY sticky. I would also recommend fitting the tiles with the paper on BEFORE putting them on the wall. It helps to loosen the notches before they’re sticky so the installation goes smoother. I applied them right over existing tile and painted bead board, by myself with a razor knife and sharp pair of kitchen scissors, if I can do it anyone can. Very user friendly. You won’t be sorry!
L**A
It won't stay up! Seller is making it right.
This backsplash is beautiful and I paid far more for it because if how it's made and the look. This was installed on a clean wall that had been redone a month ago by a professional I have used for years. One day I started hearing "plops" coming from the kitchen. Over the next couple of days, the backsplash started falling off a piece at a time. Very frustrating! However, after contacting the seller they have agreed to make it right as after sending them pictures they said it won't stay up on my kind of wall and I did not see that in the literature and as far as I know it is not stated. So while I appreciate them doing it and they did it very promptly, I still have incurred $100 to have it installed and I'll have to have the drywall fixed. So for the proper wall this is an absolutely beautiful tile
Trustpilot
5 days ago
1 week ago