🔨 Nail it like a pro with Bostitch!
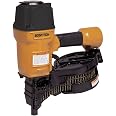
The Bostitch Coil Framing Nailer (N80CB-1) is a powerful air-powered tool designed for high production applications. With a durable aluminum housing and a large-capacity magazine that holds up to 300 nails, this nailer is perfect for various tasks including framing, sheathing, and roofing. Its aggressive toe-nailing teeth ensure precision and slip-free operation, making it an essential tool for any professional contractor.
Manufacturer | BOSTITCH |
Part Number | N80CB1 |
Item Weight | 8 pounds |
Product Dimensions | 17.77 x 15.88 x 6.42 inches |
Item model number | N80CB1 |
Is Discontinued By Manufacturer | No |
Size | One Size |
Color | Bostitch Gold and Black |
Style | Classic |
Finish | Brushed |
Material | Blend |
Pattern | Solid |
Shape | Rectangular |
Power Source | Air Powered |
Item Package Quantity | 1 |
Measurement System | Metric |
Certification | certified frustration-free |
Included Components | ANGLE COIL NAILER |
Batteries Included? | No |
Batteries Required? | No |
H**S
A Review for the Framing Nailer Novice
[Summary: Some effort to get started, but this nailer works well.]Let's start with what you're not going to get:- no 1/4" NPT air plug (required)- no Teflon tape for the plug (required)- no lubricating oil (required)- no nails (required)- no air filter (recommended)- no case or bag (nice to have)- no depth of drive adjustment (nice to have)With this, my first framing nailer, I scratched my head a few times getting the tool ready to use. It wasn't immediately obvious where the air hose connected; there's a recessed red plastic cap at the end of the handle, and an arrow pointing to it labeled "OIL". Pry this cap out with your fingernails, buy a 1/4" male NPT plug (to fit your air hose connector) and some Teflon tape, and screw the plug into the end of the nailer.The N80CB comes equipped with a black contact trip trigger. A contact trigger will fire every time the safety shoe around the business end of the tool is depressed as long as the trigger is down. The loaded nailer is over 10 pounds so its weight tends to drop it down onto the nailing surface right after the recoil bumps it up -- frequently leading to two or three nails driven. I decided I'd prefer the silver-gray sequential trip trigger, included in a plastic bag. You need a hammer and the included punch to drive out the trigger pivot pin, and to drive the pin back when you install the other trigger. The trigger moves back with no pressure when installed; you'll feel very slight trigger resistance, however, when the safety shoe is depressed.The nail loading procedure is made needlessly mysterious by the tiny drawings (.8 square inches each) illustrating the first four steps of the operation. If a normal picture is worth a thousand words, these are worth maybe 42. So I'll add a few more to help.Position the tool with the firing end at the lower left, with the "!WARNING:" label on the cyclindrical nail can oriented for reading. The loading latch is midway between this label and the business (firing) axis of the tool. There's a flat fingertip-sized metal shelf at the top of the latch. Press this down (that is, in the direction the nails fire) and swing the loading door open toward you and to the left.Grab the plastic part that has the "!WARNING:" label, and swing the top cover of the nail can open toward you and to the right.There's a buckle clamp holding the bottom of the nail can in place. Using your right hand reach below the hinge of the top cover and follow the curve of the lower can around toward its far side. Your index finger will be on the buckle latch lever. Pull the lever toward you until the latch springs open, then move the near part of the buckle clamp off the ridge at the right side of the lower can. Get a couple of fingers behind this clamping ridge and pull toward you. The bottom section of the can will pop out of the grooves it's nested into on the fixed side of the can.Reinsert the bottom section of the can so that the far side rectangular cutout ("window") underlines the correct nail length embossed in the black plastic of the fixed side of the can. Mark this position some way other than by using the measurement cutout (I used a felt-tip pen until I got used to the sizes) as you won't be able to see the markings when the can is full of nails. Remove the can again and fill it with nails. With the B & C Eagle nails at 3-1/4" I had to unwind the full 200 nail coil and rewind it to fit smoothly around the spindle. (If you have to re-coil your nails make sure the 15 degree slant puts the point forward of the head as the nail coil exits the can.) Reinsert the can at the appropriate position and reattach the buckle clamp.Pull enough of the coil from the can to get the lead nail into the business axis of the gun, and the nail immediately behind it between the teeth of the feed pawl. Make sure the nail heads are all in the feed groove provided for them. Swing the top cover of the nail can closed from the right, and the loading door closed from the left. Push firmly until the door locks into place.With your new 1/4" NPT plug in place on the nailer, attach it to your air hose's quick connector. Now you're ready to get to work!How does the N80CB work? Very well! After using my gentle finish nailer I admit I was surprised to see sparks fly each time one of the heavy framing nails was hammered home. My only difficulty: finding a local source of nails in Silicon Valley. Luckily the B & C Eagle nails available from Amazon worked like a champ (after recoiling). No jams; no problems at all.The N80CB does not come with a depth of drive adjustment. There's a fairly expensive add-on unit you can buy. You can also get an approximation of drive depth adjustment by fiddling with the air pressure within the 70-100 PSI range. Based on only framing with 2-1/2" and 3-1/4" nails, you should set the pressure based on the nail size (100 PSI for the bigger nails) and leave it alone.Finally, I found the packaging pretty meager. This is a bulky, heavy tool, and the packaging is just a box containing a cardboard sheet with cutouts designed to cradle the nailer. My unit ended up ripping the cardboard cutout sheet as its weight was thrown about by the UPS shippers. Luckily the tool itself was rugged enough to survive.
M**
Solid nail gun
Fits siding coils and longer framing nail coils nicely. Bit larger and heavier than siding nailer but worth it. Need to have air hose fitting for the end doesn’t come with one.
J**
workhorse
This framing gun is awesome a true workhorse never have any problems with it has made me lots of money
P**D
Maintain it and it'll last
Building a privacy wood fence (board on board). Used this with ring shank nails. Worked great. Good instruction on changing the trigger. Very happy with it's durability. Hung 380 pickets. Start the new day, but in the drop of oil and go. I'm a Bostitch pneumatic owner x6. Not planned to buy only Bostitch but that what has happened do to their price mark and continuing not to disappoint.
J**H
Great nailer
Bought this nailer to replace an old clipped head nailer. After using the clipped head for so long then using this one it seems like you'll never run out of nails! There's so many nails per coil, its great. Uses the Hitachi nails just fine. Not much else to the nailer to speak of...no extra frills or anything, it just works. I'd recommend to anyone in the market for a new framing nailer.
M**B
2-3/8 ring shank feeding problems .
It shoots smooth 2-3/8inch & smooth 3inch very well. BUT... Metabo 2-3/8 nails don't feed reliably in this new gun or the older N-80 gun. Other than no adjustable depth feature, this thing is scary good.
J**Z
good tool
not too heavy, work nice I'm not a professional but I could understand how it works pretty easy.
M**W
Item looks old or used but works fine.
Item looks used but seems to work fine. It’s really heavy even for me I’m 6 foot 195.
Trustpilot
4 days ago
3 days ago