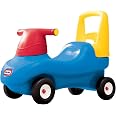
🚀 Race into toddlerhood with style and confidence!
The Little Tikes Push and Ride Racer is a versatile toddler ride-on and push toy, measuring 22" x 10" x 17" and supporting up to 50 lbs. Designed with a low seat and high back for easy access and stability, it’s made from durable plastic for indoor and outdoor use. Proudly made in the USA, this lightweight and easy-to-assemble racer encourages active play and early mobility skills.

| Item Weight | 3 Kilograms |
| Item Dimensions L x W x H | 22"L x 10"W x 17"H |
| Size | 22"L x 10"W x 17"H |
| Theme | Car |
| Material Type | Plastic |
| Is Assembly Required | No |
W**E
Good quality
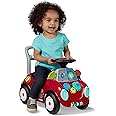
Looks exactly like the product in the picture. It is a little harder to assemble, especially as a first time mom! But after all the work put into assembling it my kiddo loves it and rides it all the time!
H**A
Great little toddle bike
Was not as easy to put together as it should have been. None of the holes were big enough for any of the screws or metal rods. Had to get a screw gun out to make every hole bigger miso we could assemble it properly. Also hammering the other pieces together was a little tricky but not too hard that we couldn’t manage. After we had it built it was super cute and seems very sturdy. No sharp edges anywhere. Nothing that could cut or hurt baby. Was just the right height for baby. Doesn’t fall over. We like that it is simple without all the bell and whistles. Now days kids are over inundated with electronic devices and the need for constantly replacing batteries. Just a good ole bike a toddler can ride themselves.
T**N
Road Rash lol
Good quality. Loads of fun. His parents had to pry my great grandson off after sitting on it all day long. 🤣
B**Y
Nice push pull and ride toy for your toddler.
Bought this for my grandson for his 1st birthday. It is pretty easy to put together and made with good materials.
B**9
Great Push-Toy - Here are additional instructions!
I bought this for my son, who has been crawling for 2 1/2 months and seems close to walking.Pros: He loves it! This is a small, simple version of a push-toy/walker. It's great for apartment dwellers or folks who have limited space at home. It's small enough to fit well in my son's playspace, but large enough to support his weight. It's study, too - he's a rough 'n tumble kid, and the car has held up very well. My sister and best friend also bought Push & Rides, and all are still in perfect shape after four years of enthusiastic play.Cons: It's a pain to put together. The directions are all in pictures (whatever happened to using words in instructions??). I've assembled entire pieces of furniture with less frustration.I'm including my addendum to the instructions for those who want a little more guidance:Parts List:K (small, black) and O (large, gray) are tools. You'll need them to tighten the nuts, but will throw them out after assembly.M: red screws; G: white anchors; H: yellow endcapsThe rest of the parts list is clearly defined.Instructions:1-Pull the three metal bars out from the bottom portion of the car. You'll have two skinny bars (E) and one thicker bar (I).2-Take one of the skinny bars (E), and hammer one end into a small nut (J). It's easiest to do this if the nut is on top of a sturdy block. Do the same thing with the other skinny bar. You'll end up with two bars (E), each with one nut on one end. You'll have two nuts (J) left over. Set the bars aside to use in instruction #4.3-Put the white plastic hubcap into the indentation of the black wheel (do this with all four wheels).4-Take the skinny bar (E). Next to the nut (J), add the wheel so that the white portion is touching the nut, then add a washer to the other side of the wheel. Put the bar through the holes as shown, so that it acts as an axle.5-Once you have the bar (E) poking through the other side, add a washer and then a wheel. Now, you just need to add the last nut (J) to make sure the wheel stays on securely. Take the two small black capnut tools (K). Fit one capnut tool (K) over the nut that's already on the end of the skinny bar. Turn the car on its side, with the capnut tool (K) on the floor.6-Put the other nut (J) on top of the exposed end of the skinny bar. Place the other small black capnut tool (K) on top. Bang on it a few times with the hammer until both nuts (J) are securely locked onto the bar.7/8-Push the white plastic anchors (G) into place as shown.9-Hammer the yellow endcaps (H) into the handlebars.10-Hammer the thicker metal bar (I) into one of the the larger nuts (N).11-Put the bar (I) into the blue car base and add red handlebars as shown.12-Use the larger gray capnut tools (O) to hammer both nuts (N) onto the bar (I) securely.13-Pop a beer: you're finished!
T**Y
Great price
Grandson loves great price for the money good quality
J**R
I figured out a modification that may help with assembly
If you are having a hard time getting the red cap on the handle bar to stay on (at steps 3 and 4 in the assembly instruction sheet), place a piece of plastic/paper towel between the cap nut (part I) and the cap nut tool (part F). Do this at both ends and hammer. It creates just enough extra push for the red caps to stick to the rod. It's a simple rig but it worked for me. I hope it helps you!I read the reviews before purchasing. I thought, "if so many people complained about how difficult it is to assemble, the company must have corrected the defects before selling more of these." I was wrong. The package came with missing and damaged hardware, damaged obviously from the previous buyer trying to assemble the impossibly defective parts. The problem is that the red cap that is supposed to keep the handle attached to the bike does not stay attached to the rod. After about an hour of hammering and hammering (and much swearing) to no avail, I gave up. I requested an exchange.The new one came with the exact same problem. I figured out how to modify the defect and I was finally able to put it together. At steps 3 and 4 in the instruction sheet, I put a piece of plastic between the parts F and red cap. I hate to brag but I'm proud of myself for not giving up and having the brains to solve the problem. My kid loves it. Crossing my fingers this stays together! I'll update later if it falls apart.
D**S
A smaller ride for beginner walkers
Purchased for my one year old grandson and he loves it! Low to the ground, steers only straight ahead, and compact in size. Perfect for beginner walkers.
Trustpilot
1 week ago
2 weeks ago