Full description not available


R**K
Great quality map
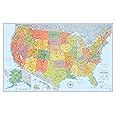
I've been doing a garage clean-up and remodel, and I decided I wanted to add a good sized USA map on a wall. So after a little comparing maps on Amazon and reading reviews, I picked this one. It is a nicely made laminated map, but it really needs to be mounted. After considering various options, I decided to use a piece of 1/2" MDF because it provides a nice, very smooth surface.The map comes rolled up in a plastic tube, so the first step was to unroll it. Being careful not to crease or dent the map while handling it, I unrolled it upside down on a table and lightly "sanded" the backside laminate with steel wool to rough up the surface just a little, thinking this should allow glue to adhere a little better to the plastic. I used 3M 45 spray adhesive to glue the map to a piece of MDF cut just a tiny bit smaller than the overall map dimensions so that I could trim a little of the laminate, about 1/16" all the way around after mounting. This glue is fairly low strength and you could use 3M 77 or other products, but 45 worked great and allowed a little more curing time to get such a large item in place. I then made a frame from some inexpensive outside corner molding, painted it black and glued it in place. I mounted the map to the wall using 18 gauge 2" nails from a finish nailer, placed directly thru the frame (catching the edge of the MDF under the molding but not too close to the edge to avoid maybe splitting the trim), at three places both top and bottom, into wall studs. MDF is pretty heavy, and this made for a very secure mounting. I then filled the tiny nail head holes, sanded them and touched up the paint. It came out looking great.I thought about using a foam sheet to mount it as others have, but preferred the surface of MDF because it's virtually perfect. For those who have not mounted large posters (or maps) on a backer, there is a specific process that I'd recommend, and here's a step-by-step: 1) lay the map over the MDF and align it precisely; 2) place a smooth, flat scrap piece of MDF across the map near the center and put something heavy on it (I used a 15 lb weight); 3) place newspaper over the whole weighted end of the map to protect it from spray adhesive; 4) roll the unweighted end of the map back over the scrap board and weight to expose half of the MDF backer, being careful not to allow the weighted end of the map to move (the laminate is pretty slick); 5) cover the exposed MDF backer with newspaper; 6) spray the back of the map with adhesive using enough but not too much; 7) remove the newspaper from the MDF and wait about 45 seconds until a light finger tip touch on the adhesive feels a little tacky but doesn't come off on your finger; 8) slowly roll map back onto the MDF, wiping back and forth across the map surface as you go to keep from trapping any air (I used a half sheet of paper towel scrunched up as a pad because it slides easily over the laminate; 9) once this half of the map is fully down on the MDF, use a paper towel to slide over this half for no more than about a minute, putting significant pressure on it to be sure the map is fully adhered with no air bubbles... on MDF it will now be perfectly flat; 10) remove the weight and board, place newspaper over the glued half of the map, and then roll the unglued half of the map back to just past where it is glued (the glue is still uncured, so you'll want to roll back just far enough to not end up with any portion of the map unglued after the next step; 11) place newspaper over the exposed MDF and spray adhesive on the back of this half of the map being sure to have the adhesive reach the start of the previously glued portion; 12) remove the newspaper from the MDF, wait about 45 seconds and then roll out the map slowly as before. Once the map is fully down on the MDF, spend a little time applying pressure to it. Look at the surface from different angles of light to get a good view of the entire surface. Once done, let it cure for an hour or so before handling... trim the edges with a razor blade if that was the plan, sawing gently against the MDF and cutting with a slow downward motion only.Hopefully the above process description will be useful to someone. Use this same general procedure any time you're mounting something too large to reasonably handle otherwise. One note: I never intend to have a need to push pins into my map, so MDF (which is virtually unpokable) is ideal. There are plenty of stickers made to apply and easily remove when I want to mark something. If you want to poke holes in the map (not sure why you would, but...) you'll want to go with a structural foam for backing.
B**D
GREAT map
This is a terrific map of the US. The colors are fantastic. Its a very eductional and informative thing to have.I bot one for me and one for my neices.They love it and they are already getting pretty good with US geography.I think Everyone should have one of these in their house.
K**M
Perfect
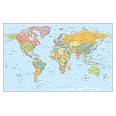
We ordered this map to use during our American history studies this year. We already have the matching laminated world map, so this was perfect to put up next to it. It came packaged in a tube, so no wrinkles or creases. The kids enjoy looking for cities and rivers on this.
C**C
Great for kids
Bought this for our son for above his bed on the wall. The detail is great, it’s much better and more detailed in person than in the photos. The lamination is good and unlike some others there was no damage in shipping. I do wish the lamination was a little bit thicker. I would consider the lamination good for delicate use, but I would not consider this to be something you could just roll out on the floor and play with. It’s not thick like a place mat – it’s basically the thinnest lamination you can get. That said, the lamination does protect it well. It’s above our 4 year old’s bed and he’s put his hands on it plenty and it has held up fine. We use little pointer type post-it notes to write names of relatives and mark the cities where they live and we mark out trips we take when we fly or travel far.Pros – detailed, laminated, HUGECons – lamination isn’t thick enough for heavy abuse
C**A
Beautiful and better than expected!
I just received this map yesterday! I read reviews of many different maps and finally decided it was worth a few extra $ to buy a laminated one. It arrives rolled up in a plastic tube and put into a tall thin box. It unrolled easily and looks so beautiful on the wall! It curls up a bit from being rolled but will flatten out easily and settle down after being hung for a few days.It is a very large map and fills up quite a large space on the wall. I was a little hesitant about all the cities marked on the map; in the Amazon picture it looks so cluttered or something but it is much nicer in person and doesn't look cluttered up with writing.My kids were immediately drawn to the nice colors of map and excited to find the different states and capitals we have been learning about this year in homeschooling. I would definitely recommend this map!
N**N
Awesome map to teach your children about the USA
Great map! our son is traveling across the USA in a theater production, and we use this map to track his path across the country. The map is huge, 36" wide x 52" tall, and it is laminated. It ships in a sturdy plastic tube, that is suitable for storing the map when not in use. Overall a great product for the price!
Q**I
its perfect
its a great reference for all our travels
D**G
Best one.
I have ordered it a while back with a WORLD MAP, and hard cover of "Oh, the places you'll go' by Dr. Seuss for my son, who just entered his 1st grade. As a whole it's the best purchase I ever made, and they make a good wall detail. And my son now knows about as many countries, and states as I do. We keep exploring more, every single day.As per the packing, it came with a few bents from the tube(s), taking a beating from shipping, but nothing which were serious, and once I hung it on the wall, it straightened out in a day or two.
Trustpilot
1 week ago
1 week ago