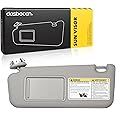
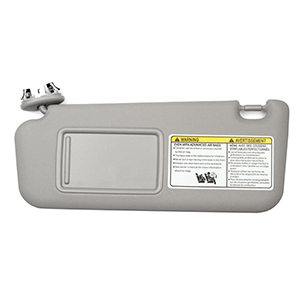
☀️ Shade Your Drive in Style!
The Dasbecan Front Left Driver Side Sun Visor is a direct replacement part designed for 2006-2013 Toyota RAV4 models. Featuring a sleek gray color and a built-in vanity light, this sun visor enhances your vehicle's interior while providing comfort and functionality. Easy to install and made from high-quality materials, it’s the perfect upgrade for any RAV4 owner looking to refresh their ride.
Brand | Dasbecan |
Color | gray |
Vehicle Service Type | Car |
Product Dimensions | 17.05"L x 9.06"W |
OEM Part Number | 74320-42501-B2 |
UPC | 053554983053 |
Closure Type | Snap |
Manufacturer | Dasbecan |
Item Weight | 1.85 pounds |
Item model number | 74320-42501-B2 |
Manufacturer Part Number | 74320-42501-B2 |
J**.
Fits perfectly; a great value
This is not a brand-name visor, but it fits perfectly in my 2006 Toyota Rav4 to replace my old, floppy sun visor that wouldn't stay in place. It was a happy surprise to find that the package included a few extra spring clips, as those are essential to installation, and the old ones can be easily bent or lost when taking out the old visor.Installation was doable without too much trouble, but there were no instructions. I watched a few YouTube videos to figure out what to do. The only problem was with some of the spring clips; they didn't stay in place at first, and I had to bend them into shape for them to fit. But once I bent them and installed everything, I ended up with a great, working visor that stays in place. The light switch on it works too.
J**S
Easy install and great product at least on day one
Took about 4 minutes to deinstall the old and install the new (after watching a few youtube install videos, the best of which was from gearmo auto for a camry sun visor, it shows exactly where to pry off the old visor easily and many other vid's do it wrong: basically, pry off the cap at the U part next to the metal rod, don't pry it off from the outside edges, then don't press up on the cap until you put the new one in place, pressing up on that cap does the locking). Works perfectly, looks great, and so nice to not have it hanging half down all the time.
A**R
Easy to install with the videos.
This installed perfectly with the existing clips. Just used a small screwdriver to pop up the outer plastic shell on the existing shade. Watched a few videos and it popped off easily.The new one fits perfectly and the process was very understandable.Color matches the beige perfectly in my 2007 Rav 4 Unlimited.No need to have a dealer do this.
R**N
Solid aftermarket replacement visor - not easy to install correctly
The quality of the visor is good, color and shape matches the original very well. I saw some negative reviews that it falls off, it's likely due to improper installation. The clips that hold the visor in place is difficult to install correctly and it takes time to install. It took me about 4-5 attempts before I was able to install it correctly and it takes patience and experience to install it. There shouldn't be any movement of the end of the visor that mounts to the roof.I have two negatives for the visor. One, the electrical connector is not as solid as the original and would come loose during installation if you aren't perfectly aligned. Second is the extension/flag doesn't operate as smoothly as the original, but I rarely use the flag so it is not a major issue. I think I can overlook the two negatives because of the value and overall quality. I can't easily tell if it has been replaced.
M**R
A Bad Experience
After some 11 years, the left visor on our 2011 RAV4 no longer stayed up. So I visited Amazon and saw all the positive reviews for the Dasbecan visor which reportedly is compatible with our car. Then I watched the videos on YouTube and decided to purchase the Dasbecan visor. (BTW, I spent about 1 hr viewing videos.)Removing the original advisor was not difficult. The trick is to pry off only the outer shell of the bracket. To do this you must not place your pry bar deeply into the bracket. The outer shell snaps on to a plastic bracket /shelf which holds the visor clips in place. To do pry off the shell, I spent some $8 on pry tools which I ordered from Amazon along with the visor.Though I attempted to install the new visor multiple times it would not click in place. I thought that perhaps the new clips were incompatible with our car so I exchanged the clips. But even then the new visor would not click in place.I consulted with the seller's technical support. One person followed up my request for help, but that person referred me to another person from whom there was no follow up.After waiting two or three days for follow up, I decided to call a Toyota dealer. This problem was not new to the parts department worker. He explained that the correct visor depended on the model, year, and the last eight symbols of the car's VIN.I gave him those numbers and he reported that a new visor would cost $110 and the installation charge would be $50. So we are purchasing an OEM visor and returning the Dasbecan visor.I was looking forward to a fix that would cost only about $50, but it was not meant to be. I spent about four hours on this project before I gave up and looked to my Toyota dealer for a solution. You win some and you lose some!
A**L
Good replacement
There are no instructions included but there are plenty of videos on youtube. Installation was relatively easy on my 2011 Rav4. The hardest part was removing the old one. You need a set of pry tools, a screwdriver probably won't cut it.The clips that were installed on the unit didn't fit the existing ones, but they included those so I swapped them out. If you look at the videos the seller included on the listing you can see how to swap them.The color is a match the build is close to the original and it functions fine.
M**H
Easy to install fit very well
Driver viser has been an issue for my wife in her 2010 Toyota Rav 4 for about a year.Every time I ask her if she wanted me to fix it,She said no !!!! Until last week.So I ordered it and replace it with ease.Fit and finish was great .Thank you Mike
M**Y
Works
Lowkey wanted to punch a goose when trying to install it with the clips with the prongs, but when I swapped to the clips without the prongs, it was much easier. It comes with two types of prongs. The light works. So far so good, now let’s just see how it holds up.
Trustpilot
2 weeks ago
1 week ago