


🔒 Lock It Down: Your Gate, Your Rules!
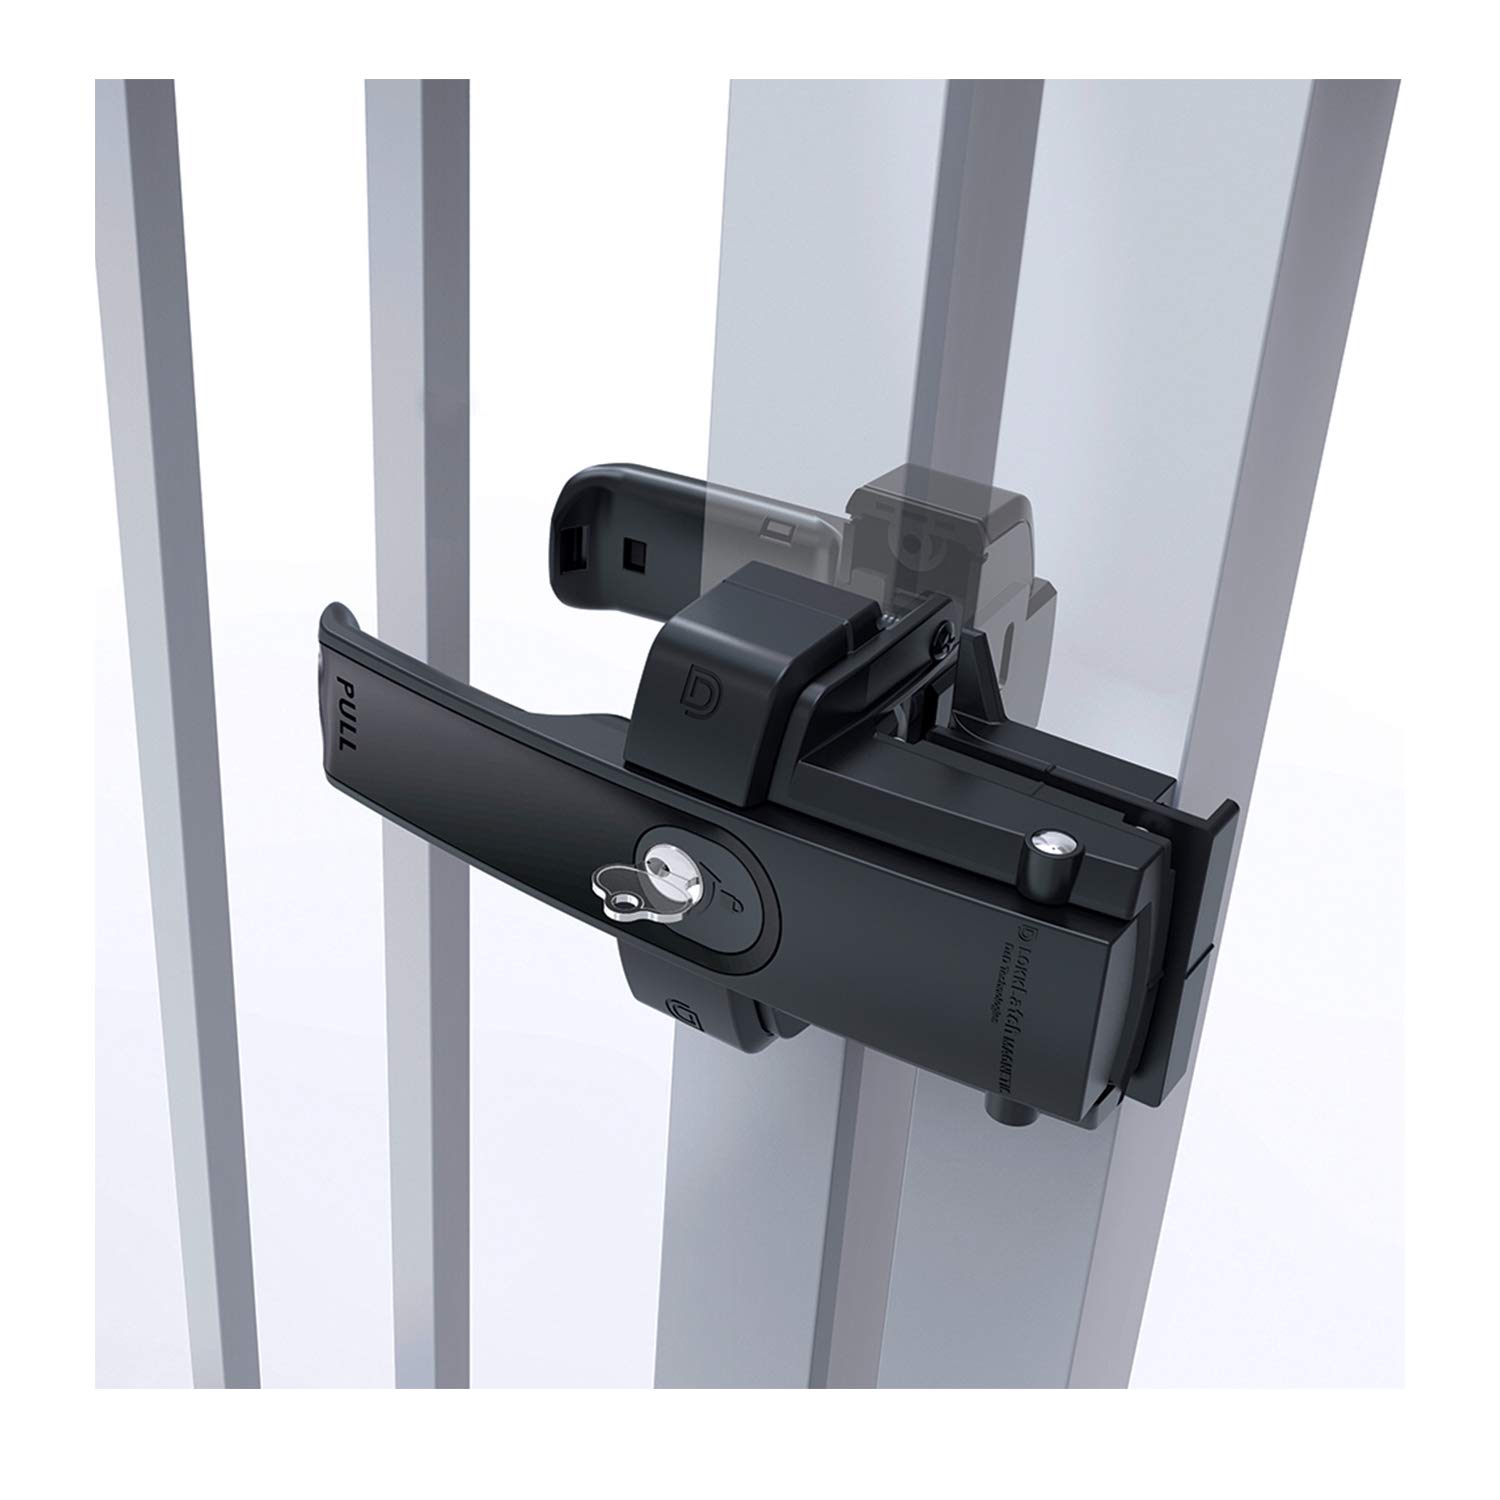
The D&D Technologies LLMKDBT LokkLatch Magnetic is a dual-sided push/pull gate latch designed for easy installation and enhanced security. Compatible with metal, wood, and vinyl fences, it features a key lockable design on both sides, ensuring your outdoor space remains secure. With low maintenance requirements and adjustable capabilities, this latch is the perfect solution for any gate.
| Manufacturer | D&D TECHNOLOGIES |
| Part Number | LLMKDBT |
| Item Weight | 1.9 pounds |
| Product Dimensions | 3.25 x 8.69 x 4.25 inches |
| Item model number | LLMKDBT |
| Is Discontinued By Manufacturer | No |
| Color | Black |
| Material | Vinyl |
| Item Package Quantity | 1 |
| Number of Handles | 2 |
| Batteries Included? | No |
| Batteries Required? | No |
L**A
Great handle lock for vinyl privacy fence
I was skeptical about buying D&D Technologies LLMKDBT LokkLatch Magnetic Dual Sided Push/Pull Handle latch due to some reviews saying poor instructions , doesn't work, some one even said they are a carpenter and they could not get the lock to align/ function. I have never installed a door lock of any kind so judging from some reviews I was immediately disappointed and wanted to find something else. after some research I liked the way this handle looked / operated judging by the demo video. I decided to take the gamble since this requires drilling a level hole through fence post and my posts aren't 100% parallel.I previously had D&D Technologies LLAAB LokkLatch with External Access Kit Gate Latch which is still on until I find something to cover the screw holes or may just leave it on as is and not bother.I always disliked LLAAB LokkLatch because it was so finicky , one day my gate was open and a gust of wind slammed my gate and bent the metal bolt/rod. my options were to buy the same one I had which would have been the easiest thing to do. But since we never liked the whole locking mechanism and the push button side did not work after a few years due to spring sagging we were looking at other options.Based on some good reviews I decided to buy the LLMKDBT LokkLatch from D&D shipped by amazon they only had 1 instock with more coming soon, prime delivery $89.95. I believe this was about $10 more then some other vendors but I did notice some serial/ model numbers were different and I wanted the latest model incase there were some improvements over previous models. also I knew if it didn't function I could easily ship it back for a refund.I watched the demo/install video linked on amazon and read the instructions carefully. fiddled with the lock to get an understanding of how it is supposed to function. the slider plate with the screw was very difficult to slide, after a quick inspection I noticed the plastic slider opposite of screw had a little excess plastic. thankfully I recently ordered MAVAST Silicone Deburring Tool with 21 High-Speed Steel Blades Blue on amazon for a different project and was able to quickly shave off the piece which was preventing the slider to glide. https://www.amazon.com/gp/product/B0875WT5LF/ref=ppx_yo_dt_b_asin_title_o06_s00?ie=UTF8&psc=1I then used ( 90 Degree Right Angle, Positioning Clamp Woodworking Carpenter Tool Aluminium Alloy Square Ruler Angle Holder for Carpenters Household ) https://www.amazon.com/gp/product/B07QCPNSD6/ref=ppx_yo_dt_b_search_asin_title?ie=UTF8&psc=1 to help get a precise line for my drill guide, you can use any right angle ruler/ square. once I had the line i then used the plastic tool included with the kit to drill pilot into #1 hole, #2 is for wood post if I remember correctly. my method was starting with smaller drill and working my way up I used maybe 5-6 different size drill bits until I got to 1/2 diameter. not sure if that was the correct way to drill through vinyl post. thankfully I had new Milwaukee drill bits and and was able to get a clean hole this way. I would not recommend using old / dull drill bits especially into vinyl as you can easily rip out a chunk and then will have to replace post. make sure you use the correct drill bits which work with vinyl/plastic. once I had clean level holes. I did a dry fit followed by inserting rod into handle and using the tool included with kit to mark where I need to cut rod for flush finish to the tool. I made sure to cut rod just a tad longer, because you can always cut more if necessary.and I got it on the first try. once you cut to short it will not work, the kit includes 2 rods incase you miscalculate and ruin the first. there is also a plastic tube which they say its not mandatory but can/will help long term for the rod to function but in order to install it you will need to drill a 16mm hole as opposed to 13mm / 1/2" hole. I did not have 16mm drill bit so I decided not to install it. if the rod will not function in the future due to elements, it will be very easy to unscrew lock handles reinstall new rod and screw back. and im sure it will be pretty easy to buy / call d&d and have them ship you a few replacement rods if you will need them.once rod was cut to size the next step was to screw down the lock. just took a screw driver / with the included screws and manually tightened the handles down on both sides. last part is installing the slider plate, there marks on handle part and slider part that help you get everything aligned. once aligned I tested the locking mechanism played with the key on both sides to make sure I could open/ close from either side and then tighten down the screws on the magnetic plate. works like a charm.@ $89.95 mostly plastic I believe this is over priced, I wish there was some way for them to make an adjustable stainless rod or tips that attach to a rod or something so that rod would have no way of sagging or misfunctioning over time. I understand everyone has differnt size posts but it is 2021 there should be no excuses that a lock like this can't be made with heavy duty parts. and for that one reviewer that is a carpenter and can't get it to work, either it was a lemon or they should consider a new career as I had no issues what so ever installing this latch and it took me about 30min -1 hour from start to finish including reading instructions several times. I installed the lock upside down due to how my gate swings, I was trying to find information if you can install it this way but was not able to find anything regarding that. installed upside done it works like a charm incase someone else is wondering the same thing.All in all I am extremely happy with how quick and easy the install went, I really like this magnetic push / pull lock. I am able to unlock / lock from either side. I only wish I was able to keep one side locked and other unlocked or vice versa. its only been a few days and we love it. will keep you updated over the years to see how it holds up.
J**S
Great Design!
Great gate latch, works well on heavy gates. The latch also forms a stop which prevents breakage. Will see how well it lasts long term, but at this point, seems like it will. Easy to install. Took about 15 minutes to remove the old broken latch and install this one. Was disappointed that it is plastic, but as finished installation, I realized it may be more durable and less likely to break. I only wish they made this model without the keyed cylinders, which I don't need, and probably account for 1/3 to 1/2 the price.
M**S
Too expensive and not reliable.
The lock on the first gate took almost two hours installation. The written instructions and on-line video are almost no assistance at all. It has been on this gate for almost two years and operates okay. The second gate lock installed almost a year later was also difficult to install and will not operate from inside the gate. It will open and close using the outside handle. It will not lock or unlock using the inside key mechanism. It almost always take at least 15 minutes of turning the key both directions to get it locked again from the outside. Today it will not lock at all. We have taken it apart and tried adjusting several times. It is not worth the expense of purchasing this lock.
G**Y
Fantastic latch if you pay attention to detail when you install them.
So I finally got around to installing this latch today on my new gates that I built. I have no idea how durable this product is yet, and I wouldn't exactly call it easy to install unless you have some minor skill and pay close attention to detail.But here's the deal: if you pay close attention to the instructions and make double sure of your dimensions this is a fantastic gate latch. You have to have a minimum clearance of 3/8" between the gates or gate and stationary post, up to 1 1/4". You have to pay extra attention to the location of the hole for the lock shaft push rod. The included guide works if you are careful. Of absolute crucial importance is the length of the lock shaft "bar" or push rod. The included guide gives you the correct length to cut it to, but if it is just a hair too long like mine was after I cut it, then the lock cylinders have too much force on them when all the mounting screws are tightened down, putting too much pressure on that push rod. I initially cut mine about 1/16" too long, and had to take it all apart and file it down to the correct length. Also remember that wood (or vinyl or even aluminum and steel) will slightly compress and change this dimension, making the push rod too long after the screws are tightened. After everything is mounted correctly and the bar is just the right length the latch operates perfectly. I've operated mine a couple dozen times so far today and it's perfect, and the locks work perfectly too.The lock cylinders need a bit of work to get them to operate smoothly...there was a touch of roughness on the FRM plastic the cylinder spins and slides on. After working the key a dozen times it smoothed out.The included screws are garbage for use in wood. They're self tapping sheet metal screws. I went and got some longer heavy duty #10 wood screws. The only location where I resorted to using the included screws was on the inside of the stationary catch "keeper", because the adjustment plate has to slide over the top of the keeper mounting plate screw heads. A #10 pan head wood screw with a thin head should work here though too. The wood screws I was using have hex heads and set a little too proud here. The included screws probably would work fine in aluminium, maybe steel too, but I'm generally not a fan of self tapping sheet metal screws.Make sure to center punch and pilot drill the mounting screw locations. Again, careful attention to detail. If you are a tad off or not square then the screw will pull the latch body slightly out of position as it's tightened down.I suspect it was these aspects of the installation that lead to other poor reviews of this latch....not paying careful attention to the length of the push rod, not understanding the material mounting it too will slightly compress and affect this length, and not being careful with the mounting screw location and squareness.If anyone is wondering, my gates are heavy. They are both are made from 2x6 frames with half lapped joints (glued and through bolted with carriage bolts), over which is tongue and groove cedar planks and trimmed with steel angle irons for rigidity. The stationary gate (cane bolt in concrete) spans 8 feet both 6 foot tall, and the access gate spans 4 feet. The 8 foot gate frame is three 8 ft 2x6 boards across, and three 6ft 2x6 boards vertically, equally spaced for a total of 9 half lapped joints. The 4 foot gate only has two 6 ft 2x6 vertically, and three 4 ft 2x6 horizontally, with 6 half lapped joints. With the tongue and groove cedar, they are solid and offer great privacy for my RV pad on the side yard. I'm going to stain them this weekend.
Trustpilot
1 month ago
1 day ago