📻 Elevate Your Broadcast Game!
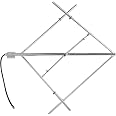
The CP100 350W Outdoor FM Transmitter Antenna is designed for optimal FM broadcasting between 87-108MHz. Featuring a double-crossed circular polarized design, it ensures excellent coverage in urban environments. With a robust aluminum alloy construction and waterproof capabilities, this antenna promises durability and longevity. Its user-friendly installation process and precision tuning features make it an ideal choice for both amateur and professional broadcasters.
J**T
Kicks out a great stereo signal for a long distance.
I’m impressed at the sound quality at and that my signal that barely went 300 yards now goes over two miles with perfect clarity.
J**N
PERFORMS BETTER THAN EXPECTED
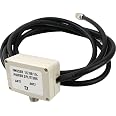
This is an honest, non-solicited, non-compensated review of the FMUSER GP100 FM Transmitter Antenna as sold on amazon. Before purchasing this item, I read reviews for this antenna from users on amazon. But first, some brief info about my FM transmitter. It is a NIORFNIO NIODESKTOP –TB SERIES, 6W/15W unit. It came with a telescoping antenna mounted on a heavy metal base, intended to just sit on a flat surface. I modified this arrangement and mounted it on the back side of my house. The top of the antenna was about 2 feet lower than my roofline. I have several FM radios around the house and garage. I got reasonable reception within my home and the signal was just barely receivable in my car to the end of my block. My transmitter was then set to 97.5 MHz, a clear space in the FM band. I was broadcasting Holiday music in my neighborhood during the 2022 winter season. Sometime in early 2023 another strong transmitter was broadcasting on 97.5 MHz, so I abandoned that frequency. I sought out a different clear frequency, which I thought would be 101.1. (explained in next paragraph). I wasn’t getting the clarity or range, so I decided to purchase this new antenna.Upon arriving at my home, I was surprised that the whole system was delivered in a 3-inch x 3-inch, x 17-inch long cardboard box, and placed in a plastic bag mailer. I unpacked all the items as described in the instruction manual. Incidentally, some (early) reviewers complained that instructions were inadequate, or there were no instructions at all. Not the case with my purchase. The manual was fairly well written, with photographs, some even in color. Not explained in the manual was the purpose of the three 24-inch “rods” that extend out from the center, forming a sort of tripod. I’m no broadcast engineer, but I have to assume that they are part of the electro-mechanical characteristic of the antenna. Also not explained was the reason for selecting and installing the correct “frequency bar”. Again, I’d guess these are some sort of band-pass filters to ensure that only the frequency of your transmitter gets through to the antenna, ensuring a clean broadcast. IMPORTANT TIP: Before completely assembling your antenna, make sure you determine a clear frequency in your neighborhood so that you will select the correct “frequency bar”. Initially I set my transmitter to 101.1 MHz, but later found out that there was already a commercial broadcast there. I had a contractor install my antenna on my roof. Once you install the desired frequency bar, you wouldn’t want to have to disassemble the unit and change the bar to your new frequency. To address one reader’s concern about the sharp edge at the bottom of the mast where the coax exits—to extend the mast to mount the antenna to my chimney, I purchased some 1-inch (ID) PVC and placed it at the end of the supplied mast. It helped to get the antenna higher and allowed the three rods to clear the chimney. I also purchased some tubular foam used to insulate copper water pipes. I wrapped the foam insulation around the coax where it exits the 1-inch PVC.OPERATION: I bumped the frequency up to 101.3 and it made a world of difference. Got in my car and had a strong clear signal all the way to my grocery store. According to Google Maps, the Line-Of-Sight distance is about 7,500 feet, or about 1 ½ miles. This through hilly terrain.
K**S
Works great !
Wasn’t sure if I would need this over the supplied antenna. Glad I did , the system worked and sounded great !
M**E
Works Perfectly
This antenna works exactly as it should. It's rated for transmitters up to 7 watts. There is a little bit of play in the joint, but it still holds it's position.
M**S
Packing in the shipping box should be your only concern
Good: SWR 1:1 at the marked frequency. Wider frequency range once the frequency was set, than expected. We love how our LPFM station audio sounds using this dipole. Assembly without really using the owners manual was straight forward.Poor: Shipping box came with two bracket screws punching holes through the box. Because of this, one of those required screws was lost during shipping. Fortunately I had extra screws leftover from a previous FMUser junk antenna. The reported antenna gain on the sticker (pictured) is typical for a simple dipole when compared to isotropic (all directions at the same time).
M**Z
Envío rápido
De acuerdo a lo descrito, rápido envío
T**S
Two serious problems
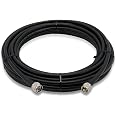
Well, there are a few problems with this product.1, NO INSTRUCTIONS WHATSOEVER (other than a few low-resolution images on the amazon.com web site. It was pretty straightforward to assemble though but might be daunting for someone not already highly technical.2. The tube that covers the PL-259 chassis mount connector at the botom of the antenna was secure with a very low quality screw, made from that crap yellow metal. It was pre-stripped in my case as well, it was a socket head and the socket was chewed up and no metric or sae tool would wor but a miniature pair of vise greps worked and I replaced the screw immediately with quality stainless steel hardware. THIS IS A FATAL PROBLEM as in high wind the tiny cheap yellow metal screw will break off and the antenna will drop right off the rube and you will lose your antenna and damage your coax cable. DO NOT IGNORE THIS it is serious if you don't do something about it. I promise. The screw was also TOO LONG and the tube moves a lot and would only be a matter of time before that cheap yellow sscrew snaps right off.3. Where the coax cable exits the tube at the bottom of the antenna, the cable is at risk of being cut and abraded because the end of the tube (the inner part) is SHARP. In wind and normal situations the cable will be rubbing against the inner diameter of the tube and will eventually damage the cable if you don't put something there to protect the coax cable. I am going to use a CAD program tonight and use a 3D printer to make a plug that I can insert into the bottom of that tube to keep the cable from the sharp edges (with a hole in the center, probably split so it can also "clamp" the cable securely.Summary: I would purchase this again even if those issues above were still lthere (I purchased two so far.) and if you use some thread locker during assembly and tighten things down well I guess this antenna will last a long time. The included coax cable appears to be well made and overall the quality of the materials is acceptable. I know the above stuff sounds serious but it is easily resolved. I am still waiting on my radio gear so I have not actually used this antenna but it is fully assembled and ready. I will repeat this again in case it is glossed over but I really recommend that you use thread locket wherever it can be used as I expect this antenna will be under somewhat increased wind loads.Update: I like this antenna more now than before. I have purchased three so far. One of them broke when the mast broke, and I am keeping one for spare besides the one in use right now. Do not forget to replace the screw on the tube otherwise you are going to be very unhappy someday.
Trustpilot
1 day ago
2 months ago