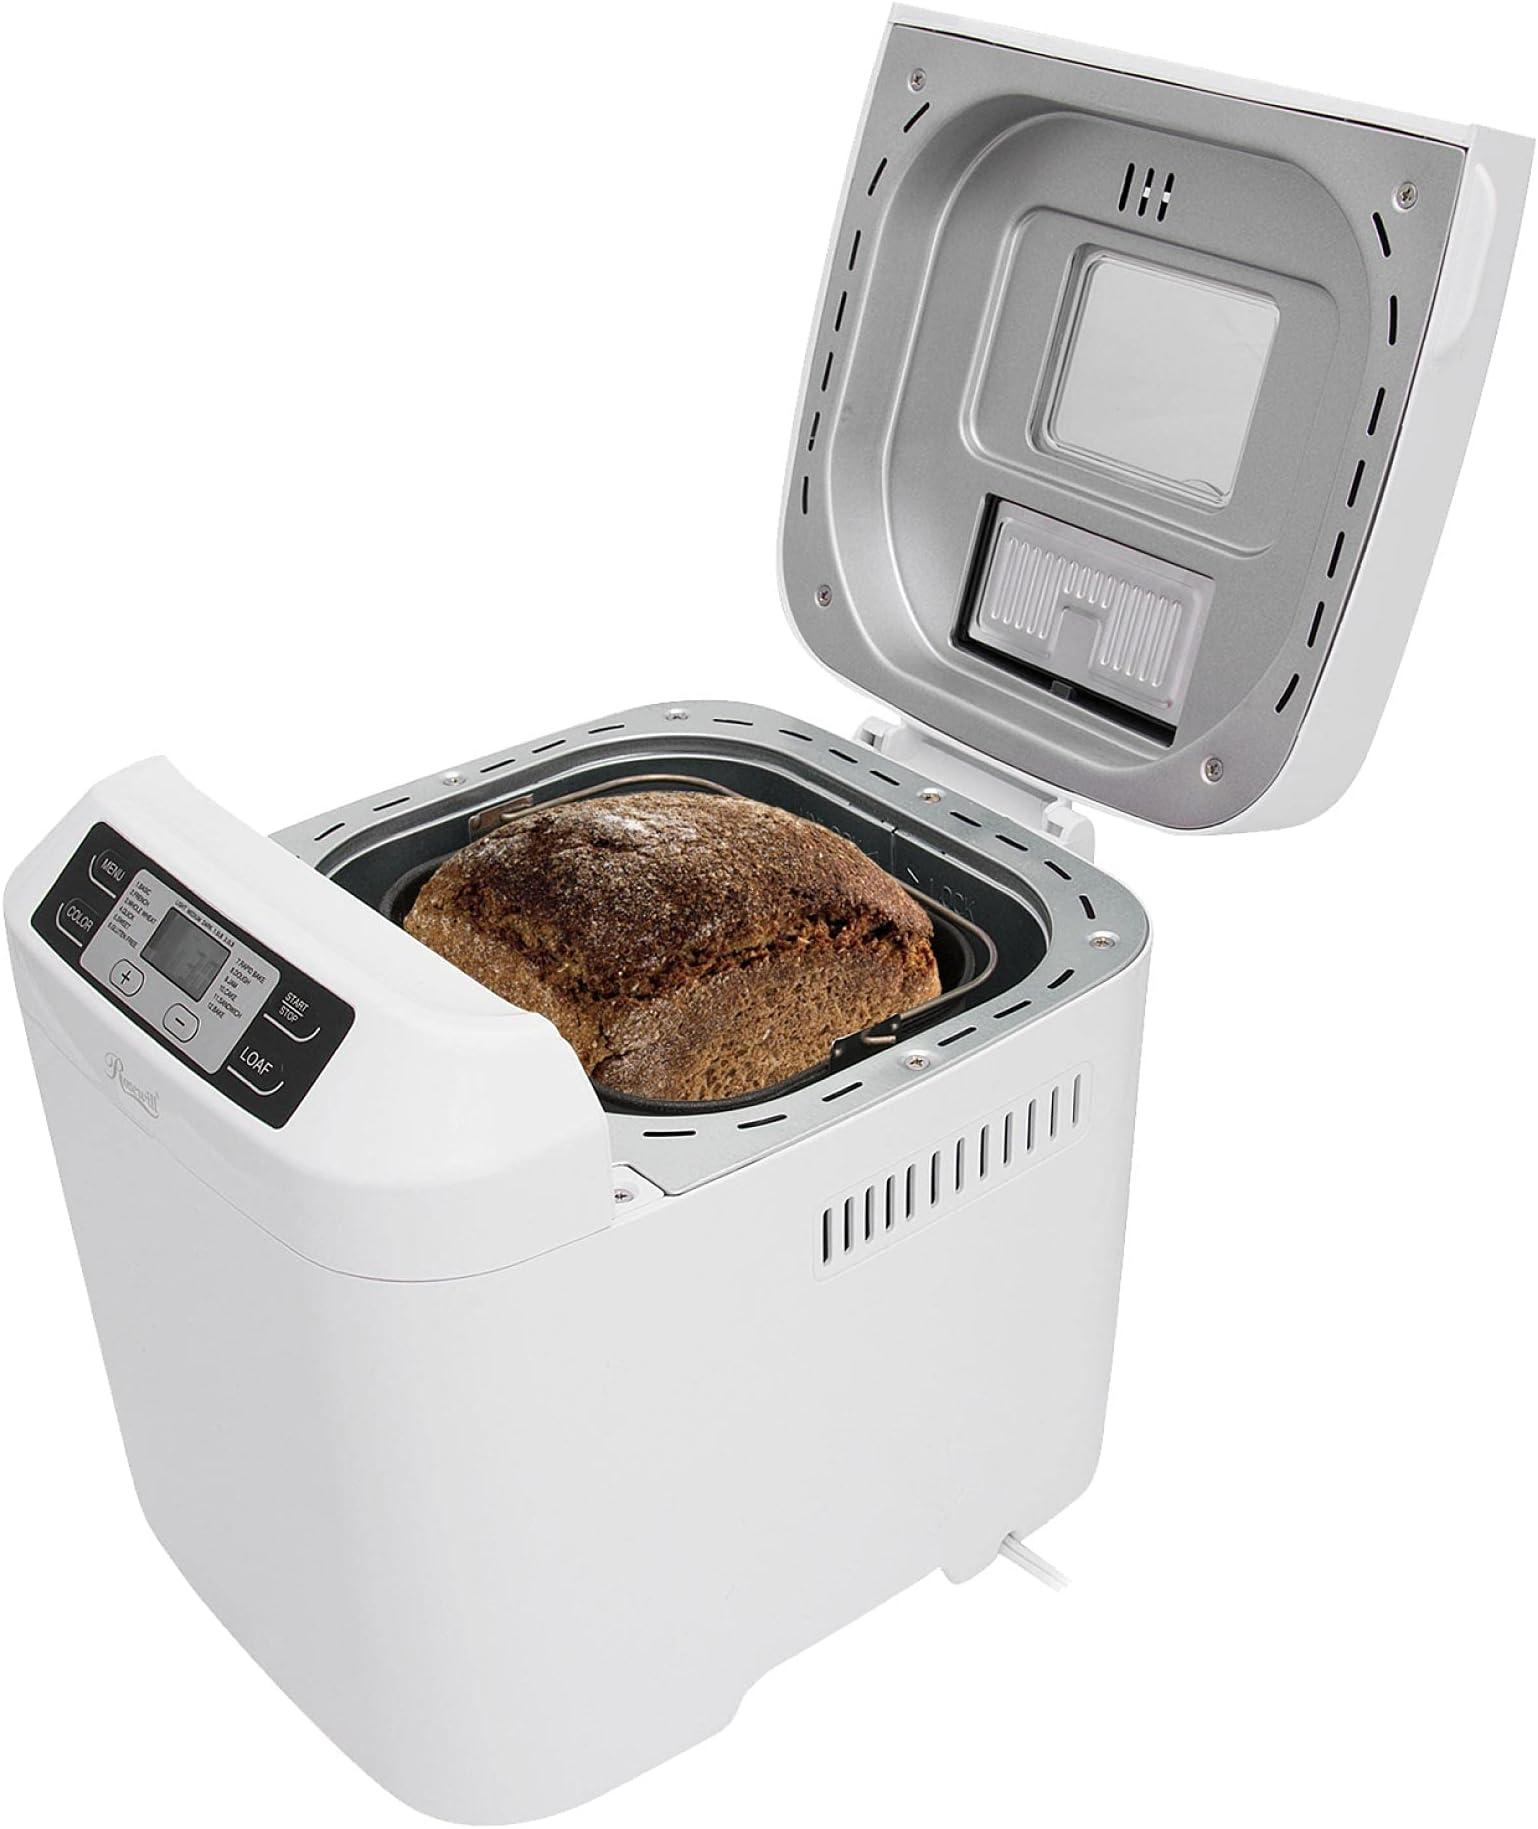
Do you like 'Italian Rolls' or Amoroso rolls but are having a difficult time getting them where you live? Fret no more. With one of these amazing bread machines and a little prep you can have them any time of the day or night, the freshest and tastiest ever!!!! I have to share my discovery as "THE SECRETS OF THE ITALIAN ROLL" are now revealed... First you need to make a starter culture (bread starter) utilizing unbleached organic flour and water-this is the prep part. Get yourself a 64 ounce glass mason jar with a lid and band type lid. These lids come in two parts, an aluminum outer ring which screws around the opening of the jar, and a circle that fits inside it. Ball makes these type. They sell them 12 to a box. Next mix 2 cups organic unbleached flour (weigh it on electronic scale,) and add enough water that is between 105 degrees Fahrenheit and 115 degrees (use a . You can use a food processor or other mixer. Start with 1 1/2 cups of water (I got this figure from the Bob's Red Mill Sourdough starter recipe-they sell excellent flour by the way.) Then slowly keep adding the warm water until you have a pourable mix the consistency of pancake batter-but not too watery. Pour this dough mix in your 64 ounce mason jar and cover it with cheesecloth. (I HIGHLY RECOMMEND GETTING THE BEST QUALITY GRADE ITALIANA MIGLIORE CHEESECLOTH sold on Amazon in lengths of 4.8 square yards. This is unbleached and amazing. After use rinse it briefly under water then you can throw it in the wash with towels or something and reuse it. After the jar is covered with the cloth, (cut it to size with scissors,) place only the ring part of the mason jar lid over it so it can breathe. Now get a saucer or something and place it under the mason jarj ust in case it goes wild reproducing and explodes on the top of the refrigerator as mine did this morning. Don’t worry I reduced the amount of flour so this will not happen, but it still can’t hurt to place a saucer under it. You you can stir it with either a dough whisk (available at breadtopia.com or a large oversized fork.) It will take off quickly and you will see it bubble and foam. It is then ready to make the best, freshest most delectable Italian bread ever. Stir it again just before using. I have two 64 ounce jars of starter I store in my oven unrefrigerated since I use them often-just put a note on your oven-make sure it does'nt get accidentally turned on with bread starter inside if you do this. Use this recipe to make fantastic bread for yourself and I guarantee you will not regret it: Ingredients- 1 Rosewill (or other) Bread Machine – I recommend Rosewill as the pan and paddle are dishwasher safe and there is an automatic dispenser. It also comes with a few handy tools. Note the paddle on this machine is not retractable, also note if you are using 100% whole wheat dough a lot you might want another bread machine as this one works best with a blend of 100% whole wheat and unbleached, or all unbleached flours. Note though I have made some amazing whole grain bread with it including rye. The only time I notice it can improve is when I use 100% whole wheat from Bob’s Red Mill. It is a fantastic bread machine on the whole. I liked it so much I have made it part of my bread system usually running no fewer than two Rosewill bread machines at once. With this Italian bread disappearing (getting eaten) so quickly you will probably end up making several starter cultures (bread starters) and have a few mason jars on hand. Note I am a small size 4 and 5’9” and this bread and all my bread machines do not cause me to gain weight although I listen to my brain and stop eating when I am full. I also make low fat breads and cakes, etc. CAUTION: Please do not get a bread machine unless you are already adept at making low fat foods and feel full easily. Now you are ready for the most amazing bread recipe ever! Italian Bread by Julie Sands Ingredients: 8 ounces Active (bubbly) Unrefrigerated Starter (you can have it in the refrigerator just take it out a day before and stir it to get it ready-add some105 degree to 115 degrees Fahrenheit water if you need to make it the consistency of pancake batter. To keep your starter going if refrigerated once a week or after use add ½ cup organic unbleached flour to it and stir again-Note the amount of flour and water to add I got from Bob’s Red Mill-someone there is the original author of that.) 12 ounces unbleached organic flour (I recommend Bob’s Red Mill) 1 Tablespoon Extra Virgin Olive Oil-I recommend Toscano from Italy available at Costco 1 teaspoon salt 180 milliliters 115 degree Fahrenheit water (use a cooking thermometer to check temperature) OPTIONAL but heartily recommended-grind a vitamin C tablet in a food processor-you will add this powder to your bread-you only need 250 mg, but can use more if that is what you have on hand-I like to add a Vitamin C tablet as it makes the bread rise fast for bread machines, also I make sure mine has Rose Hips and Citrus Bioflavonoids in addition to Vitamin C as it is just that much more fantastic-I use Kirkland Signature Vitamin C 1000 mg with Rose Hips and Citrus Bioflavonoid Complex 500 tablets ITEM #98268 which happens to be gluten free for those using their Rosewill Bread Machine to make gluten free bread-I grind up two tablets in a mini food processor in a few seconds and split the contents between 3 bread pans as we usually make 3 loaves at a time Directions: Add the ingredients to the Rosewill Bread Machine pan in this order: Extra Virgin Olive Oil Water Vitamin C powder Salt 8 ounces of bread starter (using an electronic scale place your bread pan on it, zero it out, then slowly pour the starter in until it reads 8 ounces. Make sure you get a scale you can zero out once an object is placed on it.) 12 ounces organic unbleached flour 1 1/4 teaspoon Active Dry Yeast -Now with your finger make a small well (indention in the dry flour) with your finger. Do not push your finger down too far as you do not want to mix the wet ingredients with the dry in the bread machine. It does that. Now pour 1 1/4 teaspoon of yeast (I recommend Bob's Red Mill Active Dry Yeast, Fleischmann's Active Dry Yeast or Bioreal Organic Yeast available at breadtopia.com) in the indentation. -Place the bread pan in the machine, make sure it is secured. Now if using the Rosewill set it to number 7 (Rapid Bake) and 2 pounds, light crust. Press start. If using another bread machine find its ultra fast setting (the setting where bread is made in under 1 hour and use that, if it lets you choose the color crust choose light. If it doesn’t it will do it automatically. -Now get your butter or mayonnaise out, your fixins' ready and prepare to savor the most incredible tasting bread ever. Enjoy- -MAKE SURE YOU ADD MORE 115 DEGREE WATER AND ABOUT 8 SPOONFULS OF DOUGH TO YOUR JAR OF STARTER AND STIR IT BEFORE RECOVERING IT WITH FRESH CHEESECLOTH AND STORING IT UNTIL NEXT USE-MAKE SURE IT IS FOAMY BEFORE USE-IF NOT ADD SOME MORE DOUGH/AND OR WARM WATER AND STIR AND WAIT A FEW MINUTES YOU CAN USE YOUR BREAD STARTER FOR MAKING ROLLS, PRETZELS, ETC., AS WELL AS OTHER TYPES OF BREAD-JUST TRY THE 8 OZ OF STARTER AND 12 OUNCES OF OTHER FLOUR WHEN TRYING OUT RECIPES AND ADJUST FROM THERE IF NEEDED- (note: if you think I know bread, let me tell you I am an award winning filmmaker, a director, writer and producer who has switched my genre from horror to all happy (no antagonist/no protagonist/no sadness/meanness/g-rated fare. I do this even better than I make bread, I am best at filmmaking-directing/writing and producing, and look forward to making my all happy feature film projects.) NOTE ON BREAD MACHINES: I and my spouse make all our bread using them. There are just two of us and we run 3 machines at once and use a deli slicer (I recommend getting your own Chef's Choice Deli Slicer-I got mine from Costco) to slice it, and a Checkered Chef Checkered Chef Pizza Cutter Sharp Rocker Blade With Cover that is available on Amazon as this easily slices hot bread. Please use Chef's Star High Cut Resistant level 5 protective gloves when using a rocker blade or deli slicer. These gloves are available on Amazon. I have found the best way to store fresh bread in my small kitchen is to use washable 17" cloth bread bags available on the Bob's Red Mill site in their Merchandise section. Get more then you think you need so you can wash them when they get dirty. We use plastic bread bags to freeze bread in, we just double bag it, then freeze. These are available in bulk, 1000 to a carton on Amazon. If you have a small kitchen know you can plug in bread machines in any outlet, you just have to think outside the box. The Rosewills are light and easy to lift and put away after use. I have a small, though the not smallest kitchen and we can run 3 bread machines in it but can only keep one of them out on the counter. The others we put away after use. With two people we average running all three at least twice a week. So you will have to figure out how many you should buy. We started with one, got to know our bread machine and when it was super simple to us we started adding more. Realize that even when making different breads a lot of ingredients are the same so it does not take that much extra time to run multiple machines and there is only one clean up but you have three loaves of bread. We make one loaf of sandwich bread and two loaves of Rapid Bake at once. Knowing all these things will save you a lot of time when you start putting together a bread system of your own. It has taken me almost a year to figure them out. Another timesaving tip is to make bread one day, store it in the oven in the breadpans it was made in, then slice it all the next day on a deli slicer-just remember put a post it note on your oven not to turn it on so you or another does not accidentally turn the oven on with the bread in it MY ADDITIONAL RECOMMENDATIONS FOR OTHER BREAD RECIPES USING THE ROSEWILL BREAD MACHINE: I recommend using 300 ml of water with each loaf if not using a bread starter 1 tablespoon of Extra Virgin olive oil if adding sugar only 1 tablespoon Sugar in the Raw only 1 teaspoon salt no butter I also add a bit of homemade organic soymilk to my sandwich bread UPDATE 4 YEARS LATER: I own 3 different brands of bread machines so far. My spouse and I make all our own breads, rolls, etc., excepting some pretzels and crackers, but we use our bread machines almost daily whether to make pizza dough, naan dough, pasta, sandwich bread, breakfast Amoroso style bread, or a classic sourdough bread bowl for our home made soup. WE RARELY eat at a restaurant or diner or buffet. We eat at home for the most part. After 4 years I can pinpoint some features that are outstanding to the Rosewill. The Breakfast bread setting is phenomenal and it is worthwhile to buy one of these new for that setting alone it is so amazing. It makes a perfect Pepperidge Farm brand style loaf of bread, but you need to use your own recipe, unless you know Pepperidge Farms-I always check the list of ingredients and go from there when making a taste alike. Once again note you have to provide your own recipes as this brands manual does not come with recipes, just guidelines. The Quick bread setting is faster than another brand clocking in at 2 hours and 10 minutes with the same result as my three hour quick bread model. The dispenser is handy and I use this when making most of my add in bread. NOTE: I have NOT gained any weight from making my own bread though I eat very low fat, whole grain, no eggs, etc. Okay now for some things to consider and be aware of so you are not disappointed. In my case I somehow melted my plastic lid hinges on the dispenser by cleaning the machine before it was completely cooled since I have a small kitchen and needed to use the counter for something else. I just place the lids on top and they still work and do not fall off. I noticed some of the coating around the spindle is coming off and once in a while I see some on the bottom of a loaf or spot it in the dough. It is easy to spot and I remove it, but I do think future editions they might improve the coating so this is prevented. The problem might have already been solved on brand new ones as my two Rosewills are four years old at the time of this writing in early 2020. Still all in all a worthwhile bread machine, assuming these are still sold new as I see they are, for those that use/own several bread machines. PLEASE REMEMBER TO KEEP ALL OLD ELECTRONICS YOU HAVE AND DO NOT THROW THEM IN THE TRASH IF SOMETHING BETTER COMES OUT-Julie Sands