


Buy anything from 5,000+ international stores. One checkout price. No surprise fees. Join 2M+ shoppers on Desertcart.
Desertcart purchases this item on your behalf and handles shipping, customs, and support to Argentina.
🚀 Elevate your Explorer’s style and function—step up with confidence!
Snailfly Running Boards are precision-engineered aluminum side steps designed exclusively for 2020-2026 Ford Explorer models. Featuring a no-drill installation process, these boards support up to 350 lbs and include anti-slip surfaces and mud flaps for enhanced safety and protection. Combining rugged durability with a sleek, factory-like appearance, they offer an affordable upgrade that blends seamlessly with your vehicle’s design.


| ASIN | B082XQB2YK |
| Automotive Fit Type | Vehicle Specific Fit |
| Best Sellers Rank | #53,663 in Automotive ( See Top 100 in Automotive ) #88 in Running Boards |
| Brand | Snailfly |
| Brand Name | Snailfly |
| Color | Black |
| Compatible with Vehicle Type | Fit for Ford Explorer 2020+ |
| Customer Reviews | 4.3 out of 5 stars 495 Reviews |
| Exterior Finish | Aluminum |
| Included Components | Running boards with hardware |
| Manufacturer | Snailfly |
| Manufacturer Part Number | SnailflyTXZ02000YC00TB00 |
| Material | Aluminum |
| Material Type | Aluminum |
| Unit Count | 2.0 Count |
| Vehicle Service Type | Fit for Ford Explorer 2020+ |
| Weight Capacity Maximum | 350 Pounds |
| Weight Limit | 350 Pounds |
A**R
Great running boards for Explorer
Pretty easy install. The instructions provided were worthless. However, there are plenty of instructions provided by others to make it a simple install. I did not use the mud flaps, as they did not seem to fit all that well. Overall, the quality and fitment of the running boards was great. Looks good and feels sturdy.
G**3
Factory Look and Solid Build
I recently installed these on my 2023 Ford Explorer ST and I am thoroughly impressed with the end result. The Pros: Perfect Fit & Aesthetic: They fit the lines of the ST perfectly. They look so seamless that you’d swear they were a factory option from Ford. Build Quality: These feel very sturdy and well-built. They easily support plenty of weight with no flexing or bowing. Value: Extremely affordable compared to OEM options without sacrificing the "premium" look. The Cons: The Manual: The included instructions are quite vague and poorly written. If you rely solely on the paper guide, you might get frustrated. Installation Tip: Do yourself a favor and search for a tutorial on YouTube instead of struggling with the manual. It took me about 3 hours to finish the job solo. Once I had a visual guide, everything lined up exactly as it should. Overall: Aside from the weak instructions, these are 5-star boards. Highly recommended if you want a rugged, integrated look for your Explorer.
T**X
‘22 Explorer Timberline install w/existing mud guards
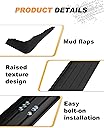
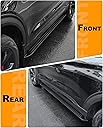
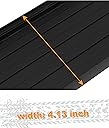
Target vehicle is a ‘22 Explorer Timberline for reference. Summary: these are good looking, surprisingly sturdy units once installed, especially given the price. Time will tell how well the polymer end caps hold up, which I had to lightly modify to work with existing mud guards. Now for the very long, detailed nitty gritty. Packaging: product arrived in a long box, undamaged - amazingly, since there was very little internal support or protective packing inside the box. The running boards were each in a bubble wrap sleeve.The large support brackets were in a loose cardboard box that was too small, so metal ends were protruding. Fortunately, they didn’t rub against the powder coated boards in transit. The rest of the mounting hardware was blister packed. The mud flaps were in a plastic bag. Everything needed parts-wise was included. Installation: NO instructions included. NO product and vehicle specific videos on YouTube or elsewhere. NO support number for the company. Say goodbye to 5 stars Snailfly. Ridiculous. Thank goodness for the helpful info from other reviewers and install videos of similar brands. Plan on spending an hour of research to figure it all out. Once you understand where the brackets go and how the hardware works, actual installation is not that difficult. TIP: if you’re not planning to jack the vehicle up, a small pocket mirror is very useful (mandatory?) for finding bracket mounting locations and determining alignment of the mounting hardware. You will also need a 12mm socket wrench (deep well socket or short extension). The included plastic Phillips head alignment pins are fairly useless. I just used a short screwdriver to help get the holes aligned. After you get all the parts de-packaged and sorted, I recommend you first explore under your Explorer, with a support bracket and pocket mirror in hand. Along the underside edge of the kick panel face, you will find three locations (one @ front of front door, one @ rear of front door, and one about 2/3 down @ rear door) where there is a slight extended tab about 2 1/2” wide, with 3 corresponding holes in the metal edge lip of the floor pan behind it (mirror!). These match the three holes in the mounting bracket. This is where the small flat brackets go (flat edge facing down), sandwiched in between the plastic kick panel and metal lip, such that the holes in the bracket align with the holes in the body lip (the unthreaded center hole in the bracket is for those plastic alignment pins that just get in your way). A few inches inboard at each location, you will also see a pair of corresponding square and circular cut-outs in the floorboard (see pics). This is where the mounting bracket with the long flexible extension tab goes. You bend the tab as needed and insert it in the square hole such that the threaded portion lays flat and centered in the round opening (see pic). Taping the tab extension in place is helpful. TIP: test fit all the bolts into the mounting threads BEFORE you get down on the floor and try to install them; I found some had burs that were easily cleared by test threading them first using a 12mm wrench. After you figure all that out it’s just a matter of installing the support brackets at each location. Patience and beer. Install the mounting bracket using a long bolt into the long tab bracket in the floorpan first, leaving it just loose enough to adjust alignment with the other flat bracket at the lip. There is enough clearance to slide the flat bracket into place after the mounting bracket is in place. In most cases I found there was enough friction between the metal and plastic lips to hold the plate in place long enough to get a short bolt started. Once you have the threads started in all three bolts, begin to alternately tighten the flat bracket bolts to pull the mounting bracket firmly against the lip, as you tighten the floor pan bolt to snug it against the floor pan. Don’t get too crazy on the torque; I suspect the tabs would strip if you use too much muscle. (If I had to guess, I applied about 20 ft/lbs.) Once the three mounting brackets are firmly installed, you can put on the running board, clamping the six captured bolts pre-installed on the underside of the board (2 per bracket; loosen to slide them where needed) into the corresponding slots in the mounting brackets. Open the doors and check fit and alignment before final tightening. Modification for Existing Mud Guards: as many have stated, the included front mud flaps are sketchy, and too small. That didn’t worry me at time of purchase as I had already installed Weathertech flaps front and rear. However, as a result, the integral bracket molded into the front end cap of the running board interfered with my existing mud flap, so the running board stuck out into the rear wheel well. After a trial fit and measurement with the running board front cap removed, I determined the boards were 1” too long. Since I had no need for the front flap bracket, I ran 1” masking tape along the contour of the front face for a guide, and cut the front off with hacksaw; easy 3 minute mod, after yet another half hour of figuring out what to do. Came out great! See pics. Design: The mounting hardware seems a little cheesy and low grade, but it works and the end result is surprisingly sturdy. Boards look fantastic on the vehicle and really complement the rugged look of the Timberline - 5 stars there. The width of the steps is functional but unobtrusive. Once the door is open, they are useable; not so much when closed, so if you were thinking about using these to help get your kayak or Thule off the roof rails, probably not. Yes, they could be an inch or two wider, but then you would risk hitting your shins. My vertically challenged wife appreciates them. I like that they look great and will help keep muck off the doors. Personally I think the width is just right. Overall: if you don’t want to spend $400 or more on other options, these are a pretty good value, despite the shortcomings noted. Recommended for those mechanically inclined. Novices may struggle a little bit. Hope you found this helpful.
K**R
It looks great indeed. The design is simple, minimalistic and just black, the way I want it
Awesome Running board! Running Board installation. Quick Background: I did the installation on my own, just simple DIY. I am expert on information technology and not on automative. I credit other reviewers that uploaded their installation experience as well as the different online videos on somewhat similar installations. From all of these, I open the delivered box to get some idea what I am dealing with. 1. I open the box, laid out and distribute the "short flange nuts", "long flange nuts", "steel long semi-flat straight mending plate", "steel flat mending plate" to each metal Brackets. There is a plastic screw to hold the steel flat mending plate but it's optional. You only use it to help you place the short flange nuts. This will help you in the actual install as it is already organized and properly distributed down to the components that you need and matters. 2. While preparing to install, I ready the running board in the ground both left and right side of the Explorer, I have 3 brackets to each side of them as well as removing all the inserted short and long "Flange Nuts" and Mending plates to make it ready for actual install. 3. You can start in either left or right. I started by visually located the target areas where I put the brackets. They are easily identifiable and that makes this install quite easy enough to follow. 4. I inserted the "steel long semi-flat straight mending plate" in the square hole then I inserted the "steel flat mending plate" between the plastic and steel body, align the 3 holes on it. Position the Bracket and put the short nuts (don't tighten it yet) then put the long nuts after. You can do it in any order you are comfortable with. You have the option to use the plastic screw to hold it as well. I use the Rachet and 1/2 socket to set the nuts or you can just your hands at the moment as you just need to set it in place but don't need to tighten it yet. 5. Do and repeat for all 6 brackets. 6. To install the Running Board, I flip it first to see the bottom and align the attached nuts to the brackets. 2 for each bracket. Flip it back and gently put it in position over the brackets. Set and tighten the 2 nuts for each bracket. 7. To complete the install, I go back to each bracket and tighten all short and long flange nuts using Ratchet and 1/2 socket. 8. I visually check and actually test the sturdiness. You can just adjust as needed but more likely it will fit perfectly. See Pictures to get visual idea. Quality: It pass my initial inspections, looking forward to test it more and/or see how it do against typical wear and tear. Pros: I am happy with how it looks, it looks OEM indeed. The design is simple, minimalistic and just black, the way I want it. It blends so well with our 2021 Ford Explorer XLT Sports Start White. Another plus point for me is that when the door is close, the running board is almost hidden or don't stick out much, however when you open the door, it gives you enough space to step into and safely alight the vehicle. For casual observer it will really look like an original part that came with our unit. Cons: 2 minor issues that does not impact the 5 star I am giving. 1. The metal clip for the Mud Guard were missing from the package, it was not there. 2. The installation guide definitely need an overhaul or redesign. If the seller care about branding, they need to improve it. Have someone create a short installation guide with references to what nut, what brace and where it goes. Have it printed nicely too. Branding is essential to have repeat customer and also attracting new customers. *** Update 10/21/2021 - The seller promptly addressed #1, really appreciate their attention and quickly resolving this.
O**O
Fit well and look great!
They fit my 2025 ST perfectly and look great too however, if you’re going to install them using car ramps it’s going to take you about 5 hours. If you have access to a lift you can probably cut that time in half. While working under the car it’s difficult to get the bolt threads started in cramped quarters. I did not install the mud flaps for appearance purposes. These running boards are well made. Some good engineering to find a way to attach the brackets however, instructions were barely adequate…could have been a lot better with some installation tips. Make sure to use blue lock tight on all of the bolts. The metal they thread into isn’t very thick! PS: I’m an 80 YO Vietnam Veteran!!
T**.
Awesome running boards for Ford Explorer ST.
The running boards look awesome on my 2024 Ford Explorer ST…took just under two hours to install. The only knock is the instructions aren’t good. They should put a QR code in the instructions linked to a YouTube video of the installation. Also, the included self-tapping screws aren’t self-tapping.
J**E
Wanted to like it.
I wanted to give this item 5 stars. Took it out of the box and it looked great. First step was to attach the end caps with a self tapping screw. Except it’s not a self tapping screw. Tried for so long all the ends were scratched and I couldn’t even get the screw in. Tried calling the customer service number and call wouldn’t go through. Put everything back in the box and returned it.
C**G
Figure it out before you start
These look great on the vehicle, they seem to be well made, and they are easy to install - after you figure out what the instructions mean. These are some of the poorest instructions I've ever tried to follow. There are 2 pages of instructions, both headed the same, but they explain different parts of the install. The tell you what to do, but not where. Assemble the rails first. Cut the little rubber seal to allow for the caps. Predrill for the screws that hold the ends on. You can attach the mudflaps now or later. Mount the 6 brackets under the car all the same. I used thread lock. Loosen the 6 bolts on the step and slide it into place. Line up the mudflap to the fender, predrill the holes, and tighten the 3 screws. Push the step against the body and tighten the 6 bolts to the brackets. You need a 12mm socket. Getting some self drilling screws would make it easier.
S**M
Cool runningboards
First of all, amazing customer service. Always responding to any concerns quickly. Got my package quickly. Easy install when I got the hang of it and no needs to lift the truck up. Only thing is that they are a little bit narrow, but dimension are exactly as specified. Would have love another 2-3 inches larger for a big feet in winter boots. Overall, they look very cool, it's what I was looking for to facilitate access for dog and kids.
A**S
Excelente calidad y se ve como si fuera de agencia
Se ajusta perfectamente a los contornos de mi camioneta, las instrucciones son claras se tienen pequeños problemas para instalar los soportes deben mejorar los tornillos de plástico que fijan las placas (termine usando unos remaches de plástico) importante que tengas ayuda de alguien más para acomodar los estribos
A**L
Perfect fit, good quality, easy to install, fast shipping, excellent customer service.
Everything is 5 STARS, from shipping time to customer service: - I received the item in 8 days !! I am in Canada. Be aware that FedEx charges import and taxes fees. - I contacted the seller because I was not aware of the import and taxes fees and they replied right away, they apologized for the confusion and offered me a refund for the fees I paid. EXCELLENT !!! - There were no instructions included in the package, but once again, I contacted the seller and they provided very good installation instructions in English. I am adding the instructions to this review. - I received the product very well packaged and in excellent conditions. - Installation is straight forward, it took me about 1 hour each side. No cuts, no drilling required. As advertised. - The running boards fit like a glove in my car. I like how it looks now. They are discrete and useful, a must if you have kids or old people who find difficult to hop on/off the car. Overall, one of my best customer service experiences ever and very happy with the product.
S**J
Looks great. Very streamlined and minimalistic
Bought these over the winter and finally installed them last week. The process was not that bad but my metal connections on my explorer were bent by mechanics putting the jacks on Them. So I had to bend them back which was difficult. However after they were fixed the process was ok. Only issue I found was the front part of the rail stuck out more then the back. Not sure why this happened but I think the plastic piece in the front was not allowing the rail to sit right against the body of the car. But if u push it hard enough it will get close to parallel. U may have to pull the back part of rail a tiny bit off the body to align it perfectly. Beside that I’m very happy with the rails and make my ST look beefier and more complete. Great complement and functionality
D**L
Fit perfectly
I’m really happy with the Snailfly running boards I installed on my Ford Explorer — they’ve been a fantastic upgrade in both style and function! These boards look great on the vehicle and blend seamlessly with the SUV’s design, giving it a more rugged and refined look without feeling like an aftermarket add-on.
Trustpilot
1 month ago
4 days ago