


๐ Elevate Your 3D Printing Game with Precision and Ease!
The Creality BLTouch V3.1 Auto Bed Leveling Sensor Kit is designed for a variety of Creality 3D printers, ensuring precise bed leveling with a remarkable 0.005mm repeatability. This kit includes everything you need for easy installation and comes with comprehensive support for troubleshooting, making it an essential upgrade for any serious 3D printing enthusiast.
| ASIN | B07WK3T7S7 |
| Brand | Skouphy |
| Brand Name | Skouphy |
| Customer Reviews | 4.1 out of 5 stars 744 Reviews |
| Display Type | LCD or OLED |
| Manufacturer | Skophy |
| Material | Plastic |
| Material Type | Plastic |
| UPC | 749390270968 |
I**I
Exactly what's needed for the perfect prints!
The kit was easy to install, easier than I originally thought. I've got BLTouch v3.1 which is nice! A tip on wiring it through the sock โ you can pull the sock upwards until you feel some resistance (don't overdo it), on my Ender 3 it went up almost a half. It also widens when compressed, so it is easier to put the cables in. Then slide it back down and repeat the operation by sliding the top part down - you'll have it done in like 1 minute. Note: I have Ender 3 with stock control box. The small issue I experienced with that โ when Pin27 board is plugged in into stock Creality v1.1.4 motherboard, it sits too high for the lid to close because the fan hits the cables. I had to make a little extension cord which allowed me to put the Pin27 board to the side of the motherboard so it all fit nicely. I used Marlin 2.0.5.3 which took some time to squeeze it to the printer memory without loosing critical features, but BLTouch with no brainer and caused no issues. Be aware that the USBasp programmer that comes with the kit is not a real USBasp, it's a toy that works only with their own software. Buy original USBasp - it's cheap, reliable, and widely supported โ save yourself a ton of time. On the bright side โ the kit had pretty long programmer cable which is a nice thing to have around. Tuning the printer after the upgrade was a bit of challenge, but an expected one. Once settings are dialed in, the first layer is consistently perfect. Don't forget to manually level your bed after you finish with installation โ the firmware compensates smaller imperfections much better. This only needs to be done when you physically do something with the printer or bed. When printer sits stationary you just keep printing and BLTouch will do the leveling for you.
J**N
Pain to set up, but worth it
Allow me to save you months of tinkering to get these to work. Buy the SKR mini board, find a dude on reddit who already did the firmware with 4x4 mesh bed leveling, and let these bad boys do their thing. I have BLtouch on both my Ender 3's and they're super unreliable and will give a "probing failed" error every other print but for some reason they work beautifully with the SKR board. Now I just slap the SD card in and press go. For best results use the standard Ender 3 textured print surface. The one with the hard back not magnetic. Don't do glass. This prints so flat that even with your z offset perfect, some filaments will peel up on the edges so glass is unreliable. Happy printing.
A**R
CR-10S Z-axis crash / bottom out and fix
I bought this for my traditional (not pro) CR-10s. While Creality V2 is basically the same thing minus the unneeded boot drives, having a V1 with the boot drives made sense to me as I have a friend with an Ender 3 who wants to update his firmware. The install seemed realitively easy but when homing for the first time the Z-axis kept bottoming out and crashing. Everything was hooked up right and I watched review after review. Finally I stumbled across a redit post that he had to flip the direction of the Z-axis wire. I cut my connector and connected it white-to-black and black-to-white and BOOM! Worked fantastic!! Best upgrade I've ever made to my CR-10S!! One thing to note is that I received a BL-touch 3.1 in the package as well as the cordage (no brown wire but instead blue). I don't like it as much as I move my printer quite frequently and, while I can disconnect all the cords from the control box to make moving easier, the BL-touch has to be disconnected at the hot-end which is a tiny connection. I changed mine up using two 3-wire fan connectors to make it the same as the rest of the wires coming out of my control box. Such a better route to go as I don't have to mess with the delicate connector on the BL-touch itself. Overall I had to cut my harness to get it to work for my needs to add those fan connectors but I should not have had to cut and reverse the Z-axis wire as that seems goofy coming from Creality and not working straight out of the box. In case you are troubleshooting your printer and the Z-axis keeps crashing you may want to do the same by changing the wires around for the z-axis connector.
M**E
Little Tricky to Setup, but Not Bad
I was researching the BLTouch for awhile and was intimidated by the setup involved. I have an Ender 3 Pro with the 1.1.5 Silent Board and this works great. I watched videos from Teaching Tech about how to set it up and how to deal with the issues related to firmware and calibration. I started watching Teaching Tech's videos once I got this, but realized that the instructions from Creality were good enough on their own. The English in the instructions is a little rough, but it's good enough to get you through. My advice would be to take your time and make sure you do every step to not miss anything. When I first plugged the ISP USB cord in, I thought a window would pop up on the computer with the progisp.exe file, but I found it on the Download section from the BLTouch page on Creality's site. (https://www.creality3dofficial.com/products/creality-bl-touch) Clicking on "Download" will take you to a Google Drive page, and make sure that you select the right folder for your printer. I accidentally installed CR-10 firmware on my Ender 3 my first time around and realized afterward that I had to take the printer apart to reflash the correct Ender 3 firmware. Once you get the BLTouch sensor connected and the correct firmware flashed, the calibration can be a little tricky. I had to set my Z Offset to -3.6mm, but then tweaked it afterwards to -3.65mm and still might need to tweak it a bit more. It also took me a bit to realize that you need a new G Code file for everything to be calibrated. I was trying it with an old G Code file and the nozzle was way high off the bed. Make sure you edit the G28 to G28 G29 in your script section in your slicing software for the Z Offset to work correctly.
S**E
Incredibly Bad
First the package with the usb adapter came tampered with and the sealed bag torn open. This kit is a not good, I'll start with the obvious, the version of Progisp 1.72 at their website is incomplete and unusable, also there are two versions of the bios and no way to tell which to use, names correspond with nothing regarding the printers or motherboards, it gets worse. The Instructions are awful and confusing but the most ridiculous thing is the adapter that plugs into exp1 has a poorly chosen connector which can be very easily be plugged into the wrong pins, no warnings in the manual. If this is done the screen and/or motherboard will be bricked. This is the second major oversight I've run across with this company, the printers are solid and print great but no one who deals with the customers can think like them or knows what they need. Also tech support is only open during China business hours making any correspondence a long painful process. Hopefully they use this information to improve.
D**T
Great product hampered by a frustrating firmware upgrade
The install instructions that come with the BLTouch are really pretty bad. But there are a number of youtube videos that show how to do the upgrade. So the install of the hardware went fine and took maybe 30 minutes. The necessary firmware upgrade took me at least 6 hours. The included directions do not tell you where to find the firmware upgrade. There's a link posted in the questions section above, but I couldn't get that link to work. There are two websites, and I'm not sure which is the correct one -- creality.com and creality3dofficial.com. After a number of online searches, the majority suggested getting the file from creality.com. So, I downloaded the one for my board -- the V1.1.5. When I went to update the firmware, I kept getting a KERNELBASE.dll error. Online searches suggested a number of possible fixes, from removing chinese characters to needing to unRAR everything (oh yea, I had to get an unRAR app to unpack the software) to running it with Windows 7 emulation to copying all the files into a single directory. I monkeyed around for a long time but never got it to work. I decided to try to see if I couldn't get a different version of the firmware to work for me. I downloaded just about everything I could find. That was 3-4 off the creality.com site and 5-6 off the creality3dofficial site. Then i permuted through them. I finally found a progisp.exe that wouldn't throw the KERNELBASE.dll error. I think that one came from creality3dofficial. Once I got progisp to work, then I had to start testing all the various .hex files to see which one worked with my Ender5pro. The first 3 hex files caused my printer to make a weird screech/click noise when I turned it on. The 4th one ended up working. I have no idea which one it was because I was just going through the process of elimination at that point. Once I did the firmware to flash, the rest of the setup was straightforward. Now with the BLTouch working correctly, I'm quite happy. But I wish Creality could get their act together on the firmware upgrade. My review reflects that -- I think it's 5 star hardware (especially for the cost) and 1 star upgrade. 2.5 stars round up to 3.
E**Y
Flashing firmware is a little tricky, but not too bad
Installation of the product is easy, and it works great (auto bed leveling is like the biggest quality of life improvement for 3d printing imo). However, flashing firmware kinda sucks. They do include a firmware flasher and instructions but to download the firmware there's a google drive link on their official site which has an OLD BROKEN version of the software and then another one on one of their other sites that has a dropbox link that works?? Once you have it downloaded I watched a youtube video and you have to make sure you check a few boxes and change some default values which is weird but whatever. Once you're finished you can flash any firmware, I recommend TH3D or building Marlin yourself. I also had to change the probe x-y offset in my version of Marlin, even with an Ender 3 configuration file example. Overall it took about a day of tinkering to get right but I love it now. Note: I received a V3.1 but had no problems with it on my Ender 3 Pro.
Z**N
great product but not easy to install
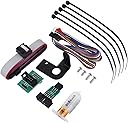
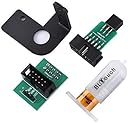
BLtouch is a great product. Came with instructions for 32 bit board that needed to be updated. I emailed the seller my discoveries who in turn will notify the manufacturer.. Creality BLtouch kit works fine, as far as hardware installation, but configuration of BLtouch on 4.2.7 motherboard is grossly inaccurate. You will need an micro SD card to save the settings on 4.2.7 silent motherboard, because there is not much room left on EEPROM once all of the features are enabled. This is so that when you power off your printer you do not lose the settings for z offset. In such case you will need to re-calibrate the Z settings again. If you forget to punch in Z offsets if the printer was powered off you will be printing millimeters above the bed. Verify BLTOUCH operation and correct installation Verify that BLtouch is working correctly by moving the nozzle assembly at least 150 mm above the bed. We will issue auto home command and we need some vertical space so that can turn off the printer power if BLtouch is not stopping downward movement when its probe is touched. Via the printer menu select Prepare -> auto home โ printer will start the auto home process and the nozzle will start moving down and BLtouch will extend (lower) its probe. As the nozzle assembly is moving down gently touch the BLtouch probe, the nozzle should stop, then resume downward movement. Touch the probe again for the second time and the nozzle will stop moving permanently. That means that BLtouch is wired correctly and it will stop when the probe touches the bed. The one thing that made BLtouch installation a little more difficult at first was limited documentation on how to make it work. I am very happy with the BLTouch and the company that supports it. I would highly recommend it for anyone considering a reliable and accurate probe for their printer. Bltouch is simple, Smart, High-precision. BLTouch is an auto leveling sensor for 3D Printers based on open-source. It could work with any kinds of bed materials, such as glass, woods, metals, and so on. the kit came with the proper cables that worked well on Ender 3 pro. I would buy it again, now that I know how to setup the sensor.
Trustpilot
1 month ago
2 weeks ago