


CAMO MARKSMAN Pro, Deck Tool for Edge Fastening Installation, 3/16" Spacing, Fits 5-1/4-5-3/4" Composite Decking (0345001)…
Product ID: 14768454
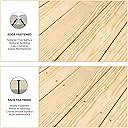
🔩Edge star drive screws
⚙️Fits 5-1/4"–5-3/4" decking
🛠️3/16" precise spacing
Desertcart purchases this item on your behalf and handles shipping, customs, and support to Argentina.
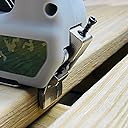
🛠️ Elevate your deck game with invisible strength and precision!
The CAMO MARKSMAN Pro is a stainless steel deck fastening tool designed for edge installation with 3/16" automatic spacing. Compatible with 5-1/4" to 5-3/4" composite decking and various wood types, it uses CAMO edge star drive screws to create a fastener-free, durable, and maintenance-friendly deck surface.


| ASIN | B006NLYWJU |
| Batteries Included? | No |
| Batteries Required? | No |
| Color | Gray |
| Customer Reviews | 4.5 4.5 out of 5 stars (592) |
| Date First Available | April 11, 2011 |
| Head Style | head.style |
| Included Components | Tool |
| Is Discontinued By Manufacturer | No |
| Item Package Quantity | 1 |
| Item Weight | 7.3 ounces |
| Item model number | 345001 |
| Manufacturer | National Nail |
| Material | Stainless Steel |
| Measurement System | Inch |
| Number Of Pieces | 1 |
| Part Number | C345001 |
| Power Source | hand_powered |
| Product Dimensions | 9.8 x 2.8 x 8 inches |
| Shape | shape |
| Size | Pack of 1 |
| Style | Marksman Tool |
| Usage | specific_uses_for_product |
Trustpilot
1 month ago
1 month ago