🔧 Drill Your Way to Fun!
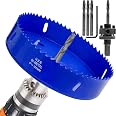
The STARVAST 6 inch Hole Saw is a heavy-duty drilling cutter designed for making perfect holes in cornhole boards and various materials. Made from high-speed steel and featuring a non-binding clean edge design, this tool ensures smooth and efficient cutting. The kit includes a hex shank quick change arbor and pilot drills, making it a comprehensive solution for your home improvement projects.
| Material | High Speed Steel |
| Brand | STARVAST |
| Product Dimensions | 6"L x 1"W |
| Color | Blue |
| Number of Teeth | 12 |
| Style | Improve Efficiency |
| Item Thickness | 30 Millimeters |
| Compatible Material | Wood, Alloy Steel, Plastic, Metal |
| UPC | 663585690501 |
| Manufacturer | STARVAST |
| Part Number | SVUS-HoleSaw-BU--180630fa |
| Item Weight | 2.42 pounds |
| Item model number | SVUS-HoleSaw-BU--180630fa |
| Is Discontinued By Manufacturer | No |
| Size | 6 inch 152 mm |
| Pattern | Non-binding clean edge design |
| Shape | Round |
| Item Package Quantity | 1 |
| Number Of Pieces | 1 |
| Batteries Included? | No |
| Batteries Required? | No |
T**N
Very good, well secured hole saw, but lacking instructions.
This review is for the 6-inch hole saw. It is a nice, heavy-duty hole saw that, used properly with the right drill, should make quick work cutting through wood or softer materials, particularly where it may be exposed and a jigsaw might not give a good enough result. The photo shows holes through two 1/2-inch plywood cornhole boards using the hole saw from one side on each hole and scrap lumber on the back to prevent breakout (see recommendation 2 below).The description says this hole saw is also good for cutting through thin metals, but due to the coarseness of the teeth, I wouldn't recommend it for that or for anything where a very fine edge (requiring a closer tooth spacing) is needed.The arbor locks into place with the hole by using two pins that must be set in the holes in the saw and set with their top groove in the ring of the arbor nut. The nut should be clipped in place using the little retaining ring to keep it from unscrewing from the threaded portion of the arbor shank. Some reviewers mention the saw can come loose when the drill stops but that indicates they either haven't set it up correctly or they got a different version than I did. Unfortunately, that shows the weak point of this hole drill: there aren't any instructions on how to assemble or disassemble it so pay attention before you take the arbor apart to attach it to the hole saw and make sure you don't lose the little retaining clip.With the lack of instructions (resulting in a 4.6* rating overall and a 3* rating on the Ease of Use part), there are several recommendations for those who have little experience with holes saws:1. Drill a good perpendicular pilot hole first, using a drill press jig or hole starter if needed. More experienced users may skip this step by keeping the bit in the arbor and drilling very slowly, keeping the bit perpendicular and the bottom of the hole saw parallel to the surface being cut so it all comes into contact simultaneously. If one side of the saw contacts the cutting surface before the rest, the hole won't be perpendicular through the material and you may be disappointed in the results.2. Cleaner holes with minimal splintering on the bottom in plywood or timber can be obtained in one of two ways. My preferred way is to have a piece of scrap wood clamped securely to the underside of the piece you're drilling (which allows for a continuous drilling operation and the hole being perfectly aligned through the entire hole. The alternate method where clamping isn't possible is to drill half to 3/4 of the way through (so the pilot hole goes all the way through), stop, and switch to the other side to drill the other half of the hole. Intuitively, this second method works well but it runs the risk of a slight misalignment in the holes if the pilot hole has been routed out even just a little.3. Have a firm grip on the drill and go slowly, operating the drill at lower speeds, and always run the drill in the forward (clockwise) direction. A loose grip can result in the hole saw catching and possible injury if the drill is jerked out of the user's hands. Pull it up just a bit periodically, keeping the saw in the groove, to allow some of the dust out of the holes. When through the drilled material, continue operating the drill slowly in the forward direction as you withdraw it. Even with the secure attachment mechanism provided on this set, it's a good idea to never put the drill in reverse on a hole saw since small, thinner saws that aren't well secured may have the arbor back out of the hole saw.4. Finally, as with all tools, be sure to use proper safety precautions and protective equipment.
M**K
This is THE BEST Deal
This is the BEST Deal. I wanted to install CAN lights but l didnt want to spend more on the holesaw than the lights. This was the best deal and it works as expected, PLUS it comes with extra bits. Overall a GREAT buy
M**E
Decent product with confusing assembly and no directions.
Seems sturdy once assembled. Price is right!! The mechanism that holds the saw has drive pins that must be lined up with the drive shaft and the rest of the housing. Manufacturer should have included directions.
O**R
Well built with extra pilot drills!
I needed a 6" (152mm) diameter hole saw to put holes in plastic buckets for hydroponic cups. This worked very well for that though I haven't tried it on other materials.It took a moment to figure out how to mount the blade on the arbor.First used the knurled knob on the arbor to retract the two pins all the way back from the threaded collar. Then, screw the blad on to the arbor... Last, line the holes in the blade with the pins in th earbor and turn the knurled knob to extend the pins into the holes in the blade and secure it.Be sure to tighten the pilot drill with the included allen wrench. Extra pilot drills come with the saw, which is a nice benefit.A variable speed drill works best. Plastic tends to grab the teeth, so either secure your workpiece with clamps, etc. or have someone hold it. I put the bucket lid over two short 2x4's spaced about 4 inches apart. This supported the lid well for cutting and the 2x4's gave enough space that the pilot drill didn't go into the work bench.Start out at slow speed--drill the pilot, then carefully push the saw into the plastic--you can speed it up a little once you're cutting evenly. The cut out circle tends to cling to the inside of the saw... just use a scredriver to push through the hole in the back of the saw and force the circle out... watch out for the sharp teeth on the saw and keep your finger off the drill's trigger!Although this was bought primarily to use on plastic, I may need it on wood, etc. I don't plan to use it on metal.Overall I would highly recommend this saw for wood and plastic... metals remain to be seen.
D**N
Cornhole driller
I make custom cornhole sets for friends & family. In the past I've always had to clean up holes when using a router, as well as it being time consuming. Clearly the hardest, least fun of the project. This is a sturdy hole saw, well capable for this use. It cut 4 perfect holes in less time than I could've even setup my router, much less cut 1 hole. Great product at a decent price, and very glad I got it.Remember you're cutting a big hole, & working with little leverage. Go slow & steady. When you're almost thru the wood flip the board over and finish from the other side. It's so much cleaner, & easier on your wrists & your drill.
L**C
Worked great
Used it for a cornhole board works perfectly
W**N
Worked perfectly
Bought this saw blade for a cornhole board we were making... it was very easy to use and the "hole" came out perfect
J**A
Blue paint colors your project!
Worked fine but the blue paint wore off onto all the woodI had to sand every piece I cutA real pain in the neck!!
Trustpilot
Hace 3 semanas
Hace 1 mes