


🎥 Elevate Your Footage—Stabilize Your Vision!
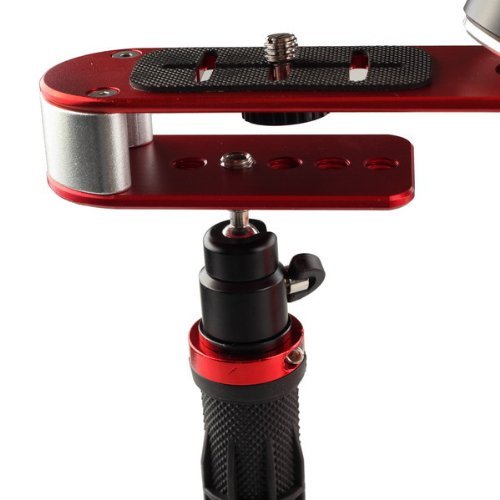
The OFFICIAL ROXANT PRO video camera stabilizer is engineered for professional-grade stabilization, accommodating cameras up to 2.1 lbs. Its innovative design features a personalized no-slip grip and three adjustable counter-weights, ensuring smooth, shake-free shooting for all your video needs.
S**K
Dosen't work for Canon 80D
The product is not able to withstand my Canon 80D weight.
K**.
Great product with an even better support staff!
I bought this unit for myself to use in Hawaii in October (my brother may take it to Vietnam with him in May). So I really wanted to get a stabilizer without paying the god-awful prices of an electronic one b/c I really regret not having one when I went to Japan in 2016. So I wanna use this in Hawaii to get some gorgeous 4k scenery shots with my camera.The unit feels great, but I guess I need to get accustomed to the grip on the handle and the way the gimbals turns. Other than that, it feels really well built and comfortable to hold. I'm using a Lumix LX100 on it, so I'm trying to figure out if I can balance with just the lightest weight or if I need to get an extra washer for a little more weight (doing this weekend). The design itself is nice, simple and feels/looks really well built. I kinda wish I had bought the black one now, but I mean it still does the same thing LOLI've tinkered with it to figure out the balance (even watched those Otis Originals vids on YouTube).Overall, I'm really glad I made this purchase and I've already oiled the gimble up and even got some locktite to make changing the handle out much easier without having to remove that tiny piece all the time. I've also got it set up with a smallrig barrel nut connector like Otis' for an easier way to do slow pans and tilts. I'm really excited to put this to use in the next coming weeks to do some test shots!
E**E
My experience with the Roxant Pro Stablizer
The OFFICIAL ROXANT PRO video camera stabilizer for GoPro, Smartphone, Canon, Nikon - or any camera up to 2.1 lbs. I’m a novice filmmaker and I’ve never written a product review before. I’m doing so now because I’m really impressed with the product and the company as a whole. They really care about customer satisfaction and producing a high-quality product. I started producing videos on a weekly basis on my YouTube channel in April 2018 (search metoowhatnow if you’re interested).QUALITY OF CONSTRUCTION AND FEEL:It’s excellent. Every detail of the stabilizer seems to have been put through good quality control. There’s nothing cheap that’s going to fall off and break. I love the look and feel of the Roxant Pro. It has a comfortable handle and when it’s balanced, it feels like a natural extension of my arm. I don’t find the weight to be a problem. But I’m not shooting for hours at a time, which could make a difference. But if I try to use my Canon 70d, which is my mistake because it’s over the recommended weight of 2.1 pounds, not only does it get a little heavy, but also it’s almost impossible to balance. And it shouldn’t. It’s not supposed to.BALANCING:Balancing the stabilizer involved a lot of pain and frustration. However, this would’ve been reduced if I took time to properly read the instructions. My advice. READ THE INSTRUCTIONS!! Slow down and do NOT assume you can unwrap the product, snap-on your camera and start running around your house producing perfectly stable and fluid results like many videos show on YouTube. Maybe some people are lucky, but I tried to fast track it. Not a good idea. I highly recommend (as does Roxant) watching the Otis Original channel on YouTube. He wastes no time teaching you how to balance the product with pretty much every camera type the Roxant Pro is designed for.Listen to Otis when he says that it only takes a fraction of an adjustment to get to that perfect place of balance. It really is a highly sensitive and accurate product, so the balancing process is naturally going to be sensitive and require accuracy.I have 5 cameras (GoPro 3+, Canon 70D, Nikon D5300, Canon PowerShot SX610 HS and an iPhone6s) I’ve had success with the PowerShot, Nikon, and my iPhone. The GoPro and Canon, not so much. But again, they’re not within the weight limit the product was designed for.I’m still learning how to use it. Like most nubes, and especially when it comes to the world of camera stabilizers, I’m a little frustrated with the learning curve. But the more I understand the technicalities of the product, and it’s proper application, I’m ok with the process and I’m seeing drastic improvements. Did I mention? READ THE INSTRUCTIONS!CONCLUSION:I love product and highly recommend it. The price point is good. I think it stacks on top of every other product in the same category of mechanical stabilizers for the weight ranged it’s designed for. I’m using it regularly, which is a good sign.Stabilizers that don’t have motors are difficult to learn to use. It’s the nature of the beast. But I do think the Roxant is the best way to go for mechanical stabilizers.Just make sure you understand what it’s designed for, it’s capabilities, and limitations before you buy it. But this is just good common shopping sense anyway. It’s more of a challenge when things are technical and have specific applications, plus, having a wide range of similar products doesn’t make it any easier. The OFFICIAL ROXANT PRO video camera stabilizer for GoPro, Smartphone, Canon, Nikon - or any camera up to 2.1 lbs.
B**I
So far so good!
So far it seems really cool. I really like the solid build. Works well with my T4i camera and I’m excited to use it for my video podcast where I will be walking the streets of Montreal with my guests. I have a great videographer on board who was excited that I made this purchase since he had used one before.
D**T
Solid device that did not work for me.
As everybody says, it is constructed of very solid materials, but that quality by itself that does not necessarily make a goodstabilizer. If someone shipped you a big rock in a box you would have to say the construction was solid, but you'd have a heckof a time stabilizing a camera with it.I tried my Roxant stabilizer with two different cameras; a DSLR weighing 1.9 lbs, and an iPhone with a little tripod screw-bushingadapter. Getting it balanced is not that hard; You can either read the printed instructions or watch an instructional video on theweb. I didn't feel the need to do either. It's really not rocket-science... it's just a simple system of pivot, arm, andcounterweights. You just have to move everything around till it balances, then tighten it down.That's where the problems start. It is very hard to tighten the unit properly. The camera sits on top, of course, held in place bya screw with a knurled knob. But that knob is in between two metal beams or bars, and thus very difficult to turn. I could use myfingertips, in which case I couldn't get it tight enough and the camera would flop around uselessly, or I could use my pliers, inwhich case it became nice and tight, but of course cosmetically it soon ruins the appearance of the knob. On the top side of theunit underneath the camera is some black rubber matting to help grip the camera. Unfortunately, after tightening the camera screw,the camera always ended up pointed a little to the left or right, and whenever I grasped the camera and rotated it a little tostraighten it, it dislodged and tore the rubber matting, which quickly ended up destroyed and useless. I'm not saying this would happen on every unit ... perhaps mine was not quite glued down properly, but it's something to watch out for.The other tightening problem is with the main screw that holds the two bottom pieces together. You loosen it and slide the twopieces up or down relative to each other to adjust the length and balance. Then you tighten it. No access problems here; thescrew is easy to grip. Unfortunately it was impossible to tighten it enough, so the bottom piece, with its two or three heavycounterweights always came loose very quickly and started flapping around like a pendulum. It doesn't take a degree in physics tounderstand why ... you are trying to "lock" two pieces of polished unprotected metal together with a single screw that presses onlya small section of the two pieces together. The amount of friction (grip) that can be achieved by this method is not enough towithstand the movements and stresses a stabilizer normally undergoes. For me the solution was to cut and stick a rubber pad onone of the two pieces (I used something called "Carpet Tape" which is a thin white rubber with adhesive on one side). Once thiswas done, the two pieces locked together pretty well. Somewhere else I saw someone mention something about a "rubber washer", and thinking about it in retrospect that would have been the perfect 2-cent solution, and it would not involve cutting or sticking anything onto Roxant's nice polished finish. It may well be that Roxant provided such a washer with their package. and I just didn't see it. In any event, if you lose yours, you can get one at any hardware store. Someone else suggested using a second threaded bolt to lock the lower and upper arms tightly. Personally I don't think that's a good idea because it would prevent rotating the lower arm slightly to the left or right to balance a camera that is left-heavy or right-heavy. (see next paragraph). I'm sure that's why Roxant in their wisdom stayed with just one screw.Much is said about the difficulties of balancing a camera whose tripod mount is off-center. I didn't find this to be a problem. Ifthe camera's center of gravity is substantially left or right of center, the Roxant can compensate to some degree because thecamera mounting platform allows left-right adjustment of the mounting screw. It's a pain, and I had to keep using those pliers, butit can be done. You can also compensate for this by adjusting the bottom counterweight unit so it is not vertical. If the cameraleans right, adjust the bottom unit so the weights are a bit left of center, and vice-versa.USING IT AS A STABILIZERMany others have written that the gimbal is too tight and needs to be oiled. I found the opposite was true: the gimbal floated very freely. As a result it was impossible for me to prevent constant side-to-side swaying of the camera, like a ship in a storm. This problem was enough to make it unusable, for me, regardless of the length and weight adjustment of the counterweights. It's a shame because a little damping of the gimbal would probably fix that. There is a tightening screw for the gimbal but it is very crude and could hardly be called an adjustment. It seems to be just a way to lock it. A proper damping mechanism would probably be more like the old Miller or O'Connor fluid-head tripods (memories of film-school) where the action is damped by the viscosity of the contained fluids. This device just has a little round ball in a little round hole. On the other hand, some people say that to control "sway" you should steady the unit with one hand while holding it with the other, and I've seen videos of that being done, so if you can do it, I'm sure it would make the unit work much better. Unfortunately I'm partially disabled now and need two hands to hold the unit by the handle so I don't have another hand available to do that. This brings me to another point: with a heavy DSLR on top, and some heavy counterweights down below, this thing is HEAVY. Actually too heavy for me, which is why I really couldn't use it as a stabilizer. In fairness this is a problem with all stabilizers of this type, and the only real solution is to wear a stabilizer vest with an attached pivoting support arm. Personally I don't want to have to get suited up and go around looking like Robo-cop just to shoot a little video, so nix that idea. A much better method for me, when I can afford it, is to use an all-electronic brushless gimbal stabilizer. Such devices have no long heavy swinging counterweights, and are much lighter and more sophisticated.Still, for only $60. this seems like good value for a simple mechanical stabilizer. I would have given it 4 stars if it worked for me. Unfortunately my own rather weak arms prevented me from being able to develop the necessary technique. That obviously is not the manufacturer's fault. I had an interesting few hours messing with it before giving up. Unfortunately I can't return it because the pliers have scratched the mounting screws, the black rubber on top is all ripped up, and I've stuck rubber tape all over the bottom arm so it would lock properly.EXTRA NEWS:I have to give high marks to the manufacturers who - after this review appeared - tracked me down, contacted me, and offered an unconditional refund, even though they are not really at fault for anything. It's obvious they want their customers to be happy with this unit.
S**E
Needs better balance instruction.
I gave it 4 stars because it DOES work. Be wary, though, it is NOT easy to balance. The overall instruction is hopelessly generic. 'Find the center of balance on the camera'? How? 'Play with it a bit'? Sure glad THAT one was 'detailed'. I was able to get mine to balance but it was more luck than knowing what I was doing. It would lean forward, so I would move the camera in the mount to compensate, but now there is no side to side groove to correct that, have to move it back again, balance the side to side and now it's leaning forward again.More grooves, Roxant.The weights on the bottom can be moved up and down. Why? Is it so the weight can be lower? Or is it a way of moving it back and forth under the camera? Is the weight supposed to be under the center of balance on the camera? THAT is something that should have been in the instruction.The weights? Should they be MORE than the camera? Less? About the same?I used all 3 weights on mine, they come to about 1.25 Lb. according to my kitchen scale while my camera with lense comes to 1.75 Lb. The weight was nearly all the way down, and yes, it seems to be roughly under the camera's center of balance. For me, the camera had to sit in far left of the center groove, and the bottom weight was swung ever so slightly to the left.So, DON'T try to balance both axis at once. Set the camera dead center (pointed correctly forward the way you plan to use it) and see if which way it leans. Work on front to back using the handle position first. Don't worry if it's not perfect yet, too soon for that. I just put my finger in the center of the 5 handle holes and held it up like that. Does it lean forward? Try the next hole forward. Ditto leaning back. If none of them work reasonably close, IE it still wants to fall over completely, try the next T intersection. There are only 3 side to side grooves (should be at least 5), I ended up using the center groove and the second handle hole from the front. If it STILL won't balance, try removing 1 of the weights and repeat. When it's reasonably close, attach the handle to the hole that works best for you.Now that front back lean is reasonably close, we can start side to side. Don't swing the bottom weights, use the grooves first. This is decision time. Does it lean REALLY far side to side, or only a little? If it's only a few degrees, then go ahead and swing the weight, that will be enough. If was about to fall off your finger, then you want to slide it in the groove. If you use the groove (and if you have to, then it's best to use them) it limits the range of forward back balance. Ditto moving the camera forward and back away from the side to side groove. This is why you want to know early if you have to use the side to side groove, that limit is more harsh than the front back groove.Now you should have side to side balanced. If you have to use the very end of the groove like I did, NOW you can swing the weight on bottom a little bit right or left. Now we start moving the weights up and down to fine tune the front back balance. All the way up AND down and it still leans the same direction? Take off a weight. There are 3, try 2, then 1. You MIGHT have to start all over at this point, but I have my fingers crossed for you. :)Now that you've balanced it and set it down, you just noticed when you picked it up that it's not balanced anymore. That's OK, most likely the weights shifted, just fine tune the up down and side to side swing a little. The more you practice, the easier this will get.Once balanced, the shots look great. Very smooth. If it's rough, but the balance is good, try WD40 in the gimbal.
Trustpilot
Hace 1 día
Hace 2 semanas
