✨ Turn ordinary into extraordinary—glitter that speaks success!
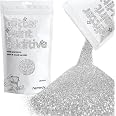
Hemway Glitter Paint Additive is a 100g silver glitter crystal enhancer designed for water-based paints and varnishes. It delivers premium light-reflecting sparkle, is easy to mix and apply on multiple surfaces including walls, wood, and furniture, and offers fade and heat resistance. Vegan and cruelty-free, it’s the perfect choice for professionals seeking long-lasting, dazzling finishes.
Color | Silver |
Brand | Hemway |
Item Weight | 100 Grams |
Number of Pieces | 1 |
Item Form | glitter |
Recommended Uses For Product | exterior, interior |
Manufacturer | Hemway |
Unit Count | 3.5274 Ounce |
Part Number | HW-GPA |
Item Weight | 3.53 ounces |
Product Dimensions | 4.33 x 0.39 x 7.09 inches |
Item model number | HW-GPA |
Is Discontinued By Manufacturer | No |
Size | 3.5 Ounce (Pack of 1) |
Finish | sparkle |
Volume | 2.5 Liters |
Usage | Furniture |
Batteries Included? | No |
Batteries Required? | No |
A**H
1,000% Worth The Time & Money!!!!
The media could not be loaded. I went to Lowes and purchased "Valspar Ultra Interior Paint & Primer" - Semi-Gloss Paint. The Paint Color Sample was 'Sherwin Williams' and Lowes has these within their paint color selections. I chose "ARGOS HGSW7065" as my paint color. It is for a little girl's room and I didn't want to go too dark in the gray family, and even with two coats of paint, it is the perfect shade of gray.I read multiple reviews before hand and really appreciated all the tips. I think the key is to purchase a paint mixing tool to attach to your electric drill. I placed the gallon of paint inside a five gallon bucket in order to avoid spills or a mess. I put '1' coat of paint on the walls WITHOUT the glitter additive, and let it dry thoroughly.Next, I used '1' gallon of paint, and slowly mixed in '2' bags of silver glitter. I then proceeded to fill my paint roller pan and would use up that batch, then use the drill to mix up the paint inside the gallon bucket thoroughly, and then poor up the next batch of paint and so on. This way, my paint didn't thicken up or dry up.As I was painting, I did see some glitter begin to shine through, but when it was thoroughly dry, I actually saw a ton of glitter, so much that I contemplated NOT buffing the walls. BUT, I am glad that we did, because slightly buffing the walls, the glitter immediately came to life. (Buffing the walls does not knock off glitter, it simply removes the paint that is covering the glitter, but does not remove paint from the walls).One of the helpful tips was to purchase a ScotchBrite pad. I purchased some ScotchBrite refill pads and only used one. The buffing process took about 45 minutes and actually was very easy. It sounds overwhelming, but it was honestly surprisingly easy. I was very hesitant to attempt this project, but am very happy that I did so and although it sounds difficult, it really was almost as easy as it is to simply paint a regular wall. The glitter is a fine consistency and although I used '2' bags to my '1' gallon of paint, it is not overwhelming or too much whatsoever.I tried to take video and pictures of the room at nighttime, and they did not do justice whatsoever. However, the videos in previous reviews are a great example of the results. I would 1,000% recommend this product and project to friends and family and I would hands down do this again in the future. I am glad that I read multiple reviews and did not give in to thinking that this would be too difficult of a project.Update: See the attached video, but this absolutely does NOT do it justice. I LOVE it!UPDATE: September 2024Back at it again 8 Months later! I’m still in LOVE!!! I painted a second room using the same paint and the same silver glitter and this time I added 2 1/2 packs of silver glitter to 1 gallon of paint and did it exactly the same technique as I did in January. When I finished, the glitter was coming through so well that I actually contemplated not even buffing the walls. I will continue to recommend this product and I plan on doing a third room in the next month. It truly ROCKS!!!! Even though I tried to take pictures and take videos during the day or night, it just truly does not do justice to how awesome it shows up! I had to take down the original video to add an updated one so I hope this is helpful bc Amazon allows one video only.
A**.
ALL THE GLITTER!!!
The media could not be loaded. I LOVE glitter. I especially love holo glitter. I decided to replace my bedroom door with a custom painted glitter door, and boy was it the best decision I ever made! This was a great quality holo glitter. I mixed it into my paint (not very evenly, but it’s not something I’d done before), and after the final coat dried I came back with the non abrasive pad (may have been processed separately, but it was made by the same company), and the results were stunning. Instant serotonin!I need more projects to paint so I have an excuse to buy more of this!
C**C
Astonishing!!!
5 stars isn't even enough. This is the most beautiful glitter I've ever used! Awe-inspiring. Blinding (literally, husband had to shield his eyes at first glance). Pictures don't do justice, not even close. The video is best I could get for a visual. I applied polyurethane over black satin paint, then sprinkled the glitter (haven't sealed yet). Its amazing. I'm almost speechless. No smell. Very fine texture. Heavy duty, reliable seal on bag. I plan to use this for my walls as well. I literally want to use this glitter everywhere.
R**.
imperfect but fun
Used several of these, learned a few things....- I would NEVER use the heaviery duty, chunky glitter like the moon and stars again; it clumps up and is very difficult to distribute- micro glitter is extremely subtle, but fun; use lots. use lighter or similar colors to your paint; darker colors end up looking a little like dirty spots in some lights- the buffing pads are not really necessary, fine sandpaper will accomplish the same thing.
****
Very sparkly
This product is very pretty. Lots of glitter
R**Z
Sparkling ceiling
I used them on the ceiling and it looks fabulous
T**B
Not a great value
You need a lot of glitter to make an impact on the wall.
G**S
Stay away from the shapes stick with the basic glitter
So I have 2 opinions because I purchased 2 different types of the glitter. The basic glitter (mother of pearl) worked so well. We used the same glitter in 2 different colors and it’s better in the lighter color but still noticeable in the darker one. Do not skip the buffing step! That makes all the difference. We used a buffing pad attached to our drill and it made the world of difference. Now, we also got the star and moon glitter. That one is horrible. It clumps together, it doesn’t spread evenly. It doesn’t matter if you mix it in the paint tray or the gallon it’s horrible. I was very disappointed with that product and will not buy it again.
Trustpilot
Hace 2 semanas
Hace 1 día