Elevate Your Outdoor Experience! 🌟
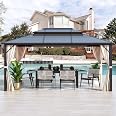
The YOLENY 10'x13' Hardtop Gazebo is a premium outdoor structure featuring a double-layer polycarbonate roof for UV protection and ventilation. With a spacious design that accommodates up to 8 people, a sturdy aluminum frame, and included privacy curtains, this gazebo is perfect for any outdoor gathering or relaxation space. Installation is straightforward, making it an ideal addition to your garden, patio, or lawn.

O**N
Beautiful Pergola
Hello, I wasn’t sure how to start this review I’ll start with shipping was not very good because it came in multiple shipments and at first I wasn’t sure how many boxes I should be getting, two of my boxes went all the way to New York and I live in Vegas shipment started in California🧐 Once we put everything together, hoping I had all the pieces it looks beautiful highly recommend even though boxes decide totravel 🚚I love it❤️.
D**A
Good looking, sturdy and holds up well to strong winds and weather.
I purchased this gazebo back in 2021 for my back yard and couldn't be happier. It took me a few days to assemble it. Did mostly by myself but had help mounting the roof framing. I am very happy with this purchase. I installed a fan and lighting making it a great place for family gatherings. It still looks new. It is good quality and would easily purchase this brand again if I need to.
O**E
YOLENY Gazebo Assembly
Day 1. 12x20 model but I assume will work for all. I received 6 of 7 boxes. Some boxes over 100 pounds, you might need help to move. Ask manufacturer which had directions...was told 2. They say get all boxes before starting, but inventory list had last box with all roof panels, so I knew I could start. Set yourself up for success. Get a worktable and sawhorses. I padded mine with the padding from the boxes. Benches could work also...trick is to do most of the work waist high to start. Spent two hours sorting all members and inspecting for damage. I found 3 roof members with damage which would be seen so I have requested replacements. This obviously will have me at a standstill with the roof framing. At first glance some parts look bent (See Photo). This is intentional as these are the screen and curtain tracks and this keeps the hooks from sliding out. More success pointers. Get a 5/32" Allen head wrench/tip for your cordless drill, you will not want to put this together with the little Allen wrench they provide. If you have used it for complete assembly...God Bless You. Also, a cheapie canvas nail pouch to have screws with you at all times vs back and forth to your worktable. Sort all pieces, CAUTION, if there are say 2 of the C1 pieces, only one is labeled C1. They are bundled together, so once you unwrap, keep them together. Also break out all the hardware/screws and Ziplock bag them with their respective labels. When you lay out parts, group by letters, makes it easier to find as you assembly. Also, as you garb parts...remember only one is labeled, so when I needed a C1, I took the C1 that wasn't labeled. This way, if you stop or didn't need the other C1 for a few steps, you don't have a part laying around without a number on it. Ready to begin after lunch and of course I waited until the hottest part of the day. 1st picture is ready to get rolling. I was able to get all the legs up and all the horizontal pieces together on my own. This included the tracks, screen hooks, gutter parts and column supports. The mid columns are in temporary as you need the roof up to complete the install. As I'm building on my deck, I ran temp screws thru the base plates to hold vertical things in place as I assembled. I did all this myself with the help of a 6- and 4-foot ladder. A body to help hold the corners together as you set the horizontals would be helpful. 4 hours later I'm cleaned up and tools put away, boxes all cut up and in the recycle bin. Alot of complaints about the gutters leaking. Where the horizontals meet there is a gap or rather the butt joint. Once assembled and outside trim installed, I'm going to caulk this butt joint with clear silicon caulk to hopefully avoid the mid span drips people have shown. I also had two pieces that were not drilled with holes or not drilled correctly. I have a set of drill bits, so I didn't want to wait for new parts, so I just drill them myself. I have a Dewalt cordless drill/nut driver and set the clutch at 10. This should keep you from over tighten bolts. Also, I left a lot of bolts loose to aid in assembly, then went back thru and tighten up any that didn't need to stay loose for follow on steps. Successful Day 1. Last picture is what's done and cleaned up. I have a construction background and have assembled a lot of box furniture in my 60 years. So far only had to take off and move one piece. Again...spend the time to get organized ahead of time and get some proper tools to make your life so much easier. 5/32" Allen tip, 10 mm wrench/socket, cordless drill, drill bits, if needed, a drift punch (awl) to help align holes, couple or benches/sawhorses and a small worktable and a cooler with some appropriate beverages, maybe a cigar. More later and will update "Stars" when completed. So far, the manufacturer has been very responsive to my questions/concerns.
J**R
Assembly
Well let me tell you a little about what I did and maybe help someone else out. First I read a lot of the reviews and the things they said and did to assemble this gazebo especially the roof panels. I wasn’t sure what some people were talking about until I started the panels then oh yeah I found out. First the frame was definitely a breeze to put together. I mounted my gazebo on my deck over top of my garage so I wanted it to be able to withstand the wind and storms so I pulled up some deck boards and put in a few 2x6 in between my existing ones where the holes are on the mounting bracket on the bottom of the four posts and drove 6 inch lag screws into the new 2x6s then I thought the small screws that hold the posts on to the mounts weren’t enough to hold it so before I screwed those in I got a tube of loctite PL Max premium and put a nice thick bead on top of the mounting bracket and slid the post into the loctite then put my screws in. Just for extra support. Now the panels. Yes the clips they provide blow!! I saw one guy used two sided tape. Great idea. Those clips go on the angle of the panels then into the corner track on the roof. If you don’t use something to hold them in place you will definitely need therapy during this process. I’ll tell you what I used on the clips. JB Weld Super weld UV light activated glue. I put glue on panel where the clip goes on then when I got the clip on I ran a bead of that glue along the two parts of the clip that clip onto the panel then turned glue pen around and used the UV light on the JB weld to cure it in seconds. That stuff is strong!! Those clips will not move when installing the panels into the corner tracks. The clips are no doubt a design flaw and they could’ve done something better. It looks like they are used to channel rain water but if you don’t use something to hold them in place it will drive you nuts. The guy with the two sided tape comment prevented my insanity before I even started the panels. You will need two people for sure and make sure you get those clips the whole way in the corner tracks or the holes will not line up. Now other than that I do think it is a beautiful gazebo. I got the 12x14 that fit perfectly on my deck. It’s worth the money in my opinion. It took me longer to set it up since I worked during the day then come home and worked a little on it. Next day after finished it rained pretty hard. No leaks. Bonus!! Well hopefully my review helped out on assembly. I would read other reviews and get ideas for the panels. That was a huge help before I even started them.
A**R
Poor Quality and Customer Service
DON'T BUY FROM THIS COMPANY!! We bought this Gazebo and so far love it but one leg was bent in the original shipment and asked for a replacement leg one item A which they sent after a month of back and forth and they sent us a used leg with dirt and dents after 3 months that was obviously from another return. On top of that there were tons of small dings in parts on the original shipment but we didn't even ask for those parts just the one with the most damage. The box was fine with no damage so not sure why all the dings. Will never buy from this company again. Poor customer service just wrong. I will say the Gazebo is nice and will hopefully withstand the wind as it's definitely not as sturdy as our old one. Reason for new one was it had a roof and old one didn't. Good luck if you decide to purchase from these guys.
Trustpilot
Hace 2 días
Hace 1 día