Desert Online General Trading LLC
Dubai, United Arab Emirates
Desert Online General Trading LLC
Dubai, United Arab Emirates


🌞 Power Up Your Adventures with Ease!
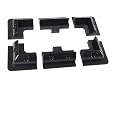
The Renogy Corner Bracket Solar Panel Roof Drill-Free Mount is a versatile and eco-friendly solution for mounting solar panels on RVs and boats. Made from durable, UV-resistant ABS plastic, it ensures a secure fit without the need for drilling, making installation a breeze. Compatible with all Renogy solar modules, this bracket is designed for long-lasting performance and sustainability.
| Manufacturer | Renogy |
| Item model number | Solar Panel Roof |
| Product Dimensions | 17.78 x 11.68 x 5.84 cm; 204.12 g |
| ASIN | B01LWASUU1 |
P**X
abordable
tres satisfait
A**O
SIN PERFORACIONES EN EL TECHO
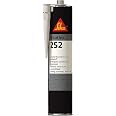
Piezas de excelente calidad y buena construcción, ideales si no quieres hacer tantas perforaciones en el techo o no tienes rieles de agencia para la fijación, las piezas las tuve que modificar un poco para que ajustaran en las ondulaciones que tiene el techo y para su fijación utilice Sikaflex 221; las únicas perforaciones que tuve que hacer son las de ingreso de los cables al interior de la camioneta
D**.
Cool product
Solid/well thought-out product. A little large on account of the needed footprint. The footprint surface and the roof are your adhesive surfaces so, you need it. Or, punch holes through the roof and use screws.. I like them but if you are doing a closely positioned array, maybe their width could be an issue.
B**N
works fine
I didn't know but solar panels come with 2 wires, a live and neural which are separate so this is ideal.Stuck it down same time as panel brackets. No problems at all.
D**.
Surface prep is key
I did a lot of research and this product gives strength to the claim that you can do a no holes solar panel installation.I'm happy with the product it is a strong and well built. Looks like it had a good amount of surface area for the adhesive to use. I will add that they are hollow and it would be a better grip if it wasn't but...Instructions seemed a little off...So in my research I found that 3m vhb tape was the 1# go to for drill free installation.So I got some 3m vhb tape 4950, sikaflex and eterna bond tape to hold it. Also de natured alc. And sand paper or surface prep.NOTE. The surface prep is key you must have a good clean surface for a good bond.If I could do it over again I would have done better surface prep.My first misake was screwing the legs to the panel befor it was on the roof (im glad I didn't vhb or sikaflex the legs to the panel.) My roof had a slight pitch so I had to take off a few legs and re screw some so all the legs were flush to the roof for maximum bondage.I put the legs on the panels on the roofI put vhb tape on the bottom of all the legs.Clean roof well let dry, mark corners, peel vhb tape, set, press and seal with sikaflex. Let it dry and cure then I added some eternabond tape as an extra precaution that stuff is strong.Also to note had my panels on the feet bracket mount when I did the installation so I didn't get to seal the back of the legs. I'm going to just use a spray sealant like flex seal on that inside area.
Trustpilot
Hace 4 días
Hace 2 semanas