Desert Online General Trading LLC
Dubai, United Arab Emirates
Desert Online General Trading LLC
Dubai, United Arab Emirates


🔗 Connect your ambiance flawlessly — because your space deserves seamless glow-ups!
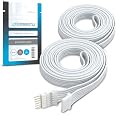
The Litcessory 6-Pin to Cut-End Connector (4 Pack) is a precision-engineered accessory designed exclusively for Philips Hue Solo and V4 lightstrips. Featuring a micro 6-pin V4 connector, UL-listed safety, and support for up to 33ft of continuous lighting without signal loss, it enables professional-grade, flexible installations with easy male/female pin conversion. Perfect for millennials seeking sleek, customizable smart lighting solutions that blend effortlessly into modern interiors.


| Color | White (Micro 6-pin V4 / Solo Lightstrip) |
| Brand | Litcessory |
| Indoor/Outdoor Usage | Indoor |
| Light Source Type | LED |
| Power Source | DC Power Supply |
| Light Color | White |
| Theme | Indoor |
| Style | Modern |
| Controller Type | bluetooth |
| Number of Light Sources | 4 |
| Item Weight | 0.02 Kilograms |
| Number of Items | 4 |
| Water Resistance Level | Not Water Resistant |
| UPC | 850020654307 |
| Manufacturer | Litcessory (Philips Compatible) |
| Part Number | HUE-6pToCut-W04A |
| Item Weight | 0.634 ounces |
| Package Dimensions | 15.07 x 12.68 x 0.63 inches |
| Item model number | HUE-6pToCut-W04A |
| Size | 4 Pack |
| Item Package Quantity | 1 |
| Batteries Included? | No |
| Batteries Required? | No |
A**B
Good quality
Worked like a charm. Great product .
U**I
Easy to install if you take care with the cut
Took less than 5 minutes to install the cut end adapter onto the Hue lightstrip and get it working.I think you can avoid an unreliable connection by making sure the raised part of the adapter connections are aligned properly with the lightstrip contacts. I did it by cutting the lightstrip to the left of the scissors line, as shown in the photo.I also left the backing tape on the lightstrip to increase the contact pressure when the adapter is clamped down.There should be no need to bend any pins or tweak the cable.
C**S
Perfect accessory for your Philips Hue Lightstrip
I needed a way to attach my Philips Hue Lightstrip v4 to the back of an IKEA pegboard. I had to cut the strips and then connect them using these clips and everything worked perfectly.
B**E
Splicing troubleshooting nightmare, too late for refund
These products do not work when trying to splice Hue light strips, lots of troubleshooting and eventually just bought another light strip. Waste of money trying to save 20 bux by splicing!
O**T
Works as advertised
Simple to use and is sturdy and well made. The pins can be removed to allow it be used as a female end which is very helpful and increases the flexibility in how/where you use it. It's bit expensive though.
A**K
They Work Great IF Done Properly
Litcessory only has instructions/tutorials for the V3, but nothing for the V4. With the V3 you have to remove part of the plastic and use a special tool to bend the metal pins on the connector before inserting it. If you try to do this on the V4 connector, the connection will be loose and may not work. I unfortunately wasted a 2' section of a hue strip because of this. Turns out with the V4 the process is very simple, all you do is cut the strip on the cut line. Do not remove any of the plastic. The cut strip inserts snugly into the connector and holds well once closed.I would give this product 5 stars if there were instructions and I hadn't wasted a portion of the hue strip trying to figure it out. The process is so much simpler with the V4, Litcessory why don't you have any instructions for the V4??
B**Y
Worked with my WiZ lights after the 1 modification
I installed some WiZ lights along the top of my upper cabinets. With two sets of cabinets, I chose to use the Litcessory RJ45 to 6-pin with the cut-end to cut-end, and 6-pin to cut-end connectors. The end result was amazing. The light strip was custom cut to length and the RJ45 connected the two sets of cabinets. My only issue was that I had to trim back some of the rubber on the light strip to allow the connectors to work correctly. This requires someone to very carefully handle a utility knife or razor. Take your time and be careful to make sure everything is done correctly.Pros:- Custom look- Great fitCons:- Requires cutting away additional rubber on the top of the light strip which can be a bit trickyWould I recommend it to a friend? Yes
J**R
simple connections for Philips Hue lightstrip
After watching complicated ways to install under cabinet lighting using Philips Hue Lightstrip that involved ethernet cable and soldering, I wanted a simple method that would not be so challenging. These parts worked perfectly, no problem at all, with my v4 Lightstrip (Bluetooth). Everything installed without a hitch first time.there is polarity to the Lightstrip system (B-->A) so my advice is to plan the connections, cut strips to length and connect them with the various connectors end-to-end for the whole system to any wall plug (where you can get at everything easily and check it). Confirm that the plan and all the parts work. If everything works well, then run the wires through the various holes knowing that it all works.
Trustpilot
Hace 3 semanas
Hace 1 día