We remain fully operational. Our teams are working around the clock to ensure your deliveries continue safely.

Descargar la aplicación


Servicios al cliente
Sobre nosotros
Copyright © 2025 Desertcart Holdings Limited
Descargar la aplicación


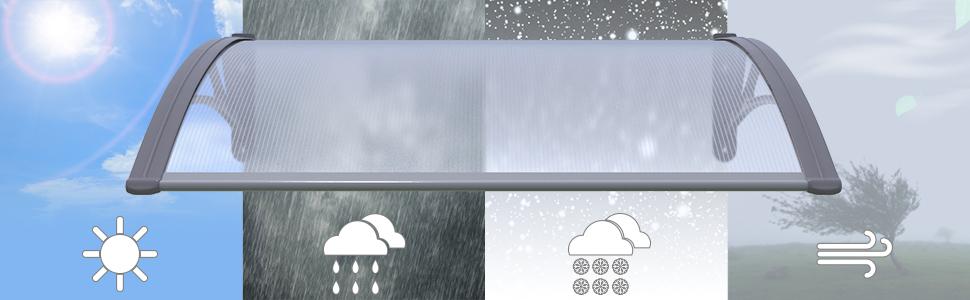
🏡 Elevate your doorstep style with weatherproof confidence!
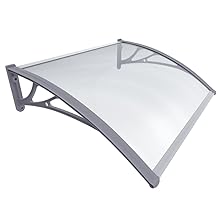
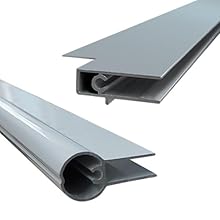
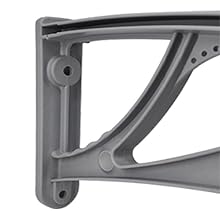
The VOUNOT Door Canopy (120x80cm) combines a 6mm thick polycarbonate sheet with a rust-resistant aluminum frame and ABS supports to deliver durable, all-weather protection. Designed for easy installation with included hardware, it shelters entrances from rain, snow, sun, and wind while adding a sleek, modern aesthetic to your home exterior.


| ASIN | B08R8JWGBQ |
| Best Sellers Rank | 79,520 in Home & Kitchen ( See Top 100 in Home & Kitchen ) 8 in Window Awnings & Canopies |
| Brand Name | VOUNOT |
| Colour | Grey |
| Customer Reviews | 4.4 4.4 out of 5 stars (5,148) |
| Fabric Type | Polyester |
| Is Assembly Required? | Yes |
| Item Dimensions D x W x H | 80D x 120W x 23H centimetres |
| Item Type Name | Door Canopy |
| Item Weight | 2.6 Kilograms |
| Manufacturer | VOUNOT |
| Material Type | Acrylonitrile Butadiene Styrene, Aluminium, Plastic, Polycarbonate |
| Operation Mode | Manual |
| Pattern | Solid |
| Projection Distance | 80 Centimeters |
| Size | 120x80 cm |
| Style Name | classic |
| Unit Count | 1.0 Count |
I**H
A good easy to install, fiddly to assemble, canopy great when fitted
This canopy is good value despite being all plastic construction the support frame is very rigid and light. Assembly is easy but here is the only problem I found especially if you don`t have an assistant to help you. I put up the centre support and assembled each of the end ones onto the perspex roof and secured them using the supplied screws in the ends, the plan was then to slide eachg side onto the already mounted centre support and secure in the holes I had already drilled, this was when the problem began. I bent the roofing material into the support but everytime I went to move the outer end it would pop back out again and again before I could secure the first bolt, so I took down the centre support assembled the whole canopy on the ground and drilled in 4 stainless steel self tapping screws (see photos) through the centre support to joint the two half together. After doing this the whole canopy was one piece and fairly strong, but a little bendy. I put the whole thing back up using the centre support first then each end in turn it was very easy once the canopy was in one and wasn`t constantly popping apart. Also the additional two screws I think will give added procetion to the joint in even the strongest of winds. The anchor bolts that come with it are sturdy but I was fixing into a timber structure so opted for coach bolts instead but the supplied fixings look like quality anchor bolts. As for strength well winter is coming and so will the winds I shall have to see how it fairs, that being said I think it will stand a pounding by strong winds - will let you know next summer. All in all for the price a sturdy, well made peice of kit. It is December now and we have had some 70mph plus gale force winds and the canopy has with stood them no problem at all.
M**R
Decent canopy, buy better bolts
Decent canopy for the price. Could be assembled and fitted by one person if needed, however, using the bolts supplied is a fast track to frustration. I'm experienced in DIY but don't consider the fixing bolts to be fit for purpose. Do yourself a favour and buy decent shield anchor bolts and you'll be fine. Fitted two canopies to provide a bike shelter down the side of the house.
D**W
Easy to fit, cut to size, solid and a great price
Having bought this without the forethought of “will this actually fit between my annoyingly placed drainpipes?”, I discovered pretty quickly that, no, no it won’t. Having said that, looking at it was nothing a tape measure a scalpel and a hacksaw couldn’t fix. It took roughly 20 minutes of cutting and assembly to get the finished item (more like 5 minutes without the cutting to size), and putting it up was a simple affair as it weighs next to nothing (I did require another pair of hands to mark the holes for drilling, but this took seconds). Not a fan of the supplied bolts so I opted for some hefty wall plugs and screws I have laying around. Stability wise it feels solid as a rock, I will update its wind resistance should anything unfortunate happen but am confident it will withstand some serious punishment. I like the way it looks, nothing too flashy but wouldn’t look out of place over most doors. Happy with this spur of the moment (due to the horrific downpours we’ve had recently) purchase. Quick and easy to put up, cheap, looks good, can’t really ask for more.
P**E
Good looking, well made and easy to fit canopy
Well made door canopy. Easy to fit. I did it by myself and it took about an hour for assembly and installation. Some people have complained about the bolts but I had no problem with them. They tightened up fine and the canopy is very secure. I am very pleased with it.
P**D
Good buy
Brilliant. Does what it is meant to
M**S
Here’s the missing instructions
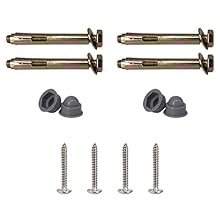
Ok I bought this without considering the negative reviews. So I thought I would give a measured opinion. The instructions are quite clear that you assemble the complete unit first (mine was 200x80). This is straightforward and you do need another person to assist in this respect. Now what is missing completely in the instructions are the wall drillings. So here are my tips. 1. Decide how high you want the canopy. 2. Measure the hole spacing between the top and bottom hole on each bracket. Should be 140mm. 3. Get somebody to hold the unit upright so you can measure the spacings between each bracket. I found these to be 96cm. 4. Using a spirit level and hammer drill, drill 6mm pilot holes in the wall. 6 holes spaced 14cm top and bottom and 96cm spacings across. 5. Once your are happy with the exact pilot drill positions use a 10mm masonary drill to open out your pilot holes and drill to a depth to suit the anchors bolts. Note top drillings are deeper than the bottom ones. 6. Using another person hold up the frame against the wall and align the holes. Make Sure the bolt thread is engaged fully in the bottom nut and apply wd40 to the thread. 7. Starting at one end insert the long and short anchor bolts through the bracket and Lightly hammer the bolts in. 8. Using a 13mm spanner tighten the bolts. If they keep turning but a flat head screwdriver behind the bracket and lever it outwards. This makes the bottom nut engage and stop spinning and the bolt should then tighten. The wd40 helps this process. 9. Repeat for The other two brackets. Then alight the plastic nut covers and lightly tap them down. The whole process should take about an hour. The materials are robust enough and the canopy is very secure.
A**M
Inmiddels hangt het boven mijn voordeur voor enkele jaren en nog steeds prima. Goed product
A**I
ممتازه
P**O
Facile da istallare e di buona fattura.
D**.
I bought this product for €42.09 i like it i want to buy 9 more units at advertise price €38.59 what i going to check out it's gon up to over €60 how is this Des
J**D
Très bien. Facile à monter. Je n'avais pas pensé au fait qu'il serait placé haut, j'aurais dû prendre un auvent plus profond
Trustpilot
Hace 2 meses
Hace 2 meses