


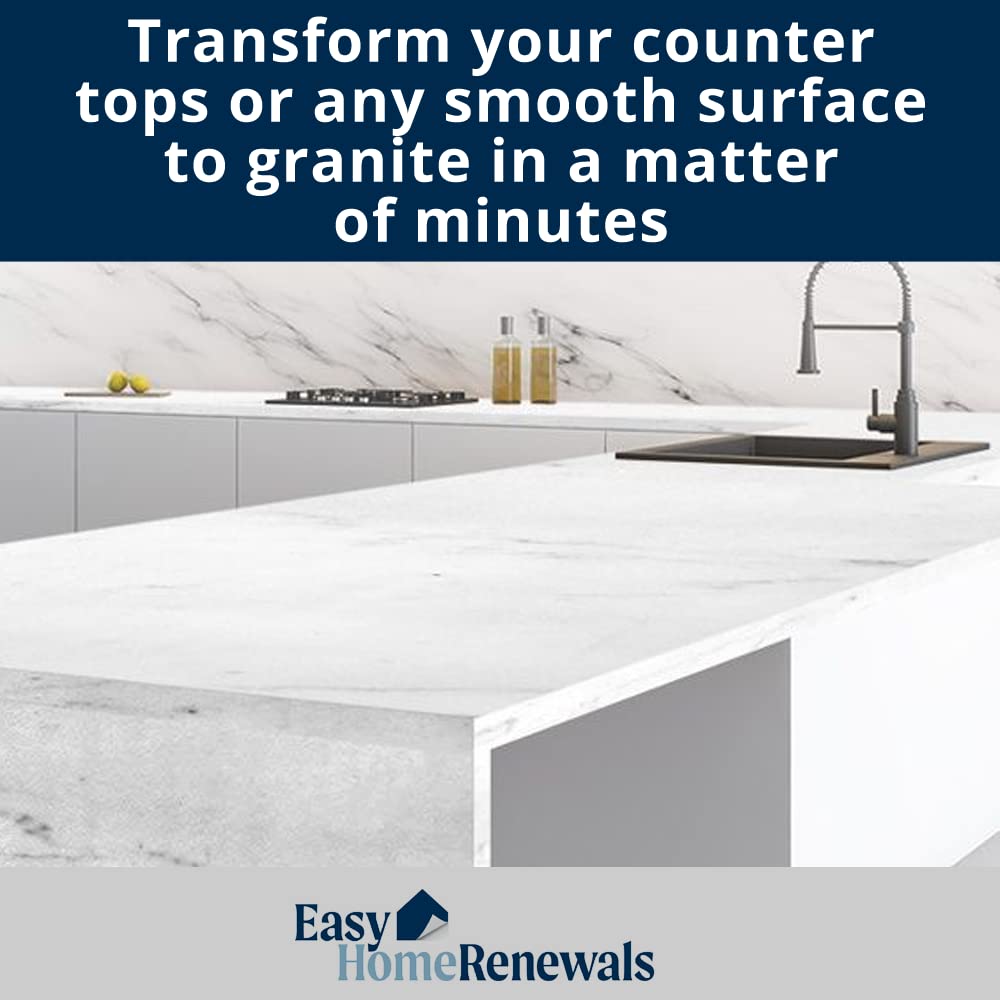
Instant Granite White Italian Marble has subtle veining and creates a clean and elegant look. The pattern is closer to Statuario Venato than Carrara or Calcutta. Instant Granite transforms your counter tops, or any smooth surface, to granite in a matter of minutes. As seen on TV, this is the best faux granite solution on the market. Save your money! You can have granite-looking counter tops for a fraction of actual granite. Our No Bubble, removable, self-adhesive backing is preferred by professionals and makes installation easier than other products on the market. Use our vinyl to protect or update countertops, tables & floors. Use in bathrooms, kitchens, closets, laundry rooms, school projects, workshops, office, craft projects, & furniture. Cover cabinets, doors, countertops, shelves, & walls. Our PVC vinyl is top of the line, preferred by over 500 professionals, and now available for retail customers for home improvement projects. Thousands have tried it and loved it, you need to see if for yourself. *FAQs - Can you cut on this? No. Make sure to treat this material like you would any laminate or Melamine counter top. - Will it melt? Yes it will melt at 190 degrees F. Make sure to use trivets like you would any counter top. - Can I use household cleaners like 409 or Windex? Yes, nothing abrasive. *PLEASE NOTE: The natural vs artificial lighting of your kitchen and the fact that every computer monitor has a different capability to display colors, and because everyone sees these colors differently, the color of the product you receive may vary slightly inside your home. We accept unused returns for any reason. To make installation easier by preventing unnecessary seams, we will combine orders with multiple lengths into one piece of material up to 30 ft. **Free samples!** Contact us to receive your sample today.
E**R
READ ME IF YOU'RE WONDERING HOW TO HANDLE ROUND CORNERS
First off, "instant" is so misleading :)Mind you, I read umpteenth reviews before purchasing this stuff...I knew I was diving into some 10-hour granite. Did I have to take an apprenticeship and learn the finer points of stone work. Nope. What this process instant? Certainly not.Anyway, that's not why I'm writing this review!I'm writing it because the web doesn't offer much information on handling rounded corners with this stuff. I've seen a few jobs where people just wrap it around with creases, which frankly, looks kind of awful. There's also a blurb in one of the videos about using "relief cuts" to wrangle curves, and I didn't find this advice helpful either.Confession: I didn't take photos of my process, just the outcome (sorry). I'll try to be very clear in my instructions.1. Prep the surface, making sure it was clean and then spraying it down with a mist of water.2. Apply the Instant granite, first pressing out the bubbles and shrinking the countertop layer first.3. Wrap the edges, but ONLY those where the edge is flat and required no folding / puckering. Don't wrap the corners.4. Shrink the flat edges down with your hair dryer, taking care to not hit or wrap the the corners so that you have a lot of slack around the corner (think pointy flaps, sticking out).5. CORNERS: Pull the flap down (hold taunt), around the corner, stretching it while is was heated; if you do this right, you can get about 1/8 of an inch to wrap down around the top lip of the corner, no puckering---try rubbing it down with your squeegee as you do this.6. At this point, you'll still have some excess film (essentially the part of the flap that begins to pucker when you want to press is to the rounded edge).7. Trim the excess off the corner using your razor knife. You want nice, clean lines, because it will show slightly through your next layer no matter what. I promise it doesn't look bad and it's waaaay better than a puckered edge. Follow the lines of the counter.8. To finish, cut a small rectangle of Granite. A strip that is the same length as the uncovered corner; add 1-2 inches to it's width so that it can be wrapped under the counter.9. Apply to strip to your corner. Think of this like wrapping a band aid around a knee. It helps to line up the top of the strip with the top edge of the curve (so that it doesn't stick up, or look jagged).10. Once you're happy with the placement shrink it down with your hair dryer. Round the top edge down using your finger nail while the film is still warm. You'll find you need to add relief cuts when you're folding this piece under (it gets bunchy and bulkly if you fold it in one piece). Cut these carefully and fold it under in small sections; be careful not to cut too far up.I saw a video where they advised tacking your film under the counter with small nails. I used a staple gun and it turned out great. I wouldn't recommend cutting it flush with the bottom edge, because who can get that to look right? Not me!The result on the rounded corners isn't perfect, but it looks pretty good. You don't notice the patch unless you're looking for it. If you're using a version of Instant Granite with a stronger pattern than the light marble, you won't see it. Period.Hope this review saves you time reviewing "Instant Granite, Rounded Corners."
M**M
Not "instant" but still great
The short:I wish I could say 4.5 stars out of 5, but I don't get that option. It's almost perfect.In my opinion, it is hands down the best upgrade for a kitchen for the value.Before/After photos of half of the kitchen attached.The long:We knew this wasn't an "Instant" thing, but that's pretty much the only misleading part.We had a LOT of ugly yellow counter to 'fix' in the kitchen. We ordered 2x 144" and 1x of the 36".It took us a good 12-13 hours to redo the kitchen counters, but it looks FABULOUS.There were 4 of us helping, 2 that entire time (my husband and his father) and 2 part of the time (myself and his mother).The instructions are pretty good, corners take a bit extra work (to be expected), and making sure you get great edges will also take some extra work.The main issue I had that prevents me from giving it 5 stars is that the tools they provided left marks on the product, both the rubber and non-rubber sides of the tool. Not scratches, maybe stress/scuff marks is a good way to describe them? They are not everywhere but where and how they end up created didn't seem to have a pattern (we were 3/4 finished when I turned on the kitchen light and started noticing them, and couldn't figure out what was causing them).When looking directly down at the counter you don't see the marks. And even in the daytime, it's not very noticeable. But in the evenings/early mornings when the overhead light is on, you can notice the marks if you look at the counters from any side angle. It didn't bother my husband, and most of the time I don't see it where it bothers me, but that even the tools they provided left marking was a little annoying. So I couldn't 5 star it. Sorry.We did have a few spots "bubble up" afterward, but these were near the sink and probably had water sit on them longer than it should have. The fix was very simple: take a little pin, puncture the bubble, push out the air and viola!, flat again. Never had the issue recur in the same spot, so it may have been not as well put down in that particular spot.I do recommend this product for someone looking for a relatively inexpensive way to change the look of a counter top.Just know it's going to take you some time, but it will be worth it.
P**4
Real Nice Instant Granite and Best price around!!
I wanted to redo the counters but didn't want to spend a lot right now and came across this. I did my homework first, check the reviews, watched the videos, including YouTube and compared pricing. this is the best price around by far. I ordered enough to do all the counters and including the 2 bathrooms. Shipping was real fast and came almost 2 weeks before the due date. I emailed the seller because it said 2 packages so was concerned, he responded back the next day, and said he packed them both together and for me to open it and check and sure enough both pieces were there. I recommend them to anyone wanting to do this and I will post pictures once I have it done. There are grids on the back for cutting, that was nice and felt thick, not like contact paper. I can't wait to get it done!!! Thank you Easy Home RenewalsAll Done with the counters, I only took a picture of one side. I will share this, make sure your counters are clean from grease and dirt, I also filled up a bottle with 50/50 vinegar/water solution to get all the reside off, then I filled up another bottle with a soapy solution ( dish soap and water), as you will need it. I also recommend having some help, I did it by myself and there was some challenges, you will need a hair dryer or heat gun, I went to Lowe's and got one for $24.00. Once you measure the paper, start from one side and work your way along, spray the counter with the soapy mixture, not a lot but enough to mist the area and it will give you the time to lay it down and get all the air bubbles out, squeegee works well, have have a sharp razor blade and paper towels, ruler, marker on hand and plan on at least 2 to 4 hours. I also got some clear caulking to put around the sink area. Hope this helps. Love the look!!
E**.
Quality Product, slightly tricky install
It is not perfect, but looks surprisingly good. This paper has a very realistic marble pattern without fake looking repeats or weird “swirls” that some have. I chose this brand because the width is enough to wrap the edges of my countertop. What is with all the 24” products? It is heavy duty but you have to be careful not to overwork it because it will stretch. I also caused minor scratches in one spot trying to get small bubbles out with the included “squeegee”. I can’t speak to long term durability, but so far (a couple of weeks) adhesion has been good and it has wiped clean every time. There are a few small bubbles I can’t get rid of, but I am choosing to ignore them. You don’t notice unless you are looking for them. My hot tip is to tape the length of the paper to the back of your counter with painter’s tape to keep it in place as you start to un-peel the backing. It is pretty awkward at first. I had better luck in peeling just a few inches at a time and then smoothing back toward the roll (in-stick) side to get the bubbles out. Once I started that technique I had virtually no bubbles or wrinkles. It does look real enough, and is a vast temporary improvement. It also reinforces my decision to go with light colored stone (quartz) countertops when we get around to the real renovation, so this stuff is worth the design reassurance for the future $$$ even if it doesn’t last.
J**G
they actually went out of their way to contact me and get me a better deal ordering a larger roll than 3 smaller sizes
Outstanding customer service, they actually went out of their way to contact me and get me a better deal ordering a larger roll than 3 smaller sizes.The product is pretty consistent with what is displayed. We really like the gray undertones with the white, and the seam is barely noticeable because of the grey lines that run down. It all looks seamless.The corners were a bit tricky, and we definitely had some issues with installation. I think it's best to use a staple gun and wrap the material underneath the counters. The adhesive just doesn't cut it. Additionally, we ran into issues with bubbling and tried using hair dryer, but found it would stretch out the material and make the rest of the process harder.So a bit of advice, start with wedging material into your counter corners with the top folded down. This way you avoid any gap or bubble that might form in there. It's easier to work out from that point than from side to side as we tried to do initially.
Trustpilot
Hace 4 días
Hace 1 mes
