We remain fully operational. Our teams are working around the clock to ensure your deliveries continue safely.

Descargar la aplicación


Servicios al cliente
Sobre nosotros
Copyright © 2025 Desertcart Holdings Limited
Descargar la aplicación


🌞 Harness the Sun, Own Your Freedom — Solar Power Made Simple
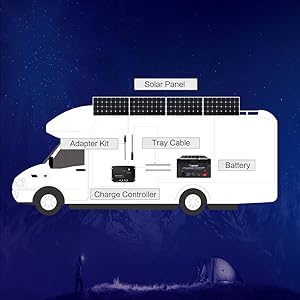
The Renogy 200 Watt 12 Volt Monocrystalline Solar Panel Starter Kit delivers efficient, reliable off-grid power with high-efficiency 22% monocrystalline panels and a smart 30A PWM charge controller. Designed for RVs, boats, and trailers, this durable, easy-to-install kit produces up to 1000Wh daily and supports multiple battery types with advanced 4-stage charging and full system protection. Expandable and complete with mounting hardware and cables, it’s the perfect entry point for sustainable, quiet, and independent energy.


| AC Adapter Current | 30 Amps |
| ASIN | B00BCRG22A |
| Best Sellers Rank | #16,133 in Patio, Lawn & Garden ( See Top 100 in Patio, Lawn & Garden ) #59 in Solar Panels |
| Brand | Renogy |
| Customer Reviews | 4.6 4.6 out of 5 stars (6,131) |
| Efficiency | 22% |
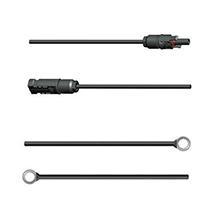
| Included Components | cable |
| Is Discontinued By Manufacturer | No |
| Item Weight | 37 pounds |
| Item model number | 200 Watt 12 Volt Monocrystalline |
| Language | English |
| Manufacturer | Renogy |
| Material | Aluminum |
| Maximum Power | 200 Watts |
| Maximum Voltage | 12 Volts |
| Output Voltage | 12 Volts |
| Product Dimensions | 6.45"L x 4.31"W x 1.76"H |
| Special Feature | Short Circuit Protection |
| UPC | 816360020509 |
M**Y
All RVs should have one
I am a RV Technician, and a good solar panel is the first thing I add to my personal RVs. Keeps the battery charged, and regardless of usage my battery(1 full one is all I need) is fully recharged by 2:00 the next day, I don't have to remove it during winter as charged batteries will not freeze. The benefits of battery health, and the need for fewer batteries are worth the cost of at least one solar panel. Mono-crystaline panels are well worth the cost, as amorphous panels loose their efficiency after a few years - google it. Mono-crystaline also work in well overcast and low light conditions, as well as performing better in a fixed mount setting. I got the 100 W kit with 30 Amp controller (plan to add more later) with the nice mounting brackets. Simple to install, with the caveat that you need to be smart enough to unscrew the leads before you try inserting and tightening the wires (I saw a review that slammed the quality of the controller because the wires would not screw down tight). I like the 20' of supplied wire (only needed about 8 on my RV, then 25' of 10/2 Romex from controller to battery). I get 15.4 V with sun direct overhead, and the controller knocks it down to 13.1 V to head towards the battery (I get < 0.1 V line loss in my configuration) Good price for the kit, and a well thought out contents. You need to supply the runs to battery and/or load, or use what is left from the 20' supplied. Brackets are super, as I have had to make my own in the past - not fun. Overall a great kit that I wish everyone had installed on an RV, especially those who call me and complain about $200 and up to replace batteries after a winter without removing or recharging them. Particularly important now with the 12 V slideouts - not fun if you dry camp and have to crank them in by hand (remove a lead to motor first, else they will backfeed the 12V system)
D**K
Dry-campers delight; a well documented, small and easy set up solar system
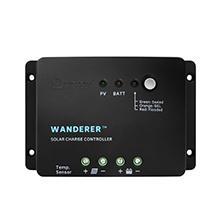
Very pleased with the quality of the product and installation documentation. The panels and charge controller are simply great quality. From the reviews I read before buying, Renogy stands behind its system and responds to troubleshooting customers - a big plus over competition in my purchase decision. A DIYer, I wired the Wanderer Charge Controller into the bedroom of our travel trailer to have immediate access to the system status (and to keep it dry), plus two ammeters; one to monitor solar charge rate to a battery bank and one to monitor our power draw from the same battery bank. That gives us the ability to see the automated doings of the Wanderer, which is really a superb quality charge controller. The system package came with everything necessary, except in-line fuses, to get hooked up to our battery bank (four deep cycle 12-volt flooded cell marine batteries with about 300 amp hour storage capacity) and to run the power cable leads about 8 feet away from the trailer. I purchased an additional 50 feet of power cable (on Amazon - Unlimited Solar's - Solar PV Cable Set with 2 x 50FT MC4 Wire Exntensions - 10 AWG) to be able to place the panels away from shade we might park the trailer in. The MC4 connectors are what Renogy uses and are compatible with other vendor MC4 extensions. For now we are laying the panels on the ground; I will build an adjustable stand for future camping trips. So far everything works great, panels have been in 7 hours of sun per day on two camping trips and kept us charged up for daily 12-volt use (lights, water pump, an electronic ignition propane fridge with a constant 12 watt/0.8 amp draw, propane furnace ignition and fan, CO2 detector). We have shifted our lights to LED's (lower power draw bulbs), but I expect this setup would keep up with higher incandescent bulb's power draw in camping spots with ideal panel exposure. I also plan to have a 200 watt AC inverter in the mix and expect that will be adequately supplied by the system. We really like camping away from campgrounds, in BLM deserts and National Forests, so this is a great set up for us. I will recommend to friends!
V**Y
excellent performance for me
This panel works great. I have (4) panels total now on two different solar setups. I started experimenting with solar on some rural land to charge a 35aH battery 24/7/365 for general use. Performance has been great and I expanded from 1 to 2 panels there but still need to upgrade my battery size. Charging and maintaining using these panels and the controller has been flawless. No issue. Easy to setup and keep my 12v battery charged and recharged in any season. This past fall, I bought a second setup of 2 panels and controller to use in my workshed. It's all assembled and ready to go and I will get a battery and install there when winter is over.
L**O
no possible to have assistance .... all back
J**N
funciona bien pero no lo probe bien porque estuvo nublado y sacaba pocos w
F**U
Permet de recharger une batterie 75A 12v Avec un frigo nomade branché dessus Je conseille d'acheter le boîtier pour gérer avec l'application
A**R
So far very pleased with this kit, I added an extra panel which was very simple to connect and have it charging my leisure battery in my camper. I was unsure how many watts I would really need but 200 seemed a good place to start and provideds plenty of power in the sun, I had the 40amp mppt so I can always size up if the fridge draws too much power during the winter months. Would recommend 👍
H**D
I had owned solar panels before, but never really installed any , so when I seen his this kit It seem to look so simple .After I gone thru the instruction's that came with this kit It did not take much to realise that It was infect simple. As I was unpacking all of the items I was impressed not only the way it was shipped but also the quality of this kit . Everything needed was there , This panel is of high quality and should give me years of worry free service . My needs for watts was not that high , it will run and charge all of my needs ; ie TV , Receiver , I Pad , Kindle, Phone , and service my RV battery's. This kit can be expanded at any time later as MC 4 connectors make it that ease. It's on the roof of my camper now and working great.. PS; the instructions talk about covering the panel when hooking it up, They had that covered to, as it came with a piece of cardboard inside the box that fits perfectly when the install take place .
Trustpilot
Hace 2 semanas
Hace 1 mes