💿 Bring your discs back to life — because skipping is so last decade!
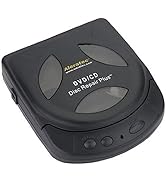
The Aleratec Motorized DVD CD Disc Repair System is a compact, portable device designed to restore playback quality by motorized cleaning combined with a specialized repair solution. It targets minor surface wear causing read errors and skipping, improving laser readability and extending the usable life of CDs and DVDs. Ideal for professionals and collectors seeking hassle-free disc maintenance at home or on the move.


| ASIN | B0002A9SJ2 |
| Best Sellers Rank | #1 in Audio & Video Disc Repair Kits |
| Customer Reviews | 3.9 3.9 out of 5 stars (2,491) |
| Date First Available | June 1, 2005 |
| Is Discontinued By Manufacturer | No |
| Item Weight | 9.9 ounces |
| Item model number | 240121 |
| Language | English |
| Manufacturer | Alera Technologies |
| Product Dimensions | 6 x 5 x 2 inches |
S**S
This is the best 40 bucks I ever spent.
First off I see a lot of reviews with people having issues. I don't know if they are reading the instructions or not but you definitely have to read them. This thing fixed every single disc I have used it on which is pretty good because I didn't think it was going to work. I only used it on a couple of discs so I can't speak about the longevity. First thing you should do is get cotton pad with rubbing alcohol on it then wipe the disc with it. Use circular motions. Then use the included (or another one laying around) fine small microfiber cloth. Don't use the other microfiber with the bigger strands/bristles that's for applying or removing wax or cleaning windows. Make sure you wipe from the center out when using the fine microfiber. If that doesn't fix your disc and stop it from skipping then you should use this device. This thing isn't magic and it can't fix really bad discs. This thing does leave scratches on your disc so if that bothers you then shouldn't use this product. I have a large collection of all kinds of discs and this thing is a god send. I love this thing and it is very fun to use for some reason. I just hope that it lasts.
R**Y
Repaired cds
Wonderful it really works well!!
P**.
Works on discs that will work!
So this isn't Jesus, it can't raise the dead. But it can certainly help. Read the other reviews first on how to properly use this, be sure to clean the disc first if you try the repair but you need the buffing pads. No need to clog the buffer! It saved one unreadable with two buffing, two repair, and a cleaning session! Will keep this thing around to make my jellyfin server and I'll look to get replacement pads!
K**Y
Junk
Started out with high hopes. Reading through the instructions got a little murky. “the box labeled wet” - there was no label on the box. Opened the one with cleaning solution to find “wet” in tiny letters. Popped the heads in to run the cleaning process. Ran fine. Here’s the fun part. No way to get the cleaning heads out to install the next set. Dry head came out easily, cleaning heads disintegrated. Head still stuck. No lever, no assist, no room to pry. Cleaning solution now everywhere in machine. Machine not working. It is now in pieces in my garbage. I have now guaranteed that these pieces are so mangled that they will never be a disappointment to any human being ever again. At first I thought I wanted my money back, now I’m just thinking of taking it as a life lesson on what garbage products to avoid in the future. Don’t waste your time or money.
A**R
Avoid using the red buff pads! Repair and Cleaning do OK but won't remove deep scratches
I've rewritten this review to reflect my latest experience. Just know up front that you may not be able to save your CD, but it's worth a try. As the Three Stooges once said when they were "doctors": "We kill or cure!" Same with this machine! First, about CDs, DVDs: The "playing" side is the thickest part of the CD, with clear polycarbonate meant to be scanned through to read the "pits and lands" at the data layer. The label side of the disc is the thinnest and closest to the data bits. If the label side is scratched, the disc is probably a goner because it's probably reached the data bits. If you hold a disc to the light and can see holes through it, you're probably out of luck unless they're very tiny holes your player can correct for. If the scratches are only on the playing (silvery) side, then you can probably fix it if you can polish or buff your way through the scratch (if it's not too deep). If you're looking for a simple, one step solution to all your unplayable optical media, this is NOT it! If you just want to keep it simple, try washing the disc in the sink, or buying another one. Or take your disc to some place that sells used CDs and see if they have a professional machine to take the scratches out. If you're patient and willing to work with a machine that's not perfect and work within its limitations, keep reading to see what I've discovered. There are much more expensive and bigger machines here that get the same complaints, so you might as well take your chance with this little thing and pay less for it if you're patient and willing to take a risk. First, this machine seems to do OK with very light scratches (the kind your player can probably read through) with the "repair" and "clean" pads (yellow and blue). Three very small drops of the repair "sauce", and one run makes it nice and shiny. As for the "clean" (blue) pads, they just use isopropyl alcohol to clean the surface of the disc. If you're only cleaning one disc, don't waste the solution by filling the reservoirs, just put a few drops on the small blue pads and go. If all you have is finger smudges on the disc, you can wash it in the sink with hand soap or dish soap, and you're good to go. What about deep scratches? For those, you'll want to pull out the red "buff" pads, and they will likely make your disc unreadable. So, if your disc plays but it's just ugly, don't use the red pads. Other reviews here say one pass with the red pads is OK, but my CD needed much more than that. Start looking for a new disc, and be prepared to give your disc up for dead before you pull out the red pads! I have two disks I've run through this machine. One was severely damaged with lots of tiny pits, and I had at first tried using sandpaper followed by Novus polish. (You can find this method on line: Start with 1000 grit wet sanding, and work your way up to 7000 grit, then polish to make it shiny again.) This manual method still did not take off enough polycarbonate to get all the damage, but did not introduce any new errors, at least. This was an audio CD, and the tracks that were good before I took the CD to hell and back were still good, and the ones that were bad before were still bad, though the disc was uglier after the process. So, I did several rounds with the red pads, and then took it through the yellow and blue, but I knew it was bad when I saw severe clouding in the inner (where the TOC and important data is) and outer edges of the data area. So, now the CD is completely unreadable. My advice: Never use the red pads unless you've already given the disc up for dead, because it'll take a miracle or a lot of manual intervention to bring it back. If one pass with the red pads doesn't fix it, be prepared to go the manual wet sand route. Anyway, the good news is, I had another CD with a deep scratch that I also wanted to fix. It was the worst kind of scratch: An arc right in the direction the disc spins, which affects too many bits for the reader to correct. I learned my lesson about the red pads, so I went with the manual sandpaper method above, which I had to do several times to get the scratch out. Finally I was done, but the disc was hazy after all that "torture", even though it now read the problem track. So, I ran it through this machine using only the yellow pads and washed the residue off under the sink. Now the disc looks almost new, and reads every track. (Your mileage may vary, of course!) Use this device with caution, and realize you may have to manually intervene to save discs with deep scratches. Also, if you're ripping or testing audio CDs, all that sanding and polishing may introduce other, hopefully correctable errors. For the most part, if you can avoid using this machine, do so. Try washing the disc under soap and water first. Most players can read through light scratches or correct minor errors, especially if they go from the inside out. If they follow the curve of the disk (like the pickup scratched it), you may be out of luck. Deep scratches may need the yellow "repair" pads and solution (sparingly, three tiny drops). You may need to be a skilled craftsperson with fine sandpaper to fix the really bad ones. If I do manage to save the ruined disc, it won't be thanks to this machine. The only reason to try to save a CD with this machine is to save another piece of polycarbonate from the landfill, and avoid having to buy another one if possible. Collectible and Out Of Print CDs will be worth less after taking them through this process, but if you succeed and make them playable again, that saves you from hunting for another one and paying through the nose for it, doesn't it? If you're handy with tools and like to invent hacks, I could see how this machine could be a platform for improvements, such as making it take fine sandpaper and polish pads.
R**R
Cleans and renews good.
Cleans and renews good. Be careful with the pink resurface ones. Can be too abrasive.
S**E
Aleratec DVD cleaner/ repair. A home run!!
This is an awesome machine. My son had 10 dvd’s he needed repaired due to scratches etc. The Aleratec totally made them look brand new!!. Very impressive and worth the buy. Get one.
D**H
The only one for me
I have had this for five years and another brand for one. I am ordering this brand again. So that right there should tell you something. I clean ALOT of DVD's.
J**H
First thing to know is the instructions are amazingly weak at properly describing how to use this (This works for me and I offer this as advice without any guarantee it will work for you without ruining your discs or equipment) I purchased this item because my 400 disc dvd changer died and I had no intention of buying a second one to replace it and some of my discs are 20 plus years old and needed to have scratches removed through a more professional buffing The first thing to know is the red buffing pads are a worst scenario use only, do NOT start with them. I had a couple double sided discs that needed it because the one side that was not facing inwards in the cd wallet took a beating. If yous use it try it once with the "repair" button and look at the problem area after, if it is still visible give it a second run The yellow pads are the main user here with the repair button, for the discs that have become cloudy this will fix that or even some light scratches, my warning on this is use a very very small amount from the repair tube, if you use too much it will gum up the pad and cause excess friction which will stall out the machine, you will be able to see the disk slowing down or even stopping the machine when this happens (and it will until you get good with it) you can fix the pad by using some dish soap and water and gently rubbing it on the palm of your hand then rinse it off and let it dry fully (give it an hour), once it takes the buffing marks from the red pads out (might take 2 turns, only need to apply the paste the first time if you do it in quick succession the blue cleaning pads are good if you mom would look at the disc condition and pull a kleenex out of her purse and lick it. Warning on using there, while they come with a tank for holding the provided solution, only use it if you are going to be cleaning many discs in a short period, to buy this is expensive on its own and with the bottle you get just apply a little bit to the top of the wet pad and use it that way Hopefully this helps especially all the people that gave it negative reviews, there have been a couple that I tried this on that looking at them (and guessing they lost a fight with Wolverine) I knew I should have just thrown them out but I was curious to see just how much damage this could restore and common sense was correct on each one.
D**H
As advertised pro : works great on discs that have few scratches con: deep scratched discs require more pressure Happy with purchase
M**Y
I'm converting my CD/DVDs to my hard drive (then cloud). For most, I just use Novus scratch remover and K&F microfiber clothes. Add in Exact Audio Copy (music) and Recovery Toolbox (data) freeware and I could transfer about 98% of my discs without errors. This product was for the other 1-2%. I strictly use it for it's repair feature which involves grinding the surface of the disc with a very fine abrasive (sandpaper). I also bought. I know someone said throw the red discs out and ignore the instructions in another review but I specifically needed to use the red discs so I did follow the instructions. And it worked! I was able to recover a couple of dozen heavily scratched CDs that are long out of print and not available on streaming sites (or even torrents), so this product was worth it. For most discs, you can get away with the products and software I listed but if you need to try something when all else has failed, this is worth a shot.
K**R
This product is excellent TO clean, AND I MEAN CLEAN the surface of the disc. But as for removing scratches, the polishing pas with the cream supplied simple doesn't do it. As for the buffer pads (pink), it simply destroy the surface. You may watch what it does on Youtube .
A**E
Not impressed at all. Would try something else instead after seeing results....
Trustpilot
Hace 2 meses
Hace 1 mes