
Descargar la aplicación


Servicios al cliente
Sobre nosotros
Copyright © 2025 Desertcart Holdings Limited
Descargar la aplicación

🚀 Elevate your WiFi game—coverage and speed that keep you ahead of the curve!
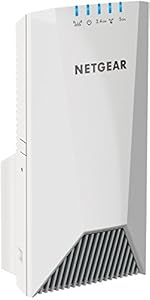
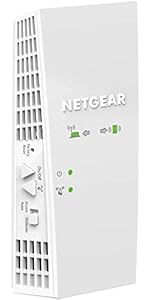
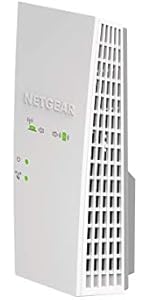
The NETGEAR EX6250 WiFi Mesh Range Extender expands your wireless coverage up to 1,500 sq.ft., supporting up to 25 devices with dual-band AC1750 speeds reaching 1750 Mbps. Compatible with any router, it features mesh smart roaming for seamless connectivity, a Gigabit Ethernet port for wired devices, and an easy setup process. Its compact design fits neatly into any outlet without blocking access, making it an essential upgrade for professionals demanding reliable, high-speed internet throughout their home or office.


| ASIN | B07MDZ8G4T |
| Best Sellers Rank | #37 in Repeaters |
| Customer Reviews | 4.0 4.0 out of 5 stars (4,541) |
| Date First Available | January 7, 2019 |
| Item Weight | 10.6 ounces |
| Item model number | EX6250-100NAS |
| Manufacturer | Netgear |
| Product Dimensions | 1.75 x 6.34 x 3.2 inches |
C**S
If you have a weak wifi signal, buy this to boost it. IT WORKS!
NETGEAR WiFi Mesh Range Extender EX6250 Price as of 11/11/2020 List Price: 119.99 Discount Price I paid: $89.00 _______________________________ 2.4Ghz is slower speed wifi but the signal travels farther 5Ghz is faster speed wifi but the signal doesn't travel as far _______________________________ My Goal: Extend my verizon fios router wifi signal for both 2.4Ghz & 5Ghz to my entire NYC apartment. (Large apartment with many bedrooms, many walls, some of those walls are concrete) My Verison fios wifi router is on one end of my apartment and i need to boost the signal from that to the other end of the apartment. _______________________________ Currently: I have a Linksys wifi extender i bought years ago but it's too weak to boost both 2.4ghz & 5ghz to the other side of my apartment, it's not strong enough to penetrate all the walls. All the walls in my apartment eat up the wifi signal. _______________________________ New Setup: With this new Netgear wifi extender, i was able to remove my older wifi extender and i plugged this new Netgear wifi extender into an outlet on the other end of the apartment and now i get FULL BARS for both 2.4Ghz & 5Ghz in the ENTIRE apartment! _______________________________ The Netgear status shows me the signal strength the extender is picking up: 2.4Ghz signal strength: 162Mbps 5Ghz signal strength: 585Mbps _______________________________ INSTALLATION (setup): (It comes with a paper instructions booklet plus the instructions are online) Google: EX6250 The instructions are on the Netgear website. Very basic simple instructions. Connect to the netgear extender using a device that has wifi (i used a windows 10 PC), connect it to the netgear wifi extender and then in your web browser go enter this URL address: http://192.168.1.250 (You should be able to do this same thing on a mobile phone or tablet) That will take you to the Netgear admin page where you can follow the steps to configure your device. _______________________________ Additional options: There is an ethernet port on the device if you want to hardwire an ethernet cable to the wifi extender to configure the admin settings and as another way to connect the wifi extender to your network. Fastlane option. From what i read, that will boost your 2.4Ghz or 5Ghz signal. You have to turn this option on and then you need to pick which signal to boost. You can only do one. So have to pick 2.4Ghz or 5Ghz. So if you only need 5Ghz then you can use fastlane on the 5Ghz and the 2.4Ghz will be turned off. And now your 5Ghz will be faster. NOTE: I would not use the "fastlane" option because Amazon Alexa smart plugs use 2.4Ghz. They won't work with 5Ghz unless you can find ones that do. There is a 1 button quick setup. (WPS) but i don't use that. That basically lets you configure your home router so that if you press the WPS button on two devices (router and wifi extender). They will quickly sync together (quick setup) but you need to have that WPS option on your home router for it to work and that option needs to be enabled to allow it. NOTE: I don't use that because that will also allow anyone to walk over to your router and connect themselves to your network without needing any passwords. (bad security) Access point option. I don't plan to use that option. The wifi extender has a ethernet port on it, for the access point to work you need to use an ethernet cable and connect your router and this wifi extender together. I'm not 100% sure what the access point would be good for because the wifi extender option works really well. It's all you really need. I don't know much about how that access point would work or how you should or could use it so i wont comment much on that. In the end i ended up using the Ethernet port on the WIFI Extender to connect an ethernet cable from the WIFI Extender to my Roku. Another good option, buy a small 8 or less port Ethernet Hub. Connect an Ethernet cable from the WIFI extender into the Hub. Now you can connect devices with an Ethernet cable (laptop, ethernet printer, etc), directly to the WIFI extender (assuming you need / want a wired connection) The only reason to do this? Possibly a more stable internet connection? If all else fails. Try that. _______________________________ CONCLUSION: This Netgear wifi extender is POWERFUL while being very compact. No external antennas required. Looks very clean when installed into a wall outlet. If you install at the top outlet, the bottom outlet will NOT be blocked. I highly recommend buying it. A little pricey but it works well! Now it may be overkill if your apartment is very tiny. But if you have a ton of bedrooms with lots of walls & weak wifi signal. This should easily fix it. If you have a big home especially with a big backyard and you currently have a weak signal. This might also be useful to cover a huge range and get wifi across your whole home and yard. BUT check the specs first. The specs show the range it covers. It looks like you can connect two of these wifi extenders together if you need a bigger range but start with only 1 because it works so well you might only need 1.
C**8
Easy as pie install. FAST & FABULOUS!
This was super-easy to install. I wanted a Wi-Fi 7 extender for my new Netgear Wi-Fi 7 router, and this was perfect. I could have gotten something cheaper, but I wanted a same-brand compatibility product to save my sanity when installing or upgrading technology. As you know, sometimes it can be a real nightmare. Functions perfectly and has lightning-fast speeds. Just FOLLOW THE SIMPLE THE DIRECTIONS.
Q**B
Not as easy or robust as it should be ****update****
This is not my first extender but I was due for an upgrade and decided to take a chance on this one, the E6250. I'll start here, it was real close to going back and still might. The app for the set up was a miss for me, didn't work any of the 5 or 6 times I tried it, I'm using an android phone with the app if that helps anyone? Plugged it in directly and went through the set-up process and it connected, everything was pretty good at this point, the frustration of the app took a backseat to the fact at least I got it. Got everything hooked up and it seemed to really be working pretty well. The next day and it wasnt broadcasting anything on the 5G band? Logged in and sure enough, nothing broadcast on 5G even though it was set to on. 2.4 Broadcast was still fine. Factory reset again and doing the same process, it worked again, 6 hrs later, no signal..... again? Repeat, go out to the trash to recover the box its going back in only to get caught up doing stuff with the kids, At this point it hasn't lost its mind or the 5g signal again so there's that. The pros to this is when it works, it seems to really works well, its nice I can pick and choose if the item needs 5.0 or 2.4. Coverage seems to be just fine and about what they claim, I have no dead spots in the house so that's great. Given the issues I've had with it so far I just can't give it a higher rating, I had a Netgear repeater for like 5 years before this and it finally dawned on me an upgrade was badly needed but had -0- issues with it the entire time. Went with another Netgear because it was so good. But, For now its working and seems to be doing ok, Should anything happen in the near future I'll stop back by and append, Hope this helps somebody. *** Okay, Update: changing my 2 star to a one star, after two tries I'm going to just say either I have no idea what I'm doing or these just are not very good. For the life of me I cant figure out why it will not stay broadcasting in 5G? I've reset, I've redone, I've even returned and gotten another one, neither would stay broadcasting in 5G? also I'm not sure how I can log onto my router wi-fi, have a 70mpbs download speed, log onto the repeater which is logged onto the router wi-fi signal and get between 20-28mpbs? same signal? even with the "Fastlane" option enabled its less than half of what its receiving? Weird to because my 6yr old netgear repeater was awesome? guess I'll go back to that.......
R**N
Great product. Boosted our wifi signal significantly and was able to use the Ethernet port also. Fantastic.
J**.
Se desconecta mucho
H**E
No es tan fácil de programar pero funciona y se ve bien.
J**R
facilidad para configurar
L**S
Es muy compatible con modems o routers
Trustpilot
Hace 2 semanas
Hace 3 semanas